
Darkroom photography has been around for a long time now, although its practice has evolved. More and more people have picked up the art of darkroom photography, although it’s easy to see why it may seem intimidating at first; there’s a lot about it that can be difficult to know when starting out. Some initial questions you might ask is what is photographic darkroom paper and what kind should I buy?
Photographic darkroom paper (also known as enlarging paper) is a type of paper that is sensitive to light and used in creating photographic prints. There are two basic types of darkroom paper for black & white prints: resin-coated (or RC) paper and fiber-based (fiber-based, FB, or Baryta) paper. RC paper is less expensive, thinner, has a quicker processing and drying time, and is less prone to scratches which makes it better for beginners. Fiber-based paper has been around much longer, more prone to scratches, thicker (sometimes known as double-weight), more archival, and has deeper blacks with a richness to the tones than RC paper. Because of its short processing and drying times, RC paper is generally used for contact sheets, test strips, and proof prints while fiber-based is used for final black and white prints in exhibitions. For color darkroom paper, only RC paper is available.
When getting into darkroom photography, being confronted with the choice of either resin-coated or fiber-based paper can be daunting. Knowing more about the different types of paper available depending on pursuing black and white or color photography will help you with your decision.
What is Darkroom Paper and How Does it Work?
Darkroom paper is paper used in photography that has been coated in light-sensitive chemicals to create a print. When darkroom paper is exposed to light, an invisible image is captured and revealed after processing the paper through a series of darkroom chemicals and water.
This means that when using darkroom enlarging paper, a darkroom is mandatory. If the paper is exposed to light too early—specifically before an image has been made on the paper – the paper is generally ruined and another sheet should be used. Therefore, it’s essential when using darkroom paper to turn off all lights, keep your phone in your pocket, and make sure all windows are properly covered. Even a tiny sliver of light can cause your darkroom paper to be fogged by light and ruined.
While color darkroom paper is sensitive to all light, black and white darkroom paper can be viewed using safelights (or this safelight bulb on Amazon.com that will turn any light into a safelight). Safelights are traditionally red but can be amber as well and allow for safe viewing of your working area without ruining your darkroom paper. For more information on why red or amber lights are safe in the darkroom, check out this recent article about darkroom safelights .
.
Another thing to note about darkroom paper is that it is sensitive to temperature in addition to light. This makes it imperative to seal the paper well in the light-tight bag it came in as well, making sure to put the folded side face down, in the box it came in. If storing the paper for a long period of time then store the unused darkroom paper in a cool, dry place out of direct sunlight or in a refrigerator (like color or instant film). If stored in a fridge, you must let the paper return to room temperature before using – which can take anywhere from 1 – 5 hours depending on environmental variables like temperature and humidity.
Resin-Coated Darkroom Enlarging Paper

Resin-coated (or RC) paper is one of the two commonly used types of paper used in darkroom photography. Resin-coated (or RC) paper is sealed between two polyethylene layers; this means that resin-coated paper isn’t prone to absorbing chemicals, which shortens the amount of time the paper needs to wash in water at the end of the developing process. This shortens the overall amount of processing for an image immensely.
On top of the polyethylene layer rests the emulsion layer, which is the part of the paper that is sensitive to light, and the “super coating”. The super coating is made of a hardened gelatin giving the paper extra durability.
All color negative paper is resin-coated paper. For this reason, color darkroom enlarging paper is very archival and the colors are stable (meaning they won’t fade or shift toward other colors) for about 30 years if left out of direct sunlight or framed behind museum glass, which blocks 99% of harmful UV light.

See this article on Wikipedia about how color darkroom paper works to make a Chromogenic print (C-print) using the RA-4 process.
There are two types of color darkroom enlarging paper: color negative paper and color reversal paper. Color negative paper is used for making prints from color negatives to make positive prints while color reversal paper or film is used for making positive prints from slides. I recommend letting labs handle making prints from slides since the chemicals can be very toxic. Because of this and because of the rise of digital cameras, there are very few places online that will develop slides (called the E-4 process). I recommend TheDarkroom.com or DwaynesPhoto (faster and cheaper) and used both for film developing and digital scanning.
Color darkroom RC paper is similar to black and white RC paper in that it has a paper base sandwiched between to layers of plastic lamination with layers of light sensitive emulsions. In addition to the light sensitive silver halide crystals (light black and white paper), color paper also has layers of emulsions are sensitive to different wavelengths of light that make of 1/3 of the spectrum. Color film has a orange mask so when the negative image is project by light from the enlarger only the blue light makes it through. This blue light hits a layer of yellow dye embedded in the paper and the original colors are created. When the paper is being developed, the developer chemical is combined with the silver crystals and colors on the paper in the spots where the light hits the paper. The development is stopped by the stop bath stage. During the next stage, a solution of bleach and fixer (blix) removes the silver image and any other unexposed silver halide crystals that were hit by light while making the resulting image unaffected by light. In the final washing step, all the remaining chemicals are washed away.
Fiber-Based Darkroom Enlarging Paper
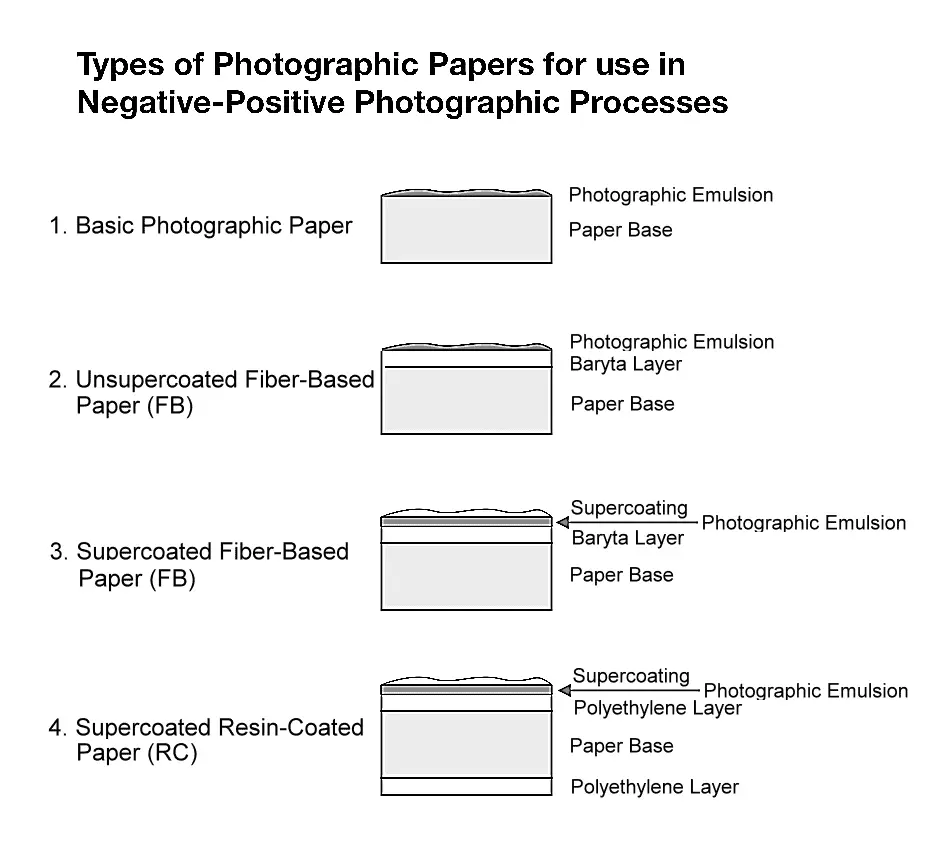
Fiber-based paper is the other commonly used type of paper used in darkroom photography. Unlike resin-coated paper the base of Fiber-based paper isn’t sealed between polyethylene layers. Instead, on top of the paper is a baryta layer, which is comprised of barium and strontium sulfates.
On top of the baryta layer rests the emulsion layer. Ordinarily, fiber-based darkroom paper consists of just a base and emulsion layer. Because there are no plastic protective layers over the paper, fiber-based darkroom paper inevitably absorbs chemical properties used in the process of creating the photo, which makes the washing and drying process of fiber-based paper take considerably longer than resin-coated paper.
Differences Between Resin-Coated & Fiber-Based Paper For Black and White Photography
While both papers are capable of creating beautiful images, there are some key differences to keep in mind when choosing a type of paper to use.
Keep in mind that both Resin-Coated (RC) enlarging paper and Fiber-Based enlarging paper are available for black & white processes while resin-coated paper is only available for the color darkroom process.
Resin-coated and fiber-based paper differentiate themselves in several categories including:
- Durability
- Archivability
- Ease of Use
- Drying
- Cost
Durability
What contributes to the favorable reputation of resin-coated paper over fiber-based paper is its durability. While both papers are capable of producing outstanding photos, it’s no secret that poor handling of any paper can ruin the quality of the photo. For this reason, the durability of the paper used in the process is a huge factor to consider when choosing which paper to use.
Resin-coated paper is protected by two polyethylene layers, with a super coating on top of that; this means that resin-coated paper is incredibly durable in the sense that it’s nearly indestructible and can’t be torn easily. This is important during the developing process of moving the paper through all three developing chemicals in their tray. When learning the process you gain confidence in gripping resin-coated paper with the tongs, and for beginners who lack the experience or technique to handle sensitive fiber-based papers, this is ideal.
Fiber-based paper generally lacks any protective coating. It’s just a piece of paper (the base) and the emulsion layer. Fiber-based paper feels more fragile because it doesn’t have a plastic base so it feels like thick, wet paper. Without proper attention to care, while your image is wet it can be scratched or torn. For this reason, beginners learning the skill of producing darkroom photos, resin-coated paper is generally best.
Archivability
After going through all of the potentially arduous steps involved in producing a photo, the goal is to somehow archive or store the photo. How well each type of darkroom paper is archivable, or can last, is one of the main factors worth considering when choosing between your options.
According to Ilford, one of the leading manufacturers for photographic materials, there is currently no industry standard for testing the lifespan of darkroom photos. Still, however, fiber-based paper is recommended since it has been around the longest of the two.
Resin-coated paper tends not to last as long as its counterpart. While technology in developing higher quality resin-coated paper has improved since RC paper’s introduction, the truth of the matter is that resin-coated papers aren’t likely to withstand the test of time, unlike fiber-based paper.
If the goal of your photography is to show in an exhibition or preserve your images for as long as possible then fiber-based paper is the way to go because of it’s archivability and tonal range. Unless, of course, you are processing color because then you only have one option – RC paper.
Ease of Use
Resin-coated darkroom paper is recommended for beginners for good reasons. It’s easier to use than its fiber-based counterpart in the sense that the paper is easier to handle. The plastic layers of the base of the paper create rigidity for the paper.
Because of its more delicate nature, handling a fiber-based photo is inherently a much more involved practice. While successfully producing a good fiber-based photo can yield a greater level of satisfaction because of the greater degree of skill and challenge involved, it isn’t an easy task.
Fiber-based paper is susceptible to absorbing significantly more chemicals than its counterpart. While resin-coated paper can be washed off with at least 30 seconds of rinsing, a fiber-based photo can take up to 30 minutes of washing before moving onto the next step in production. Not to mention the time it takes to dry, fiber-based photos simply take longer to produce.
A fiber-based print, because of the emulsion being on a paper base rather than on top of a layer of plastic, tends to have a more organic and handmade look.
Resin-coated photos come out smoothly because of the layers of material sheathing the base of the paper and the surface quality of resin-coated photos cannot be changed. With fiber-based paper, this isn’t the case. In fiber-based photos, special dryers allow for the person to change the surface of the photo, enhancing its feel and finished look.
Drying Time and Methods
Resin-coated darkroom printing paper tends to dry much faster (around an hour) and flatter than fiber-based paper because of the plastic layers. Fiber-based paper dries much slower (24 – 48 hours) and also has a tendency to curl when drying so you will need to employ specific ways to flatten them out using heavy books or a heat press after drying. Other special methods are used for fiber-based paper to help it stay more flat when drying (see below).
Cost
Resin-coated paper, on average, tends to be more affordable and cheaper than fiber-based paper because of the ease in producing the material needed for it. Even more so than that, other factors add to the final cost of using fiber-based paper.
People who are interested in creating fiber-based prints have to take into consideration the amount of time it would take to produce a photo. For example, as we mentioned above, a resin-coated print can be washed in about 30 seconds and then left to dry. With a fiber-base print, you will need to account for more time for washing your print, which means more water usage, and an additional processing tray with an extra chemical (Hypo Clear – like this bottle on Amazon.com) to bring down the wash time of your fiber-based print by 50%) to run your print through.
How to Dry Darkroom Paper? Fiber-Based Vs RC paper
Drying Fiber-Based Darkroom Paper
The best process I’ve found to dry fiber-based paper is to place the wet print on a piece of very clean (important part of the process) thick glass or plexiglass large and thick enough (6mm) to handle the entire print. Using a rolling squeegee, I roll it over the paper over a sink to squeeze as much water out as I can without pressing down overly hard . Then, I use watercolor tape to hold down the edges of the print to the glass after drying the edges of the glass so the tape will stick. I will lay the paper and the glass sheet flat while the paper is drying to help the paper dry flat. After the paper dries in about 24 – 48 hours, depending on the temperature and humidity of the environment, I use a utility knife the cut the print off of the watercolor tape.
Drying RC Darkroom Paper
To dry RC paper, the best process I’ve found is to place the wet print image-side down on a piece of plexiglass large enough to handle the entire print over the top of a sink and use a squeegee to pull out as much water as possible and then let it dry, which will usually take around an hour, depending on the temperature and humidity of the environment, but you can dry them faster using a hair dryer if you are in a hurry.
However, let both types fully dry for at least 72 hours if you are going to frame them to make sure as much of the water has evaporated as possible.
Print Dryers
Some people use a print dryer that moves the print through a series of heaters or rollers to dry the print or print dryers that look like a small steam press for clothing. These are expensive but handy to dry prints much faster than just by air. Some people like to also use drying racks like these or like these on Amazon to help the darkroom prints dry flat.
Dry Down
One thing to know about both fiber-based and RC paper is that they have what’s known as drydown. Drydown is when darkroom prints dry they get loose about half of a stop-of-light and some of their “edge”. This is something you need to compensate for when making a print and choosing your exposure time.
Which Darkroom Paper Should You Use?
Ultimately, which darkroom paper you use comes down to personal preference and intentions. If you intend to make your photos last a long time or be framed in an institution someday, then fiber-based photos are the way. If you’re just getting into photography, then starting with resin-coated (RC) paper is a better choice, not just financially, but for your skill and stress levels as well. You want to have as easy a time as possible, especially considering how intensive and time-consuming darkroom photography can be in general.
If you’re a beginner with loftier ambitions, it’s still recommended that you start with resin-coated paper. This way, you can build up your skill with a paper that’s basically guaranteed to survive no matter what (assuming you don’t expose the paper to light too early), and get some fairly applicable practice for fiber-based photos.
After the choice between RC paper and fiber-based paper this are more options to discover. Like before, if you are interested in making color prints in the darkroom then your choices are mostly made for you except for the paper finish. However, if you are interested in making black and white darkroom prints your options not only include the paper finish but also contrast grades in addition to paper tones.
Paper Contrast Grades
When it comes to black and white paper contrast grades there are two basic types: Graded Papers and Variable Contrast Papers. Graded papers are darkroom enlarging papers that only able to have a set contrast amount built into the paper of contrast levels of 00 to 5. The downsides of these papers are you have to shoot your negatives specifically with the same amount of contrast as your paper and if you wanted more (or less) contrast then you needed to buy additional paper. You can still purchase some graded papers from companies like Ilford and Arista but, while popular in the past, have fallen in popularity because of the availability of papers that can handle multiple contrasts in one paper.
Variable contrast papers are another type of darkroom enlarging paper that can handle multiple contrasts. Contrast filters (like these on amazon.com) are used with variable contrast paper to increase or decrease contrast in darkroom print when printing from a negative on an enlarger to make the best image from your negative. Other techniques using contrast filters like split filtering (where you use make two exposures to the same print using two filters for contrast and tone control) can also improve your print. This type of paper is best for beginners because your negatives don’t have to be as precise.
Paper Tones: Cool, Neutral, or Warm
Another option for black and white paper is paper tones. These include cool, neutral, and warm tones papers. Cool tone papers have a slight-bluish (or cool) appearance in the shadow areas and are used for industrial and commercial photography. Neutral tones are the most common tone for darkroom paper and give a neutral (neither cool nor warm) black appearance to the shadow areas. This paper tone is used for all types of photography. Warm-toned papers have a more brown appearance in the shadow areas and are mostly used for landscape and portraits.
Most, if not all, cool or warm tone paper is going to be fiber-based paper so because fiber-based paper is more suitable for toning. The good news is that there are several great options available with a variety of surface finishes. Below are a few that I recommend:
- Ilford Multigrade FB Warmtone VC Variable Contrast B & W Enlarging Paper – 8×10″-100 Sheets – Glossy Surface: This variable contrast fiber-based black and white paper by Ilford has a glossy surface finish. It produces a warm black image on a warm white paper base. It is also available in semi-matte if you prefer a less shiny finish.
- Ilford Multigrade Art 300 FB– Pack of 50 Sheets (20.3 x 25.4 cm) White: This paper made by Ilford is interesting in that it is a fiber-based paper that has a cool base color and produces a warm image color. The paper has a texture but has more of an eggshell finish and can produce deep shadows. It also has a shorter washing time because of its smaller paper weight.
Another option would be to soak your print in a solution. For example, by washing your RC or fiber-based print in a selenium toner solution (like this one from Kodak on Amazon.com), you can extend the print life and increase contrast with the richness of the blacks in all papers. With a stronger dilution ration you can also make warm-toned papers have cool chocolate hues, give neutral-tone papers slightly purplish brown tones, and no tone change with cool-toned papers.
When used with warm-tone papers, it produces cool, chocolate brown hues; with neutral-tone papers, it produces purplish brown tones; and with cool-tone papers, little to no color change is expected.
Choosing Between Finishes: Glossy, Pearl, Satin, Semi-Matte & Matte Darkroom Paper
When choosing a darkroom paper, you’ll find yourself once again confronted with a choice that can affect the appearance and potentially the quality of your photo. Should you go for a glossy, pearl, satin, or matte paper finish?
Glossy Surface
A glossy finish will boost the image sharpness and color vibrancy while giving the print more contrast by making the blacks deep and the highlights look bright white.
However, there are some disadvantages to a glossy finish to be aware of. Glossy photos can be hard to view in certain lighting conditions because of the glare and they are susceptible to fingerprints, which can ruin darkroom paper.
Pearl Finish
Pearl is basically a mixture of both glossy and matte but with more of a pearlescent appearance. This finish makes the print appear sharp with deep blacks and bright whites with presence. Because this finish isn’t as shiny as the glossy finish it is easier to handle because fingerprints appear less noticeable. For this reason, it is generally recommended for the darkroom printing beginner.
Satin Finish
Like the pearl finish, satin finish is basically a mixture of both glossy and matte but with less shine than pearl. This finish makes the print appear sharp with deep blacks and bright whites with presence. Because this finish isn’t as shiny as the glossy or pearl finish, it is easier to handle because fingerprints appear less noticeable.
Matte and Semi-Matte Finishes
Matte and semi-matte paper does not have the shine of glossy paper but instead, enhances the texture of the images. This finish is smooth and clean and doesn’t suffer from glare that makes viewing glossy photos inconvenient, and for this reason alone, many photographers prefer matte. Also, when a print on matte paper is framed, the glass brings out the qualities wanted with using glossy paper without you having to worry about fingerprints, so it is the best of both.
However, matte and semi-matte have a tendency to bring out textures in your image, including unwanted textures. So beware of this when you choose an image to print on matte finish paper.
Color Printing Paper Vs Black and White
Color darkroom printing paper is different from black and white printing papers in a number of ways:
- Color printing paper is sensitive to all light so part of the print developing process needs to take place in complete darkness. While color safelights have recently been produced but they are still very dim and you must keep them some distance away from the paper so as not to expose your paper.
- Color darkroom paper requires different chemistry than black & white prints. Chemistry to develop color darkroom prints are more toxic to you (and to the environment) and more susceptible to temperature variations than those used for black & white prints.
- Color darkroom paper only comes in resin-coated (RC) paper type. It is not available in fiber-based paper like black & white darkroom printing papers.
- Color darkroom papers are more susceptible to damage from handling during the printing process. This can range from fingerprints, surface marks, and lines from crimping so be careful when handling your paper especially when it is wet.
- Although you can find color darkroom paper in other surface finishes like matte, they are more easily found in glossy and semi-matte finishes. This is good because generally the more glossy the surface the better the color saturation, color contrast, and the sharper the image appears. However, a glossy surface finish is generally more susceptible to fingerprints than other finishes.
- Color papers are not available in variable contrast paper like black and white printing papers. Instead, they are graded papers rated as: “low contrast” for high-contrast scenes, “high contrast” for scenes with low contrast, and “normal contrast” for general-purpose papers – this is what I recommend. One thing to note that the difference in contrast grade is only the equivalent of 1/2 to 1 contrast grade compared to black and white papers so it is still best to control contrast as much as possible with your negative.
- Color papers can vary widely depending on the manufacturer. Basic variable contrast Black and white papers generally are all produce the same image quality, with a few slight differences. However, this is not true with color darkroom paper. Two differences are how durable the paper is to handle when wet during the developing process and differences in the color produced by the printing paper. For example, one paper could produce slightly more warm tones while another has more blue or cool tones or the color in one paper manufacturer’s paper could be more saturated over another’s subdued color. Since color printing paper can vary so much, it necessary to test paper out before purchasing a lot at one time.
- Color enlarging paper is more sensitive to heat and the colors will change, or shift, over time. You can limit this by keeping paper in a cool, dry environment and out of direct sunlight. Some people even recommend keeping paper in a refrigerator between uses. If the box is unopened then you can put the entire box in the refrigerator or freezer, however, if the box is opened then I recommend placing it in several large bags to keep condensation from ruining your paper. If you choose to cold store your paper in, either way, make sure to let your paper return to room temperature before taking it out of the bag or box and using it so that condensation doesn’t ruin your paper.
- There are two types of color printing paper processes: printing from negatives and printing from transparencies. Each process uses different paper types and sometimes chemicals. Papers used printing from negatives generally all end in “-color” (like this Fujicolor printing paper from Amazon.com). Papers used in printing from slides or transparencies generally all end in “-chrome” (like Cibachrome or Ilfochrome). However, all negative papers can use with the same chemicals – even if they are from different manufacturers.
NOTE: An Ilfochrome (or Cibachrome) print was a special kind of color darkroom process that produced high image clarity, high saturation, and intense, vibrant colors. The color reproduction and image clarity were so good with this process that many said it to appear “3-D” and the image popped off of the page. Because of its characteristics, the process was used famously by the photographers Eliot Porter, Jeff Wall, and William Eggleston. Ilford discontinued the Ilfochrome process in 2015. However, Fuji developed a paper used in the negative process, called Fujiflex. This paper can be found in the digital-analog color printing process using a Lightjet (or a Durst Lamda printer) that can produce very similar results to the Ilfochrome process.
Recommended Darkroom Paper Products
When shopping for darkroom paper, it can be challenging to choose from the seemingly myriad options of brands. Below are some options for color and black and white enlarging paper.
Recommendations for Color Enlarging Paper
- Fujifilm Fujicolor Crystal Archive Super Type II Color Enlarging Paper – 8×10″-100 Sheets – Matte Surface: This color paper for the darkroom is from Fuji and is a matte finish, which has the least amount of shine. It is a resin-coated paper that is fade resistant over time and more stable than the previous version. It has pure whites and produces more natural skin tones with lifelike sharpness and texture.
- Fujifilm Fujicolor Crystal Archive Super Type-II Color Enlarging Paper – 8×10″ – 100 Sheets – Glossy Surface.
- This color paper for the darkroom is from Fuji and is a glossy finish, which has the most amount of shine. It is a resin-coated paper that is fade resistant over time and more stable than the previous version. It has pure whites and produces more natural skin tones with lifelike sharpness and texture.
- Fujifilm Fujicolor Crystal Archive Type II Paper – 8 x 10″ – 100 Sheets – Lustre Surface). This color paper for the darkroom is from Fuji and is a Lustre finish, which is slightly less shiny than glossy. It is a resin-coated paper that is fade resistant over time and more stable than the previous version. It has pure whites and produces more natural skin tones with lifelike sharpness and texture.
Recommendations for Black and White Darkroom Enlarging Paper
As a photography company, Iford has stuck with traditional photography for many years, and it reflects in the quality of their film and paper. Here are some options for both resin-coated and fiber-based paper to consider:
Resin-Coated:
- Ilford Multigrade IV RC Deluxe Resin Coated VC Paper, 8×10, 100 Pack (Glossy): This is the standard Resin Coated paper recommended for beginners. It comes in a pack of 100 sheets with a glossy finish. While glossy finishes have their advantages and disadvantages, for a beginner, it can’t be understated how much the nice shine adds to the quality of your image. This paper is variable contrast so it can produce a wide range of contrast.
- Ilford B&W Paper 8X10 Multigrade IV RC 100 Pack (Pearl): This paper pack has all of the same qualities of the RC paper above accept this paper is halfway between glossy and matte finish, which I prefer over glossy.
Fiber-Based:
- Ilford Fiber-Based B&W Paper 8X10 Multigrade IV 100 Pack (Glossy): While slightly more expensive than resin-coated paper, you’ll find your prints coming out better with better quality in contrast, tones, and textures. This fiber-based paper comes with a glossy finish is also variable contrast so it can produce a wide range of contrast.
- Ilford Multigrade Fiber-Based Classic, Enlarging Paper 100 Pack (Matte): This enlarging paper by Ilford has all of the same qualities of the previous fiber-based paper pack but this one is a matte finish, which some people prefer over glossy.
In general, darkroom photo paper can be expensive due to the materials used in manufacturing the paper. However, you can avoid paying so much money at a time by purchasing 25 sheet packs of resin-coated or fiber-based paper, which is initially cheaper. However, as a beginner, I recommend the larger packs of resin-coated or fiber-based because you will go through a lot of paper initially. Still, like many other hobbies, anticipate needing to budget around your needs.
If cost is something you are concerned about with darkroom paper, see this article I wrote about how long can darkroom paper last and how to test if it is still good.
How to Find the Emulsion Side of Photo Paper?
All darkroom enlarging photo paper is coated with a light-sensitive material (also known as an emulsion) on one side. This is the side you want to face up when placing your paper on the baseboard of a darkroom enlarger. With some papers, like glossy paper, it is easy to spot because one side is shiny and the other side is not. Some papers are harder to spot the emulsion side because of how matte they are. Read below for some tips
- Similar to 35mm film, the paper tends to curl toward the side with the emulsion. This is most helpful with matte paper or with color enlarging paper since it has to be moved around in very low light or total darkness.
- The emulsion side of the paper is usually facing up in the box.
- With RC paper (for black and white and color), one side is glossier or smoother when you touch it.
- Some paper (like color paper) has text on one side with the manufacturer’s name or something similar. This is not the emulsion side.
- When all else fails, lightly wet your finger and thumb with a little bit of water and pinch the corner of your paper with your wet fingertips. The emulsion side will feel more slick than the side without the emulsion. Be careful though as this might ruin your paper depending on where you touch it.
Making A Print in the Darkroom
Making a print in the darkroom can seem daunting at first but once you do it a few times is a straightforward process. See this guide for the steps for how to make a black & white or color print in the darkroom or this article about how to put together a darkroom in your garage.
In Summary
When taking up darkroom photography, it’s important to distinguish between resin-coated paper and fiber-based paper. While both papers are capable of creating outstanding images, there are some significant differences to consider.
As a beginner, resin-coated is the best option for you. Its protective layers make it much more durable and easier to handle during the processing phases of your image. It doesn’t take as long to process, dries quicker, and is even relatively low in cost.
Fiber-based paper, while equally capable of creating good images, is harder to handle. It has a reputation of being permanent, unlike its resin-coated counterpart.
Depending on the kind of color or black & white paper you use when processing your very own darkroom photo, the length of time and resources needed can differ dramatically. If you do decide to use a fiber-based paper, for example, be prepared to accommodate the extra time and items that are required.
Related Articles: