
For many people, Digital photography had replaced the darkroom because of convenience. But for some, film photography will never be replaced when it comes to making a print in the darkroom versus a digital inkjet printer. Making a photographic print in a darkroom brings up feelings of nostalgia for while a digital print, even today, still doesn’t rival the image quality or the magic of a darkroom print developing before your eyes.
Creating photographs from film negatives using a darkroom is a process that has to be perfected in order to ensure the image comes out correctly. Because there are many issues you can run into while making a print in the darkroom each step of the process essential. If you’re interested in making a print in the darkroom with either color or black and white film, this article is for you.
First Step, Develop Your Film
Most people are happy with the cameras on their phone or digital camera, however, film photography has begun to become more popular again with the rise of instant film cameras (for more information about instant cameras see this article I wrote) and other film-based cameras. With instant film cameras , the print comes out and you can watch it develop in your hand in a matter of minutes. However, with a traditional film camera, the first question you may ask is how to create a print using the film inside.
Developing the Film Yourself Vs. Mailing It Out
With developing film you generally have two options: develop it yourself or have someone else develop it for you. There are several options for both choices. Developing the film yourself can be rewarding and becomes easier once you have done it a few times before. However, you need a someone-what dedicated space to do process and dry the film, and it can be more expensive up front since you have to buy specific equipment and chemicals for both the black and white and color film process.
Having it developed for you by someone else has some advantages. These include getting more consistent development when using a professional service (especially important with color film), it can be easier since you don’t have to take the time to learn the development process, you don’t have to worry about buying equipment and dealing with processing chemicals, it can be more expensive in the long run, and by the time you mail the film in to be processed, scanned, and sent back to you then you would have been able to develop and dry it yourself.
If you want to have someone else develop your film, here is a list of 14 labs that can develop color film. However, I suggest these two companies that come highly recommended from other photography sites and constantly give great results.
- The Darkroom
- At the time of writing, The Darkroom website charges $20.95 to develop one roll of color or black and white 35mm or medium format film with shipping including good quality scans (without tax), it generally takes 3 – 6 days for your film to be processed and your digital scans to be uploaded to the web. It also takes about a week for you to receive your negatives back in the mail.
- I have personally used this company and was very happy with the results. This company has an easy to use online ordering system that allows you to track your progress, fast turn around times, and quality scans for a less expensive price. However, you don’t have the option to not get scans which makes the
- At the time of writing, The Darkroom website
- Richard Photo Lab
- According to Richard Photo Lab (at the time of this writing), they charge $14.67 to develop one roll of color or black and white 35mm or medium format film or with shipping and NOT including good quality scans (without tax). For high-quality scans (Richard’s Way they call it) add $15. It generally takes 3 – 5 days for your film to be processed and your digital scans to be uploaded to the web. It also takes about a week for you to receive your negatives back in the mail.
- This company has a fast turn around and can very good quality scans. This company has an easy to use online ordering system that allows you to track your progress, fast turn around times, and quality scans for a less expensive price. They give you the option to not choose scans if you want to scan them yourself, however, the scans are much more expensive and increase the processing time.
- According to Richard Photo Lab
If you are more interested in developing film on your own. Then I suggest reading one or both of the following articles on developing color or black & white 35mm film or medium format film at home:
- How to Develop Color 35mm or Medium Format Film at Home
- How to Develop Black and White 35mm and Medium Format Film at Home
It is possible you may run into problems while developing film yourself. See this article of the top 26 film developing problems for answers.
Now that you have an idea of how to get negatives from the film in your camera, the next step in the process is getting prints from the film negatives. To develop prints in your own darkroom, you will need to make sure your darkroom is set up appropriately, and you will need to be sure you have the proper equipment.
Next, You’ll Need a Darkroom to Make the Print
A darkroom is a place to develop photographic prints and/or negatives and is divided into two sections: a dry side (for making the prints from negatives using an enlarger) and a wet side (for developing your prints in chemicals). It is called a darkroom because it is a room that has either no lights or lit by a faint red or amber light when processing photographic prints. The room needs to be set up this way because specific photographic processes are generally sensitive to either any light or a specific part of the visible light spectrum. For example, you shouldn’t have any lights on when loading film into a developing tank for both black and white and color film or developing color photographic prints in the darkroom. On the other hand, the room can have a faint red or amber light (also known as a safelight) when developing photographic black and white prints.
For more information on why you can use a red or amber light in the darkroom without ruining your black and white prints or why it is best not to use any light when developing color prints see this article on my website.
Equipment Needed for Making A Color Print In The Darkroom
When getting equipment for a darkroom, remember you need to think of the darkroom divided into two sections: a wet side and a dry side. Each section has its own purpose and it is important to keep them separate during the printmaking process and is different equipment is needed depending on if you are making a black & white print or a color print in the darkroom.
Check out the lists below for an inventory of what you may need and where to keep it broken up the following section by black and white vs color prints since there are some differences (to scroll to the section about color equipment click here).
Equipment Needed to Make a Print in the Darkroom
Equipment Needed for the Wet Side of the Darkroom for Black and White Printing
- Film Clips – These could be swapped for clothespins, but having a nice set of steel clamps works best for your longer rolls of film. One of the best places to hang drying film or prints is over a bathtub or sink to catch the drops of water.
- Film Developing Tank – This Paterson film developing tank and reels set is a great option for developing film. The plastic reels can take either 35mm or transform to accommodate the larger medium format film. The tank can handle two reels of 35mm film or one reel of medium format film. If you are more interested in medium format film then I suggest also purchasing this larger Paterson developing tank on Amazon.
- Tongs – A set of tongs will be needed to move the pictures from bath to bath. This handy set by Zuma comes with pre-colored sections that will keep you from cross-contamination during the process, which can ruin all the pictures and mean a restart of the entire process.
- Black and White Darkroom Chemicals: Kodak and Ilford both make excellent black and white film developing chemicals (Developer, Stop Bath, and Fixer) that can also process paper prints. The Ilford link above is for a starter kit that can do two 35mm rolls but you can find the Ilford chemicals separately here if you want to process more film: Developer, Stop Bath, Fixer. For Kodak, the chemicals are as follows: Developer, Stop Bath, Fixer.
- Hypocheck – Since fixer can be reused in the black and white development process, this product is useful because it lets you know if your fixer has exhausted.
- Trays – Paterson makes some of the best darkroom equipment on the market. This set of three gives you the spots you need when bathing the negatives and photos. They are color-coded so that you can remember which solution goes into which tray. I recommend getting an extra set for the final step of the process of washing the prints and for the extra trays of chemicals if you are using fiber-based photographic Darkroom paper. (Read this article for more information about the differences between specific photographic darkroom paper).
- Funnels – You will need a way to transfer chemicals from storage to use and back again. Funnels help make things less messy. For example, specific chemicals used during the development process can be returned to their storage bottle (or an additional bottle for organization) and be reused. This would apply more specifically to the stop bath and fixer. and will help save money in the long run.
- Storage Bottles For Darkroom Chemicals – You will need bottles to store development chemicals once they are mixed. Most darkroom chemicals instructions want you to make 1000 ML (roughly 1 US Quart) so I also recommend looking for this size. I recommend glass bottles like these on Amazon.com but any kind of glass or plastic opaque bottles will do. The key is to make sure they are large enough to hold enough chemicals to fill your developing tank or trays but small enough to handle without being too heavy.
- Thermometer – You will need a thermometer to measure the temperature of chemicals when mixing them and processing them. Your thermometer needs to be stainless steel or glass so it doesn’t retain chemicals over long-term use. I prefer metal thermometers since they aren’t as breakable as glass.
- Graduated Cylinders – I recommend this kit of plastic graduated cylinders. You could also you glass cooking measuring like this Pyrex set on Amazon.com. However, it should only be used for measuring chemicals and nothing more.
- Print Squeegee – After your print is made in the darkroom, you will need to squeegee some of the excess water out/off of the print over a sink. I recommend purchasing some plexiglass like this clear 12-inch x 12-inch by 0.5-inch thick piece of plexiglass on Amazon.com.
- Apron – Since some of the chemicals in the darkroom can damage clothing, a water resistant apron is a great idea. I recommend one with pockets for storage.
Equipment for the Dry Side of the Darkroom for Black and White Printing
- Safelight – This safelight on Amazon.com is red and supports black and white darkroom paper while keeping the darkroom free of dangerous white light (faint amber can also be used with black and white prints). For color prints, you can use a very faint yellow light (though most people don’t use a light at all for color prints). I suggest this one on amazon.com that does both black and white prints as well as color. For more information on why it is okay to use a red light in a black and white darkroom, check out another one of my articles here.
- Grain Focuser– A gain focuser will help you focus your image on your enlarger when it is too hard to see. You can also use a common magnifier (like this one on Amazon.com) if you don’t want to purchase a specific grain focuser.
- Timer – During your film developing process each of the chemicals will need to be exposed a specific amount of time depending on the temperature of your chemicals and water, your film, and if you are pushing or pulling the film. This timer is helpful so you don’t forget how much time has passed. Also, each of the prints will have to spend a certain amount of time under the light of the negative enlarger in the darkroom. This timer has a place to plug in your enlarger and will turn it off when it reaches the end of the countdown. It also glows in the dark but not enough ruin your prints.
- Easel – I highly recommend purchasing an easel to go along with your enlarger when making prints in the darkroom. These are great for cropping your images while printing and keeping your paper from moving during the process. You can usually find a better deal on used than buying new so I prefer buying darkroom easels on ebay.com.
- Paper Safe – This is a light-tight box that keeps your paper safe from being exposed to light in the darkroom. Even if your paper is exposed to some light over time it can be fogged and therefore unusable for a final print. This is especially important if you have lighting switches in the room you are using in case someone turns them on accidentally and ruins your pack of paper.
- Black and White Darkroom Enlarging Paper – Don’t forget darkroom paper for your darkroom. There are several companies that make photographic darkroom paper but I recommend using Ilford. This photographic paper is sensitive to light except for amber and red safelights and designed to create black and white prints. There are many surface textures available matte to glossy as well as different base types including Resin-Coated and Fiber-Based. For beginners, I recommend using RC paper (resin coated) over FB (fiber-based) paper. Read this article I wrote on the differences between RC and fiber-based darkroom paper and which one is the best for your level.
- Anti-Fatigue Mat – Since you will be on your feet for hours at a time making prints in the darkroom, I recommend a non-slip anti-fatigue map like this one on Amazon.com. This is not something you necessarily will need right away when putting together a darkroom but will make sense the longer you spend on your feet in the darkroom.
- Darkroom Enlarger – This large machine is what shines light through your negative to enlarge the image from your film negative onto a piece of photographic darkroom enlarging paper that is developed in the darkroom to create a print. Keep in mind they can be quite expensive to purchase new so I recommend looking for a used one on eBay.com or a local school that might be trying to dispose of them.
- For Black and white prints, I recommend the Beseler Cadet II model. This enlarger model from Beseler available on B&H. com is great for the beginner. It is compact so it is a great option for a small darkroom in a garage or bathroom. This model is only for 35mm film size but can print up to 8″x10″. It also includes a lens, lensboard, and negative carrier (which is where you put your film negatives). .
- For Black and white prints, I recommend the Beseler Cadet II model
- Contrast Filters – These filters are for black and white prints and go into your negative enlarger. They either add or lessen the contrast in your images when projecting them onto photographic darkroom paper.
Equipment Needed for Making A Color Print In The Darkroom
Equipment for the Wet Side of the Darkroom for Color Prints
- Film Clips – These could be swapped for clothespins, but having a nice set of steel clamps works best for your longer rolls of film. One of the best places to hang drying film or prints is over a bathtub or sink to catch the drops of water.
- Film Developing Tank – This Paterson film developing tank and reels set is a great option for developing film. The plastic reels can take either 35mm or transform to accommodate the larger medium format film. The tank can handle two reels of 35mm film or one reel of medium format film. If you are more interested in medium format film then I suggest also purchasing this larger Paterson developing tank on Amazon.
- Tongs – A set of tongs will be needed to move the pictures from bath to bath. This handy set by Zuma comes with pre-colored sections that will keep you from cross-contamination during the process, which can ruin all the pictures and mean a restart of the entire process.
- Color Darkroom Chemicals: To develop color prints in the darkroom than I recommend this kit from Arista.
- Color Print Processing Tube: Use these tubes (like new this one on bhphotovideo.com or this used one on ebay.com) to develop color prints in the darkroom. They make it easier to keep temperatures consistent and more even developing across the paper. You can also find a motorized base for these drumgs to make the process even easier (like this one on ebay.com).
- Immersion Water Heater And Circulator: Color chemicals need to be kept at a consistent temperature during the process otherwise color shifts will occur. Using a water bath and an immersion water heater and circulator (like this one on Amazon.com) will help to keep the chemicals at a constant temperature during the development process.
- Trays – Paterson makes some of the best darkroom equipment on the market. This set of three gives you the spots you need when bathing the negatives and photos. They are color-coded so that you can remember which solution goes into which tray. I recommend getting an extra set for the final step of the process of washing the prints and for the extra trays of chemicals if you are using fiber-based photographic Darkroom paper. (Read this article for more information about the differences between specific photographic darkroom paper).
- Funnels – You will need a way to transfer chemicals from storage to use and back again. Funnels help make things less messy. For example, specific chemicals used during the development process can be returned to their storage bottle (or an additional bottle for organization) and be reused. This would apply more specifically to the stop bath and fixer. and will help save money in the long run.
- Storage Bottles For Darkroom Chemicals – You will need bottles to store development chemicals once they are mixed. Most darkroom chemicals instructions want you to make 1000 ML (roughly 1 US Quart) so I also recommend looking for this size. I recommend glass bottles like these on Amazon.com but any kind of glass or plastic opaque bottles will do. The key is to make sure they are large enough to hold enough chemicals to fill your developing tank or trays but small enough to handle without being too heavy.
- Thermometer – You will need a thermometer to measure the temperature of chemicals when mixing them and processing them. Your thermometer needs to be stainless steel or glass so it doesn’t retain chemicals over long-term use. I prefer metal thermometers since they aren’t as breakable as glass.
- Graduated Cylinders – I recommend this kit of plastic graduated cylinders. You could also you glass cooking measuring like this Pyrex set on Amazon.com. However, it should only be used for measuring chemicals and nothing more.
- Print Squeegee – After your print is made in the darkroom, you will need to squeegee some of the excess water out/off of the print over a sink. I recommend purchasing some plexiglass like this clear 12-inch x 12-inch by 0.5-inch thick piece of plexiglass on Amazon.com.
- Apron – Since some of the chemicals in the darkroom can damage clothing, a water resistant apron is a great idea. I recommend one with pockets for storage.
Equipment for the Dry Side of the Darkroom for Color Printing
- Safelight – This safelight on Amazon.com is red and supports black and white darkroom paper while keeping the darkroom free of dangerous white light (faint amber can also be used with black and white prints). For color prints, you can use a very faint yellow light (though most people don’t use a light at all for color prints). I suggest this one on amazon.com that does both color and black and white prints. For more information on why it is okay to use a red light in a black and white darkroom, check out another one of my articles here.
- Grain Focuser– A gain focuser will help you focus your image on your enlarger when it is too hard to see. You can also use a common magnifier (like this one on Amazon.com) if you don’t want to purchase a specific grain focuser.
- Timer – During your film developing process each of the chemicals will need to be exposed a specific amount of time depending on the temperature of your chemicals and water, your film, and if you are pushing or pulling the film. This timer is helpful so you don’t forget how much time has passed. Also, each of the prints will have to spend a certain amount of time under the light of the negative enlarger in the darkroom. This timer has a place to plug in your enlarger and will turn it off when it reaches the end of the countdown. It also glows in the dark but not enough ruin your prints.
- Easel – I highly recommend purchasing an easel to go along with your enlarger when making prints in the darkroom. These are great for cropping your images while printing and keeping your paper from moving during the process. You can usually find a better deal on used than buying new so I prefer buying darkroom easels on ebay.com.
- Paper Safe – This is a light-tight box that keeps your paper safe from being exposed to light in the darkroom. Even if your paper is exposed to some light over time it can be fogged and therefore unusable for a final print. This is especially important if you have lighting switches in the room you are using in case someone turns them on accidentally and ruins your pack of paper.
- Color Darkroom Enlarging Paper – If you want to make color prints, the base is the same for color darkroom paper (resin-coated) so you only need to choose between the sheens (for example, matte, semi-matte, satin, pearl, semi-gloss, and glossy, etc). This paper is sensitive to all light so most people develop it in the dark (though a new safelight has been developed for color paper that is a faint yellow). I suggest that you use this 8×10″ glossy color enlarging paper from Fujifilm for starters. For more information about color darkroom enlarging paper read this other article I wrote.
- Anti-Fatigue Mat – Since you will be on your feet for hours at a time making prints in the darkroom, I recommend a non-slip anti-fatigue mat like this one on Amazon.com. This is not something you necessarily will need right away when putting together a darkroom but will make sense the longer you spend on your feet in the darkroom.
- Darkroom Enlarger – This large machine is what shines light through your negative to enlarge the image from your film negative onto a piece of photographic darkroom enlarging paper that is developed in the darkroom to create a print. Keep in mind they can be quite expensive to purchase new so I recommend looking for a used one on eBay.com or a local school that might be trying to dispose of them.
- For Color Prints I recommend this Besler 67S Dichroic Color Head Enlarger. This enlarger model from Beseler and is available on Amazon.com. It can do both 35mm and medium format negatives and can print up to 11″x14″. You can also use it to enlarge black and white negatives because of the white focus light it projects. This enlarger includes a lens, lensboard, an easel, and a negative carrier.
Iford Pop-Up Darkroom
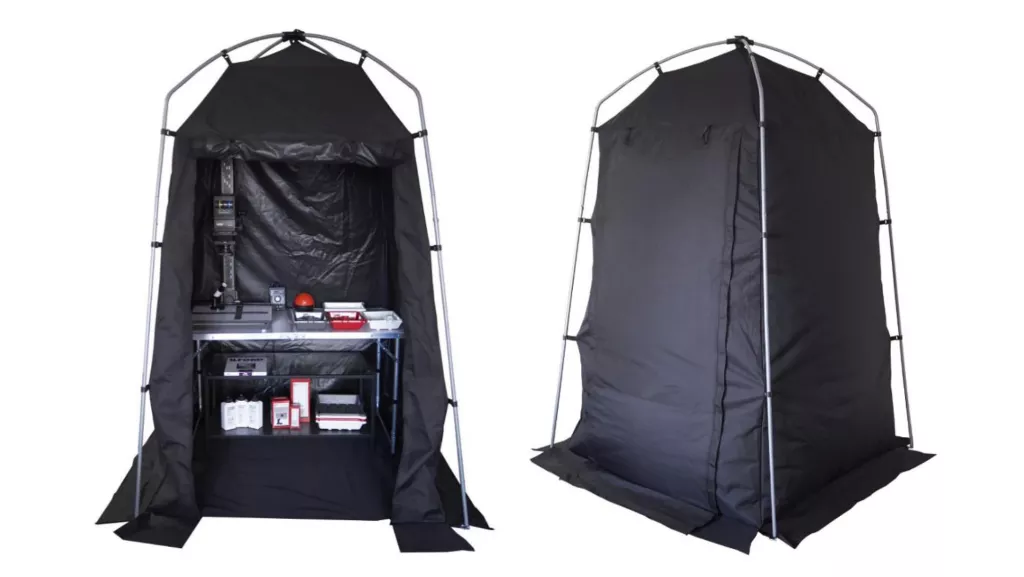
The darkroom company giant, Ilford Harmon, recently announced a new portable pop-up darkroom that is basically a tent that is light tight and can easily be set up and taken down in which you can make prints or develop film. The pop-up darkroom will be 7.2 ft (2.2m) tall and has a space inside of 4.2ft x 4.2ft (1.3m x 1.3m) which is big enough for a table for your enlarger and chemicals so you can develop film or make prints. It has a protective mat so it won’t ruin your floors if used indoors. It also has a built-in air vent at the top and bottom to help with air circulation.
The entire thing fits in the supplied storage bag and measures 26.6in x 9.8in x 9.8in (68cm x 25cm x 25cm) and weighs 17.5lbs (8kg). The pop-up darkroom will go on sale in November of 2021 and will cost around $265 USD. See this website for more information.
Ilford recently also announced a darkroom starter kit in partnership with the company Paterson that offers everything that is needed to make a print, except for an enlarger and a safelight. This will cost around $150 USD and includes the following:
- 1 x Ilford Multigrade RC Deluxe Pearl Paper 8×10” 25 sheet box
- 1 x Ilford Multigrade Developer 500ml bottle
- 1 x Ilford Ilfostop 500ml bottle
- 1 x Ilford Rapid FIXER 500ml bottle
- 1 x Paterson 1200ml Graduate Cylinder
- 1 x Paterson 150ml Graduate Cylinder
- 1 x Paterson Chemical Mixer
- 1 x Paterson Thermometer Small (9”)
- 3 x Paterson 8×10 Trays (Red / White / Grey)
- 3 x Paterson Print Tongs (Red / White / Grey)
- 1 x Paterson Micro Focus Finder
How to Make A Print in the Darkroom
Once you have all of the equipment needed, the following processing steps are for developing black and white prints in the darkroom. If you want to develop color prints in the darkroom then click here or scroll further down.
For Black and White Darkroom Paper
There are are two base types of black and white paper: Resin-Coated paper and Fiber-based paper. They each have their pros and cons in the darkroom. See this article I wrote about the differences for why you may choose one over the other. Generally, I recommend Resin-Coated paper (or RC paper) for beginners since it is more durable when wet during the development process, involves fewer steps, needs less equipment, and dries much faster than fiber-based paper.
Making a print in the darkroom from a negative involves 5 steps: Setting up the enlarger with the negative, making a test strip to check for exposure, making the print with the enlarger, developing the print by running it through chemicals, and finally, drying the print. Below are the steps for setting up your enlarger and making a test strip from your negative to see how long to expose your enlarging paper. This part of the process is similar with both RC paper and Fiber paper. Following the first steps below, each type of enlarging paper is then further broken down for the rest of 5 steps and developing process.
Setting Up Your Enlarger With A Negative and Making A Test Strip
1. Setting Up Your Enlarger: You’re going to want to plug in your enlarger and make sure there are no stray wires in the room. Near your enlarger, make sure to have your paper developer, stop bath, and fixer readily available.
2. Turn on Safe Lights: At this step, turn on your safelight and turn off any other lights in the room. Double-check that there aren’t any stray lights coming into your darkroom. Make sure any holes in the door where light can leak out are covered, and all windows are closed. Even mild exposure can fog your paper with light and ruin the paper (for example your phone), so take caution.
3. Setting Up Film Negative and Enlarger Aperture: For this step, you’re going to take out your developed film negative and place it into the enlarger. Most enlargers have a film holder/carrier to keep the film from moving. Place your negative in the film carrier with the shiny side up and dull side down (the dull side is the emulsion side) and put it in the correct location for your enlarger. Turn on the enlarger and turn on your focus light; you’ll notice that the image you placed in it is projecting itself onto the baseboard. Once your image is showing, move the aperture ring found on the lens of the enlarger. It’s recommended that you set the lens aperture on the enlarger to f/8 or f/11.
4. Image Size: Once you turn on your enlarger and set up your aperture it is time to fit your image on the baseboard and then focus your image. Most enlargers can move the head of the enlarger (where the negative and light is) up and down by turning a knob on the left or the right to make the projected image fit onto the baseboard and the correct section of your paper easel. Some bigger enlargers (like for larger format film) this process is even motorized because they are so big and heavy.
5. Focus: Once the image is the correct size to fit your easel it is time to focus your image. Focusing your image in the enlarger is easily done by moving a knob on the left or the right of the head of the enlarger. This moves the negative closer or further away from the light to focus the image on the baseboard and paper easel. Some like to do this with only their eyes but most photographers prefer to use a grain focuser (like this one or this one from bhphotovideo.com) with magnifies the image to help find the critical focus of the projected image. When using a grain focuser, look for an edge of a part of the projected image that should be in focus according to your negative and use that as your guide to focus your image. During this step, it also helps to choose an aperture on the enlarger lens that lets a lot of light through (like f4 or f/5.6) to make it easier to see the focus of your projected image. After focusing, make sure to set the aperture of your enlarger lens back to f8 or f11.
6. Contrast: With black and white enlarging paper the contrast is controlled by exposure, the negative, contrast filters, and paper contrast grade. Some papers are known as multigrade, which means they can produce multiple grades of contrast. When using these types of papers, you will need a multigrade contrast filter pack (like this pack on Amazon.com) that’ll provide you with good overall contrast on your photo negative. A good one to start out with is filter 2 or 2.5, which is the middle so you have room to raise or lower the contrast as necessary. To use the filter, place it in the appropriate area of your specific enlarger, which is usually below the negative.
NOTE: You can use a color enlarger (also known as Dichroic Head) to make black and white prints. With these enlargers, you don’t have to use multigrade filters because you can use the color knobs to dial in the contrast. This can be a bit tricky because all color enlargers vary slightly but see the chart below for the correct setting to achieve similar results when using a multigrade filter pack. Keep in mind the larger the number means longer exposure time with magenta needing more time than yellow because that filter is denser. Since you will only be using the yellow and magenta dials, set Cyan to zero.
Multigrade Filter Number | Color Enlarger Settings |
|---|---|
#0 | 80 Yellow / 0 Magenta / 0 Cyan |
#1 | 30 Yellow / 0 Magenta / 0 Cyan |
#2 | 0 Yellow / 0 Megenta / 0 Cyan |
#3 | 40 Magenta / 0 Yellow / 0 Cyan |
#4 | 100 Magenta / 0 Yellow / 0 Cyan |
#5 | 200 Magenta / 0 Yellow / 0 Cyan |
7. Creating Test Strips: Take out a piece of your photography enlarging paper and cut it into to long strips of paper 1 to 2 inches wide. Choose one strip and put the rest of your paper in the papersafe or a light tight space in the darkoom. Place the strip of enlarging paper you left out and place it on the baseboard of your enlarger and hold it in place with tape or using a paper easel. Expose your paper strip for 10 seconds. Next, take a card, piece of cardboard, or something thin that light won’t pass through, and cover about 3 – 4 inches of the strip lengthwise. Expose for another 10 seconds and repeat this step until you’ve exposed the entirety of the paper. You should do need to do this approximately 4 or 5 times.
Next, we will process your test strips so we will know how long to expose your enlarging paper with the enlarger to make a good exposure.
However, the process will differ depending on what type of black & white paper you are using between RC (Resin-Coated) or Fiber-Based paper. See the Resin-Coated instructions below and the Fiber-Based Instructions by clicking here or scrolling further on below.
General Processing Steps for RC (Resin-Coated) Paper
- Mix All The Chemicals Needed: Mix the amount of chemicals needed for the process in your chemical storage container bottles according to the manufacturers guidelines. This should be enough to cover the print in the developing tray and will be different depending on the size of your print and tray.
- Paper Developer: Measure out how much of the developer you’ll need in a tray to cover the paper. It typically says on the bottle. Place your exposed paper strip into the developer, and gently agitate the solution by lifting the tray up and down a little bit over the paper for 1 minute (if you’re using resin-coated paper), and watch as your image finally appears.
- Stop Bath: Remove the paper from the tray of the developer using a single pair of tongs and place it in another tray of stop bath covering the paper. Avoid contaminating the stop bath solution with the paper developer pair of tongs. Once again, gently agitating the solution over the paper in the tray. After 30 seconds, remove the paper with the correct tongs.
- Fixer: Place the paper in the fixer solution covering the paper, this time with another pair of tongs, gently agitating the tray and paper again. Remove the paper after 5 minutes.
- Rinse: Rinse your test print underwater for a few minutes in a tray.
- Review Test: Remove the paper strips and assess the exposure. You should see 5 different strips, each darker than the last. Select the exposure on your test print that you like the most by counting how many seconds it took to get there. At this point, you can view the paper with the lights on without affecting it. This will be your exposure time for the entire final print.
- Final Print: With the lights turned back off in the room (with only the red or amber safelight on), take out another paper and put it on the easel under the enlarger. Use your time from your test strip for the correct exposure.
- Repeat: Repeat the processing steps for processing your print but for step 8 and then go to the following step.
- Wash: Wash your print under running water in a tray large enough to cover your entire print for 10 mins. Empty and refill the wash water periodically during the process. To avoid damaging the print, don’t let the print be wet for more than 20 mins.
- Drying: Place your wet print face down on a piece of glass, or plexi glass, that is larger than your print. Use a squeegee like this one from FreeStylePhoto over a sink to remove water from the print. Put your photo to the side to dry for and enjoy your first darkroom picture. Some people use drying racks like these or like these on Amazon.com to help dry your prints.
PRO TIP: A vital thing to consider during this process is to be extra careful about contaminating chemicals from the plastic tongs. This can mess up your photo if you’re not careful about this. Mark and designate the same tongs for each specific chemical bath. Also, while rinsing your photo of chemicals, be sure to empty and refill the wash water periodically during the process.
For more information about handling darkroom chemicals and other questions, see other my article called Darkroom Chemicals: Everything You Need to Know.
General Processing Steps for Fiber-Based Paper
Mostly the difference between the two paper types are longer times for each step and the addition of a rinse step of washing before fixing and a step of Hypo-Clear before the longer washing step. Also, fiber-based paper tends to curl while drying so there is an additional step at the end to flatten the paper once it is dry.
- Paper Developer: Measure out how much of the developer you’ll need in a tray to cover the paper. It typically says on the bottle. Place your exposed paper strip into the developer, and gently agitate the solution by lifting the tray up and down a little bit over the paper for 2 – 3 minutes (for fiber-based paper), and watch as your image slowly appears.
- Stop Bath: Remove the paper from the tray of the developer using a single pair of tongs and place it in another tray of stop bath covering the paper. Avoid contaminating the stop bath solution with the paper developer pair of tongs. Once again, gently agitating the solution over the paper in the tray. After 30 seconds, remove the paper with the correct tongs.
- Rinse: Rinse your print under running water for 2 minutes.
- Fixer: Place the paper in the fixer solution covering the paper, this time with another pair of tongs, gently agitating the tray and paper again. Remove the paper after 5 minutes.
- Hypo-Clear: Place your paper in Hypo-Clear solution in an additional tray for 1 – 2 mins with agitation (see bottle for mixing instructions).
- Rinse: Rinse your test print underwater for a few minutes in a tray.
- Review Test: Remove the paper strips and assess the exposure. You should see 5 different strips, each darker than the last. Select the exposure on your test print that you like the most by counting how many seconds it took to get there. At this point, you can view the paper with the lights on without affecting it. This will be your exposure time for the entire print,
- Final Print: The main lights turned back off (with only the red or amber safelight on), take out another paper and put it on the easel under the enlarger. Use your time from your test strip for the correct exposure.
- Repeat: Repeat the processing steps above for your final print except for steps 6 – 7 then go to the following step.
- Wash: Wash your print under running water in a tray large enough to cover your entire print for 30 mins. Empty and refill the wash water periodically during the process. An archival print washer while expensive like this one on Amazon.com, will help when printing several prints at once.
- Drying: The best process I’ve found to dry fiber-based paper is to place the wet print on a piece of very clean (important part of the process) thick glass or plexiglass large and thick enough (6mm) to handle the entire print. Using a rolling squeegee, I roll it over the paper over a sink to squeeze as much water out as I can without pressing down overly hard . Then, I use watercolor tape to hold down the edges of the print to the glass after drying the edges of the glass so the tape will stick. I will lay the paper and the glass sheet flat while the paper is drying to help the paper dry flat. After the paper dries in about 24 – 48 hours, depending on the temperature and humidity of the environment, I use a utility knife the cut the print off of the watercolor tape. Some people use drying racks like these or like these on Amazon to help the prints dry flat.
- Drying Part II: Since it is natural for fiber-based prints to curl when drying, once dry put them under large books to flatten them out. Most photographer will use a dry mount press to “iron” fiber-based prints flat. You can find these for sale on Ebay.com and usually for less money than purchasing new. Squeegeeing prints on glass or a mirror and then letting them dry until they fall away will also help.
PRO TIP: Like with the RC paper process, a vital thing to consider during this process is to be extra careful about contaminating chemicals from the plastic tongs. This can mess up your photo if you’re not careful about this. Mark and designate the same tongs for each specific chemical bath. Also, while rinsing your photo of chemicals, be sure to empty and refill the wash water periodically during the process.
For more information about handling darkroom chemicals and other questions, see other my article called Darkroom Chemicals: Everything You Need to Know.
Making A Color Print vs Black & White Print In The Darkroom
Color printing (also called the RA-4 process) in the darkroom is similar to making a black and white print in the darkroom but there are a few differences you will need to be aware of.
- No contrast control: Contrast control is done with the negative with color printing and correction cannot be done through a series of filters like with making a black and white print.
- The chemistry is different and more toxic than other processes: The chemistry used to develop a color print, which is called the RA-4 process, is different than the black and white process. The chemicals are: color developer, bleach-fix (also known as Blix), wash, and stabilizer and are more toxic for you and the environment. Gloves and a mask is recommended when handling the chemicals and they should never be poured down the drain.
- The easiest way to develop color prints is by an automated machine but it’s possible to do it by hand using a print processing drum or development trays. If using a machine the paper will go in dry and come out dry. These machines can be very expensive to purchase and to maintain so you mostly find them at colleges and universities or community darkrooms. If developing at home then you can develop by using trays or print drums. Developing trays are the most complicated because you have to do the entire process in complete darkness and it takes a lot of chemistry. Print drums (like these on ebay.com) is the other way, and it what I recommend since they don’t require complete darkness for the entire process. Print drums (or tubes) are large plastic tubes that hold the paper and allow you to pour the chemistry in and out. They can either be agitated by hand (with help by a manual roller base like this one on Amazon.com) or by a motorized base. They also don’t use as much chemistry as development trays but generally can’t hold enlarger paper larger than 16 x 20″.
- Temperature is Important: Temperature control, along with agitation and length of time, is crucial when making a color print in the darkroom. Always follow the directions of the manufacturer of your RA-4 chemicals and color enlarger paper, but in general, the chemicals should be kept at a consistent 86°F – 95°F (30°C – 35°C). The color of your prints can change even if the temperature of your developer is off just a couple of degrees so it needs to be as consistent as possible. Keeping your chemicals in the development tray or drum at the correct temperature can easily be done using a heated bath of water in a sink. I recommend using a water heater and circulator like this one on Amazon.com, which makes keeping the water at the correct temperature much easier.
- Color paper is more sensitive to light than black and white paper: Since color paper is sensitive to more of the light spectrum than black and white paper it is more sensitive to stray light. When developing my own color paper, I was careful not to get too close to any extra light in the darkroom including my phone, the color safelight, or the illumination strips on a timer. According to this website, it is recommended to shield your paper from light as you walk through the darkroom to process your paper. Also, if the paper is exposed to stray light and has been fogged, you will notice it as a cyan colored areas on the edges of your paper and in the highlights of your image.
- Color Balance: When making a color print, other than exposure and focus, you are mostly concerned with color control and balancing. This is done with a filter pack of Cyan, Magenta, and Yellow filters either built in or inserted manually into the head of your color enlarger. Changing the value of these filters is what helps balance the colors of your final print. This can be a tedious task but can be helped using special handheld viewing filters that help you evaluate your prints and tell you how much more or less color to dial in.
- Developing a print takes place in either very low light or complete darkness. Since color paper is sensitive to most of the visible light spectrum, developing color prints has to happen in very low light (using a color safelight life this one) or no light at all.
- One-Shot Chemistry. Most color chemistry is one-shot, meaning it cannot be used again and this can make the process expensive.
How To Make A Color Print In the Darkroom
Unlike black & white enlarger paper you only have one choice of paper with color, which is Resin-Coated paper. Generally, this is a good thing since enlarging paper is durable when wet during development, involves few processing steps, involves less equipment, and dries much faster than other types of darkroom enlarging paper. See this article I wrote for more information about different types of darkroom paper.
Setting Up Your Easel and Making A Test Strip
1) Setting Up Your Enlarger: You’re going to want to plug in your enlarger and make sure there are no stray wires in the room. Near your enlarger, make sure to have your paper developer, stop bath, and fixer readily available.
2) Turn on Safe Lights: At this step, turn on your safelight and turn off any other lights in the room. Double-check that there aren’t any stray lights coming into your darkroom. Make sure any holes in the door where light can leak out are covered, and all windows are closed. Even mild exposure can fog your paper with light and ruin the paper (for example your phone), so take caution.
3) Setting Up Film Negative and Enlarger Aperture: For this step, you’re going to take out your developed film negative and place your it into the enlarger. Most enlargers have a film holder/carrier to keep the film from moving. Place your negative in the film carrier with the shiny side up and dull side down (the dull side is the emulsion side) and put it in the correct location for your enlarger. Turn on the enlarger and turn on your focus light; you’ll notice that the image you placed in it is projecting itself onto the baseboard. Once your image is showing, alter the aperture ring found on the enlarger until the image shown is about two levels darker than the lens’ max aperture. For best sharpness, it’s recommended that you set the lens aperture to f/8 or f/11 and focus your image.
4) Image Size: Once you turn on your enlarger and set up your aperture it is time to fit your image on the baseboard and then focus your image. Most enlargers can move the head of the enlarger (where the negative and light is) up and down by turning a knob on the left or the right to make the projected image fit onto the baseboard and the correct section of your paper easel. Some bigger enlargers (like for larger format film) this process is even motorized because they are so big and heavy.
5) Focus: Once the image is the correct size to fit your easel it is time to focus your image. Focusing your image in the enlarger is easily done by moving a knob on the left or the right of the head of the enlarger. This moves the negative closer or further away from the light to focus the image on the baseboard and paper easel. Some like to do this with only their eyes but most photographers prefer to use a grain focuser (like this one or this one from bhphotovideo.com) with magnifies the image to help find the critical focus of the projected image. When using a grain focuser, look for an edge of a part of the projected image that should be in focus according to your negative and use that as your guide to focus your image. During this step, it also helps to choose an aperture on the enlarger lens that lets a lot of light through (like f4 or f/5.6) to make it easier to see the focus of your projected image. After focusing, make sure to set the aperture of your enlarger lens back to f8 or f11.
6) Contrast: Unlike black and white paper, contrast for color printing is determined by the density of the negative.
7) Creating Test Strips: Take out a piece of your photography enlarging paper and cut it into to long strips of paper 1 to 2 inches wide. Choose one strip and put the rest of your paper in the paper safe or a light tight space in the darkroom. Place the strip of enlarging paper you left out and place it on the baseboard of your enlarger and hold it in place with tape or using a paper easel. Set your color enlarger head to the following: Cyan 0, Magenta 50, Yellow 60 as a starting place. Expose your paper strip for 10 seconds. Next, take a card, piece of cardboard, or something thin that light won’t pass through, and cover about 3 – 4 inches of the strip lengthwise. Expose for another 10 seconds and repeat this step until you’ve exposed the entirety of the paper. You should do need to do this approximately 4 or 5 times.
Next, we will process your test strips so we will know how long to expose your color printing paper with the enlarger to make a good exposure and get accurate color.
General Processing Steps for Making A Color Print (RC Paper)
I recommend processing your color enlarging paper using an automated machine since it is the easiest method. However, they can be very large, expensive, and expensive to maintain so if you want to make a color print at home your options is using a drum processor (manual or motorized) or using development trays. If using development trays, this process must be done in complete darkness and there is more of a chance for chemical exposure if not being safe and wearing gloves and an apron. However, if everything required is organized and set up beforehand, the process is not as complicated as it sounds in the dark.
I recommend using a print drum processor because it makes processing easier as well as even across the print. Print drums allow you to develop color prints similarly to the way you develop photographic film. The big plus for me is you don’t need to be in complete darkness for the entire process – just when putting the print inside the print drum. For color chemicals, I also recommend using Arista RA-4 color print processing kit (found here), which I’ll be referring to in this article.
1) Mix All The Chemicals Needed: Mix the amount of chemicals needed for the process in your chemical storage container bottles according to the manufacturers guidelines (the Arista RA-4 kit instructions can be found here). This will most likely be the amount needed for your print processing drum. It should say how much you need on the side of the drum but, in general, follow the amount recommended below in the chart based on your paper drum size, print size, and print quantity.
ROTARY DRUM SIZE | CHEMISTRY SINGLE PRINT | CHEMISTRY MULTIPLE PRINTS |
|---|---|---|
8 X 10″ | 60 ml (2 oz.) | 120 ml (4 oz.) |
11 X 14″ | 120 ml (4 oz.) | 240 ml (8 oz.) |
16 X 20″ | 240 ml (8 oz.) | 480 ml (16 oz.) |
2) Heat All the Chemicals Needed to The Appropriate Temperature. Using a water bath in a shallow plastic bucket (I also recommend using an immersion water heater and circulator for consistency), heat all of the chemicals to the recommended temperature in the instructions using a stainless steel thermometer (like this one on Amazon.com). If the temperature is too high or low, just adjust the temperature of the water bath accordingly and test with the thermometer. Also, make sure to wash the thermometer off with water between chemicals to limit cross-contamination. See the chart below for developing times related to temperature with the Arista RA-4 Kit:
Process at: | 80ºF (26.5ºC) | 85ºF (29ºC) | 90ºF (32ºC) |
|---|---|---|---|
Developer* | 2 min. 25 sec. | 1 min. 40 sec. | 1 min. 10 sec. |
Blix | 1 min. 30 sec. | 60 sec. | 60 sec. |
Water Wash | 1.5 – 2.5 minutes at 75ºF – 110ºF (24ºC – 43ºC) | 1.5 – 2.5 minutes at 75ºF – 110ºF (24ºC – 43ºC) | 1.5 – 2.5 minutes at 75ºF – 110ºF (24ºC – 43ºC) |
*Include time it takes to drain the drum in total process time.
3) Load the Print Drum: After you have exposed your test strip or final paper using the enlarger and in complete darkness, take the lid off of your print processing drum (I recommend doing this before creating your print for easier loading) and place your exposed paper strip into the drum, carefully curling the paper toward the emulsion side and only touching the edges of your paper. Lining the paper up and placing the edge of the paper against the ridge on the inside of the drum. Put the lid back on your processing drum and at this point, you can turn your safelight (or regular lights) back on.
4) Pre-Soak: To soften the paper, limit development streaks and to heat the print tank for more consistent development, pre-soak the print by pouring enough heated water into a container to cover the paper in the development tank.
Process at: | 80ºF (26.5ºC) | 85ºF (29ºC) | 90ºF (32ºC) |
|---|---|---|---|
Developer* | 2 min. 25 sec. | 1 min. 40 sec. | 1 min. 10 sec. |
Blix | 1 min. 30 sec. | 60 sec. | 60 sec. |
Water Wash | 1.5 – 2.5 minutes at 75ºF – 110ºF (24ºC – 43ºC) | 1.5 – 2.5 minutes at 75ºF – 110ºF (24ºC – 43ºC) | 1.5 – 2.5 minutes at 75ºF – 110ºF (24ºC – 43ºC) |
See the chart above – but generally, the amount should be double your paper size (for example, for multiple 8×10″ it would be 120 ml or 4 oz.). Heat it to a few degrees above the desired temperature (see the temperature chart above) using the water bath. Pour the heated water into the print drum and either manually agitate it by rolling it back and forth on a flat / level surface or use the motorized drum base for approximately 60 seconds making sure to rotate the drum completely so the solution reaches the entire print. Use consistent agitation throughout the entire 60 seconds and start the time after you have completed pouring the solution into the drum. With a few seconds remaining, pour the pre-soak water down the drain and do not reuse it.
NOTE: It is important that the rotary drum is level during this process. If not, the water cannot flow evenly over the print.
5) Color Developer: Quickly after the pre-soak water has drained completely from the print drum, measure out the right amount of developer from the container of color developer that has been sitting in the temperature-controlled water bath with a graduate cylinder. Pour the developer into the drum using a funnel and start agitation quickly by either manually agitating the drum by rolling it back and forth on a flat / level surface or by using a motorized drum base making sure to rotate the drum completely so the solution reaches the entire print. Remember to start your timer when all the developer is poured in and after you begin to rotate the drum.
Use the following chart to determine how long you need to develop your print:
Process at: | 75ºF (24ºC) | 80ºF (26.5ºC) | 85ºF (29ºC) | 90ºF (32ºC) | 105ºF (40.5ºC) |
|---|---|---|---|---|---|
Developer* | 3 min. 20 sec. | 2 min. 25 sec. | 1 min. 40 sec. | 1 min. 10 sec. | 50 sec. |
*Include time it takes to drain the drum in total process time.
NOTE: Remember, it is important that the rotary drum is level during development and agitation. If not, the chemistry cannot flow evenly over the print for full development.
With a few seconds remaining of your development time, pour the developer from the drum and into a storage bottle using a funnel. The Arista Color RA-4 kit is made to be one-time use so do not reuse it.
Note: The next solution in the Arista Color RA-4 kit is a bleach and fixer combination solution called blix (in other kits it might a stop bath solution or a water rinse).
5) Blix: After the pre-soak water has drained completely from the print drum a storage container, quickly measure out the right amount of the Blix (bleach and fixer solution) from the container of blix that has been sitting in the temperature-controlled water bath with a graduate cylinder. Pour the developer into the drum using a funnel and start agitation quickly by either manually agitating the drum by rolling it back and forth on a flat / level surface or by using a motorized drum base making sure to rotate the drum completely so the solution reaches the entire print. Remember to start your timer when all the blix is poured in and after you begin to rotate the drum.
Use the following chart to determine how long your print should be in the Blix solution based on temperature:
Process at: | 75ºF (24ºC) | 80ºF (26.5ºC) | 85ºF (29ºC) | 90ºF (32ºC) | 105ºF (40.5ºC) |
|---|---|---|---|---|---|
Blix | 1 min. 30 sec. | 1 min. 30 sec. | 60 sec. | 60 sec. | 50 sec. |
*Include time it takes to drain the drum in total process time.
NOTE: Remember, it is important that the rotary drum is level. If not, the chemistry cannot flow evenly over the print for full development.
With a few seconds remaining of your development time, pour the blix from the drum and into a storage bottle using a funnel. The Arista Color RA-4 kit is made to be one-time use so do not reuse it.
5) Water Rinse: After the blix has drained completely from the print drum and into a storage container, you may take the lid off of the print drum. Measure the water coming from the faucet with the thermomentor (see the chart below for the correct temperature) and let the drum fill up completely and pour it out as soon as is full and repeat the process until the wash time has ended.
Process at: | 80ºF (26.5ºC) | 85ºF (29ºC) | 90ºF (32ºC) |
|---|---|---|---|
Developer* | 2 min. 25 sec. | 1 min. 40 sec. | 1 min. 10 sec. |
Blix | 1 min. 30 sec. | 60 sec. | 60 sec. |
Water Wash | 1.5 – 2.5 minutes at 75ºF – 110ºF (24ºC – 43ºC) | 1.5 – 2.5 minutes at 75ºF – 110ºF (24ºC – 43ºC) | 1.5 – 2.5 minutes at 75ºF – 110ºF (24ºC – 43ºC) |
6) Remove the print from the print drum and dry the print: Carefully, remove the print from the print drum and place it face down on a piece of plexi-glass that is larger than your print. Use a squeegee (like this one from FreeStylePhoto) over a sink to remove water from the print. Put your photo to the side to dry for and enjoy your first darkroom picture. Some people use drying racks like these or like these on Amazon.com to help dry your prints. Let your paper dry completely for evaluating the test strip and color accuracy.
7) Thoroughly wash and dry the print drum: Color darkroom chemicals can easily be contaminated by moisture and chemicals so make sure to wash your print drum very well with water.
8) Evaluate your color print for exposure and color accuracy: See this excellent article on how to evaluate your print for color accuracy.
However, you can generally follow the chart below but do so in 5 or 10 increments to get a worthwhile difference in your print. You may even need to double or triple the amount for more significant changes. Also, be aware that changing your filter points will also affect your exposure so with every change to the filter pack you’ll need to make a new test strip (or print if you’re feeling lucky) to test again for exposure.
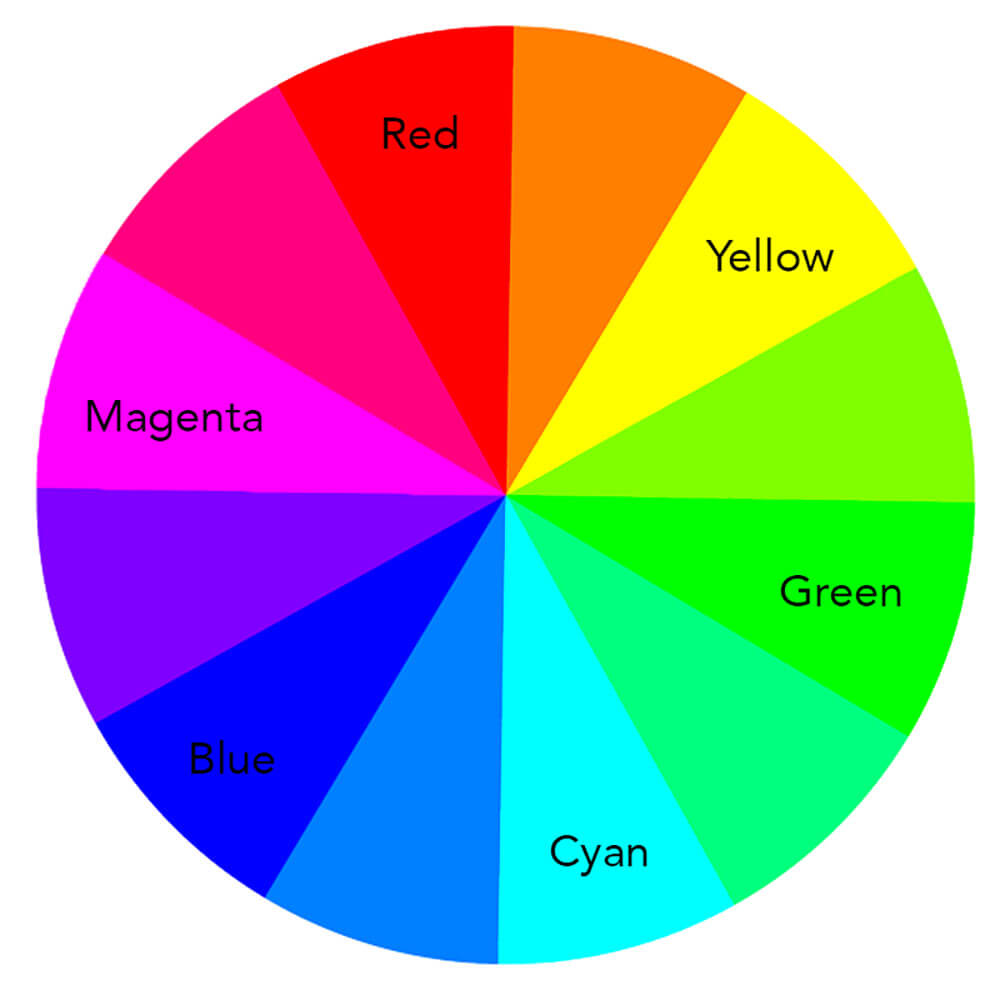
If the print looks too much: | Make these changes to the filter pack on the color enlarger: |
|---|---|
Magenta | Add magenta |
Green | Subtract magenta |
Yellow | Add yellow |
Blue | Subtract yellow |
Red | Add yellow and magenta |
Cyan | Subtract yellow and magenta |
9) Final Print: Once you are ready to make another test strip or your final print, follow the steps for making a test strip above or use the same steps to set up your full-sized print and repeat above steps 1 – 8 to develop your exposure.
PRO TIP: A vital thing to consider during this process is to be extra careful about contaminating chemicals from the plastic tongs. This can mess up your photo if you’re not careful about this. Mark and designate the same tongs for each specific chemical bath. Also, while rinsing your photo of chemicals, be sure to empty and refill the wash water periodically during the process.
For more information about handling color darkroom chemicals and other questions, see my article called Darkroom Chemicals: Everything You Need to Know.
Tips and Tricks for Making Prints in the Darkroom
When you first start working in the darkroom as a beginner, it is natural to have a lot of questions. This is normal! You don’t need to be an expert right away. It will take time to develop these skills and you will learn things along the way. Here a few tips to help you get started:
For Both Color and Black and White Prints
Practice with the lights on: Since photographic film is still sensitive to light when loading onto film reels for development, it is necessary that you do this part of the process in total darkness to not ruin your film. If you have any old or expired film laying around, you can practice this part of the process with the lights on until you feel comfortable doing it in the dark and can do it with your eyes closed. This will help you feel more comfortable with the process and confident going into it as a beginner.
Mix chemicals before you start: You will want to premix your chemicals beforehand. Most of the chemicals you purchase for black and white and color film and prints will need to be mixed to be ready for use. Other chemicals, like Monobaths, where all of the developing chemicals is in one bottle do not need mixing. All of the chemicals and kits will give you precise directions that you will need to follow for mixing the chemicals (for example, the Arista RA-4 kit instructions which can be found here). You will also need storage bottles, funnels, and a good set of graduated cylinders to help measure out all of the chemicals.
Use a gray card for black and white prints: Use a grey card (like this one on Amazon.com) when shooting black and white images. This standard grey color (18% grey) is helpful when determining exposure with your camera but also to determine exposure with your prints. Using this in an image in the same lighting conditions as the image you want to make a print of will help alleviate technical issues relating to exposure and contrast that arise in the darkroom.
Keep a notebook to document exposure and color settings during your process. With all of the settings moving and changing you have a lot to keep in mind so it can of great use to keep a notebook of your print number (and content like who or what is in the image so it can easily found again) and settings used like enlarger exposure time, lens aperture, contrast filters used (if any), color filter pack values used, and printing paper type. Obviously, you can note more things like time of day, humidity, how many prints you made that day, or anything else relevant but those would be the most valuable.
Organize Your Space When Working in the Darkroom. When working in the darkroom, especially with color prints since it has to have very little light or by in total darkness, keep your darkroom organized and free from clutter.
Be aware of Dry Down. When darkroom prints dry they get loose about half of a stop-of-light and some of their “edge”. This is called Drydown. You need to compensate for this when making a print and choosing your exposure time. This is more so a problem with black & white fiber-based prints but can happen with RC paper as well.
For Color Prints Specifically
If you notice color shifts let your color prints sit a minute before processing. If you experience random magenta/green color shifts in your finished print, most likely it can be corrected by allowing the exposed print to sit for one minute before processing in chemicals. This will allow the image to stabilize, correcting any shifting in the mid-tone densities, especially magenta/green.
Keep needed items close when developing color prints. When working in the darkroom, especially with color prints since it has to have very little light or in total darkness, make sure to place needed items near you so you don’t have to move far distances and risk breaking or knocking things over. For example, place the print processing drum next to the enlarger before you make a test strip or final print so it is easy to find and load in the dark after exposing it on the easel.
Use a gray card when taking images. Use a grey card (like this one on Amazon.com) when shooting color images. This standard grey color (18% grey) is helpful when determining exposure and color balance with your camera but also to determine color balance and exposure when printing in the darkroom. Use the grey card by taking an image with it in the same lighting conditions as the image you want to make a print. Since this will standardize the process, the card will help get consistent results if using different color printing paper or using a different color enlarger than usual.
Color filter packs on englargers on not all equal. Not all color enlargers react the same to moving the values on the color filter packs. Some color enlargers require a large jump in value to make a difference while others don’t require as much.
Changing the number on your filter pack will also change your exposure time. Keep in mind that changing the points in your filter pack will change your exposure so you’ll want to make a new test strip to test for color accuracy as well as exposure with every change.
Color filter packs work differently than you may think when printing negatives. When making a print from color negatives the color filter pack works the opposite way you might think. For example, To decrease the amount of magenta in the print, then you need to increase the amount of magenta. This is because you are actually increasing the filtration of the color magenta. If you want to subtract green from the print, since you only have access to three colors with the filter pack (cyan, magenta, and yellow) then you would need to subtract magenta since it is the opposite color on the color wheel.
 about understanding color.
 Use a color print viewing kit to save time and money. If you plan on making a lot of color prints at home then I highly recommend a color print viewing kit. These viewing kits are made of a set of filters that you view your prints through. Once you find the filter that makes your print look the most color balanced then you use the numbers on the bottom to choose the amount of color correction while keeping in the exposure correction. These filters are great because they remove much of the guessing that happens. Make sure to view your print and filters under daylight-balanced lights to get the best results.
Use daylight balanced bulbs or actually daylight when evaluated prints. Because every light has a color it emits (called color temperature), make sure you evaluated your prints under daylight-balanced bulbs (or actual daylight) to get the most neutral light. If you are using a fluorescent bulb (which is a little bit pink) or incandescent bulb (which is very orange) then you may see your print in daylight it will appear either green or blue. I recommend this daylight-balanced desk lamp on amazon.com for evaluating your prints.
Final Thoughts
Film photography can be one of the most inspirational ways to stay motivated throughout life. You will see our world through a different lens and inspire others to reach out and capture their surrounding world. What you capture through the film is uniquely yours. People can see something how you see it, and that is a remarkable thing many of us take for granted. We are allowing others to see through our eyes.
Being able to develop your own film is a skill that takes time to acquire. You will not be a master right away, but the best way to get the process down is by jumping in and doing it. Gather your materials and follow a step by step guide. Don’t ever let yourself stop if this is your passion. Everything you learn will come with time and patience.
Sources:
- https://www.reframingphotography.com/content/printing-color-film
- https://www.shutterbug.com/content/ever-wonderbrhow-ra-4-paper-works
- https://photo.stackexchange.com/questions/70704/how-to-make-color-darkroom-prints
- https://emulsive.org/articles/darkroom/printing/making-colour-prints-in-the-darkroom-welcome-to-ra-4-printing
- https://www.reframingphotography.com/content/color-corrections-darkroom
- Horenstein, Henry, et al. Photography. Upper Saddle River, NJ-United States, United States, Prentice Hall, 2004.