
One of the necessities of shooting film is that you need a darkroom to develop your pictures and make prints from your negatives. One of the best places to build a darkroom in your home is the garage. It has few windows and can be easily cleaned if there are any messes. What do you need to build a darkroom in your garage?
The materials needed to build an adequate darkroom are going to rely on the size of your garage and the volume of photos that will be developed. Compiling all these items can be a pain, but don’t worry. Follow the steps below to make a highly functional darkroom in your garage to develop your images and make photographic prints.
Organize and Clean Dust and Debris Before Beginning
A garage is a place that could be filled with extra furniture or boxes for storage or from a recent (or sometimes not so recent) move. Old couches and boxes should be removed or thrown out to create a larger space. Things like old furniture will throw dust or dust mites in the air and could potentially ruin the chemical baths, film, or your prints. The protection of your chemicals and negatives is paramount at the beginning and delicate stage. Items that should be removed from your garage are:
- Couches – As couches sit, they acquire all kinds of dander and dust. If one is allowed to sit for too long, it could form mold or mildew that will contaminate the darkroom.
- Lawnmower – A large mower will bring in all kinds of dust and grass if it shares the same space as the darkroom. Remove or clean it before returning it to the garage.
- Boxes – Dust will settle on boxes and create problems for the development process.
- Woodworking tools – Anything that brings in or harbors sawdust also will need to be cleaned or stored somewhere else.
Each garage will have a specific kind of problem but, whatever it may be, take the time to clean and remove anything that could hinder the development process. You will be thankful that you did the work now rather than cause problems later on. Using a shop vacuum or broom can help remove all dirt and particles in the area.
Survey and Prepare the Space
As the tools and storage go into their other spaces, take the time to ensure that there is room for everything you need. Moving in items after creating a space by hanging plastic will be a hassle. Fit everything together before you begin to blackout the room.
If there is anything that obstructs the floor, or if the floor is uneven, now is the time to get in there and make it level. Also, ensure the floor is even and, the storage and tables you use are flat and don’t wobble. Chemicals can make tables unsteady due to their liquid nature. Wobbly tables will leave splashes everywhere and can add to messy prints.
The combination of liquid and darkness can be dangerous. While there will be some light, the lack of bright light will cause shadows and gaps in your vision. These gaps can cause accidents to slip and fall or an electric spark that could harm or kill you and the people present. I recommend using an anti-fatigue mat made to keep you from slipping on any spilled liquid like this Rubber Anti-Fatigue Drainage Mat on Amazon.com or an anti-fatigue mat like these, especially if you have concrete floors to keep your feet and legs from getting tired while processing your film or prints.
Use Fans as Ventilation for Fumes
The chemical process used in print and film development is going to be toxic and should not be used unless it is in a well-ventilated area. If you aren’t already familiar, this article I wrote about the toxicity of darkroom chemicals and how to store them will be helpful. Read this article if you are interested in learning to develop film and make prints in the darkroom in a safer and more environmentally friendly
Some think that a standard bathroom exhaust fan can remove all the pollutants but, that isn’t true. Choose a powerful and compact fan for this this reason. If the garage serves a dual purpose, you need a fan that is capable of being moved and stored.
Position the Fan Properly and Keep the Setting Low
A box fan could also work if it is turned on the lowest setting and moves air towards an open window or door. If you are using plastic sheeting to cover the space, a fan could also cause create a hole large enough for light to penetrate the area, ruining your film or prints.
Once the film or prints are hung to dry be aware that if the fan is not on the lowest setting it could cause them to fall and get scratched. A fan turned up on high will suck dust particles and spew them into your work area. This dirt can find its way into lenses and onto negatives causing dust spots on your prints if the room is not cleaned and prepared. Cutting corners at any stage of building the room could ruin the process. The same can be said for allowing the pictures time to dry. Using a fan to speed up the process could destroy the photos. For this reason, it is important to be mindful of how much moving air is introduced in the darkroom.
Some Ideas for Fans
- AC Infinity CLOUDLINE T6, Quiet 6” Inline Duct Fan with Temperature Humidity Controller – This fans is built for small spaces like darkrooms and growing rooms. It also comes with a readout that allows you to alter the temperature, just like the thermostat in your home. The great thing about the AC Infinity is that it can be chained with other models to cover larger spaces. That means that you can expand your darkroom and keep the same fan setup you had in the old one. You will also need Flexible Ducting like this on Amazon to help direct the air.
- Hihone 12″ Utility Blower Fan – If making the room clear of fumes is going to take a larger machine with more power but with low noise, the Hihone is the fan you should be looking for. It comes with extra ducting that allows the user to vent the fumes safely away from the area. If you need more ducting than what it comes with, than I suggest purchase more like this from Amazon.com. This fan is great for the garage darkroom as it can be stored away under a shelf or cabinetry and give back needed space in the garage when not in use.
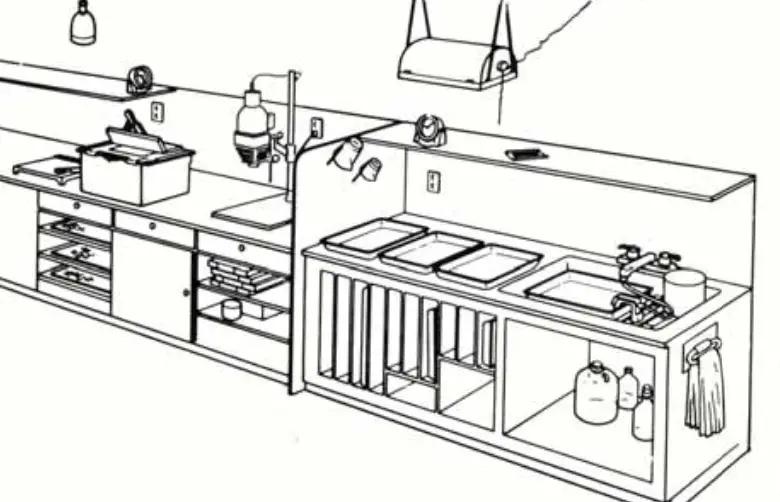
Install A Storage Space in the Area
When you moved in your equipment in the darkroom space earlier, you should have a flat table with drawers or something similar to store everything in. Here are a few tips for what to build or what to look for when purchasing:
Keep Film in Drawers, Away From Light
Having solid drawers will keep the light out during the moments before the room goes dark. Any light will ruin the film, and having ways to protect your exposures from light is the most crucial part of a darkroom. A drawer is excellent for this because it doesn’t use up any extra space while hiding under the lip of the table. Once it is shut, no light gets in.
Store Chemicals in a Safe Place
The solutions used to develop and process film is going to need a flat place to rest when using and somewhere to be stored. Moving around in the dark with dangerous chemicals at your feet isn’t a good idea. Use the space or compartment under a table to store your fluids. If you have access to the entire garage, this may not be an issue. Keep the area around the storage space clear from items that could cause a slip and fall.
Find a Level Surface for Developing Trays
The trays that hold the solution during development need a flat and level place to rest. The top of the table should have no extra holes or indentions. Once the fluid is in the trays, they need to remain in place until the process is over. A flat table ensures the pictures are appropriately covered in the required amount of liquid and will develop as intended.
Recommended Solution
This kitchen island on Amazon.com is a great choice. Locking casters on the bottom make it movable and storable, if you need to move it out of the way. The doors and drawers allow for storing of chemicals and extra rolls of film, it has shelves inside that are movable, and it includes a towel holder in case you spill any liquids.
Cover Windows with Fabric of Plastic
Making a darkroom in your garage hinges upon your ability to make the room as dark as possible. Light reacts with the film and photographic paper and could ruin the film, and there is no way fix it after the fact.
Create a space that is as close to complete darkness as you can get. You will add lights later, but there are still parts of the process that require total darkness like developing film. A garage typically won’t have that many windows.
- If you are using the entire room, use heavy fabric or thick black plastic to cover any openings. Cut pieces of plastic just larger than any windows and secure them with opaque strong tape like this black gaffers tape available on Amazon.com.
- If you want to only use part of the room, drape the area as the whole with thick black plastic like this found on Amazon.com and use black heavy-duty duct tape to secure it to the frame. Use firm pressure on the tape as you need the tape to stick for a long time. If the darkroom is going to be used long-term, the best option is to use thin plywood sheeting to cover the windows.
Is Your Darkroom Dark Enough?
An excellent way to tell if the room is dark enough is to sit in it for about 20 minutes and let your eyes adjust. Hold up a light-colored object or sheet of paper if you have it, and if it is visible, the room isn’t dark enough. Go back and check around windows and doors to seal off any light sources. Repeat the test as much as needed to make the room light-tight.
Another way to test your darkroom is dark enough for making prints is with all of the lights off (even the safelight) to put a fresh sheet of darkroom enlarging paper with the emulsion (or light-sensitive) side up in the middle of the room you want to use a darkroom. Put something on it that covers the paper (for example, your keys, batteries, or think paper). Let it sit for at least an hour in your darkroom with the lights off. After the hour, develop the sheet of paper using the right process depending on your paper type (RC or Fiber-based paper for black and white development or color paper). If you can see the outline of the object or if the paper darkens in any way, then you need to make your darkroom more light-tight.
I recommend this opaque thick 6mm high-quality black plastic sheeting available on Amazon.com that is perfect for darkroom windows and doors. This roll makes it easier to roll out and cut the sections that are needed for covering the walls and door.
Divide the Room Into A Dry And Wet Section
Keeping the chemicals out of each other’s way is going to be the name of the game when creating a darkroom.
When you set up the room, make sure that there are sides for the enlarger (Dry) and chemicals (Wet).
Keeping the enlarging equipment on the side of the room with electricity is also a good idea and not mixing with the chemicals—that way, none of the electronic equipment can be ruined with liquid.
The main reason for the separation is to protect the user from electrocution. The chemicals used to develop film are highly conductive and, a frayed wire or faulty socket could mean electrocution or death. Also, the surge of water on electricity could fry any of the components that you are using to develop.
Power and water are essential parts of the development process, and their reliability needs to be checked at this stage. Dirty water will mean that contaminants get into the solution and ruin the pictures. Likewise, electricity should be stable, and the proper outlets like surge protectors or GFCIs (which means Ground Fault Circuit Interrupter, these outlets will break connection if electrocution is about to happen) should be installed.
Getting Gear For Your Garage Darkroom
Both sides of your darkroom will need to be outfitted with gear specially designed for developing film. Check out the lists below for an inventory of what you may need and where to keep it. I’ve also provided links to the products I recommend on Amazon.com to make it easier for you.
Equipment for the Wet Side of the Darkroom
- Film Clips – These could be swapped for clothespins, but having a nice set of steel clamps works best for your longer rolls of film. One of the best places to hang drying film or prints is over a bathtub or sink to catch the drops of water.
- Film Developing Tank – This Paterson film developing tank and reels set is a great option for developing film. The plastic reels can take either 35mm or transform to accommodate the larger medium format film. The tank can handle two reels of 35mm film or one reel of medium format film. If you are more interested in medium format film then I suggest also purchasing this larger Paterson developing tank on Amazon.
- Tongs – A set of tongs will be needed to move the pictures from bath to bath. This handy set by Zuma comes with pre-colored sections that will keep you from cross-contamination during the process, which can ruin all the pictures and mean a restart of the entire process.
- Chemicals – Kodak and Ilford both make excellent black and white film developing chemicals (Developer, Stop Bath, and Fixer) that can also process paper prints. The Ilford link above is for a starter kit that can do two 35mm rolls but you can find the chemicals separately here if you want to process more film: Developer, Stop Bath, Fixer. For Kodak, the chemicals are as follows: Developer, Stop Bath, Fixer. CineStill also makes a monobath for developing black and white film (found on Amazon.com here). This means all three chemicals needed for development (Developer, Stop Bath, and Fixer) are mixed into one easy solution, though you will still need chemicals to develop the paper prints correctly.
- If you are interested in developing color film, the company Unicolor makes a set of chemicals that contain all the chemicals you need if you want something more advanced than black and white film. See this guide I wrote about how to develop color film at home using this specific kit.
- If you are interested in developing color film, the company Unicolor makes a set of chemicals that contain all the chemicals you need if you want something more advanced than black and white film. See this guide I wrote about how to develop color film
- Hypocheck – Since fixer can be reused in the black and white development process, this product is useful because it lets you know if your fixer has exhausted.
- Trays – Paterson makes some of the best darkroom equipment on the market. This set of three gives you the spots you need when bathing the negatives and photos. They are color-coded so that you can remember which solution goes into which tray. I recommend getting an extra set for the final step of the process of washing the prints and for the extra trays of chemicals if you are using fiber-based photographic Darkroom paper.
Related Article: Photographic Darkroom Paper: A Complete Guide
- Funnel – You will need a way to transfer chemicals from storage to use and back again. Funnels help make things less messy. For example, specific chemicals used during the development process can be returned to their storage bottle (or an additional bottle for organization) and be reused. This would apply more specifically to the stop bath and fixer. and will help save money in the long run.
- Storage Bottles For Darkroom Chemicals – You will need bottles to store development chemicals once they are mixed. Most darkroom chemicals instructions want you to make 1000 ML (roughly 1 US Quart) so I also recommend looking for this size. I recommend glass bottles like these on Amazon.com but any kind of glass or plastic opaque bottles will do. The key is to make sure they are large enough to hold enough chemicals to fill your developing tank or trays but small enough to handle without being too heavy.
- Thermometer – You will need a thermometer to measure the temperature of chemicals when mixing them and processing them. Your thermometer needs to be stainless steel or glass so it doesn’t retain chemicals over long-term use. I prefer metal thermometers since they aren’t as breakable as glass.
- Graduated Cylinders – I recommend this kit of plastic graduated cylinders. You could also you glass cooking measuring like this Pyrex set on Amazon.com. However, it should only be used for measuring chemicals and nothing more.
- Print Squeegee – After your print is made in the darkroom, you will need to squeegee some of the excess water out/off of the print over a sink. I recommend purchasing some plexiglass like this clear 12-inch x 12-inch by 0.5-inch thick piece of plexiglass on Amazon.com.
- Apron – Since some of the chemicals in the darkroom can damage clothing, a water resistant apron is a great idea. I recommend one with pockets for storage.
Equipment for the Dry Side of the Darkroom
- Safelight – This safelight is red and supports black and white darkroom paper while keeping the darkroom free of dangerous white light (amber can also be used with black and white prints).
Related: Why Are Darkrooms Red?
- Grain Focuser– A gain focuser will help you focus your image on your enlarger when it is too hard to see. You can also use a common magnifier (like this one on Amazon.com) if you don’t want to purchase a grain focuser.
- Timer – During your film developing process each of the chemicals will need to be exposed a specific amount of time depending on the temperature of your chemicals and water, your film, and if you are pushing or pulling the film. This timer is helpful so you don’t forget how much time has passed. Also, each of the prints will have to spend a certain amount of time under the light of the negative enlarger in the darkroom. This timer has a place to plug in your enlarger and will turn it off when it reaches the end of the countdown. It also glows in the dark but not enough ruin your prints.
- Easel – I highly recommend purchasing an easel to go along with your enlarger when making prints in the darkroom. These are great for cropping your images while printing and keeping your paper from moving during the process. You can usually find a better deal on used than buying new. I prefer buying darkroom easels on ebay.com.
- Paper Safe – This is a light-tight box that keeps your paper safe from being exposed to light in the darkroom. This is especially important if you have lighting switches in your garage in case someone turns them on accidentally and ruins your pack of paper.
- Black and White Darkroom Paper – Don’t forget darkroom paper for your darkroom. There are several companies that make photographic darkroom paper but I recommend using Ilford. This is photographic paper that is sensitive to light (except amber and red safelights) and designed to create black and white prints. There are many surface textures available matte to glossy as well as different base types including Resin-Coated and Fiber-Based. For beginners, I recommend using RC paper (resin coated) over FB (fiber-based) paper.
Related Article: Photographic Darkroom Paper: A Complete Guide
- Color Darkroom Paper – If you want to make color prints, the base is the same for color darkroom paper (resin-coated) so you only need to choose between the sheens (for example, matte, semi-matte, satin, pearl, semi-gloss, and glossy, etc). I suggest that you use this 8×10″ glossy color enlarging paper from Fujifilm for starters.
- Negative Enlarger – This machine is what shines light through your negative to enlarge the image on your film negative onto a piece of photographic darkroom paper that is developed in the darkroom. We will discuss these down further.
- Contrast Filters – These filters go into your negative enlarger and either add or lessen contrast in your images when projecting them onto photographic darkroom paper.
Research Which Items Are In Your Price Range
The main thing to keep in mind when starting the search for gear is your price range. Some enlargers and darkroom kits can become very expensive. The most expensive part of the build will be buying equipment for the dry side of the room. Enlargers can cost upwards of $1000, but they can also be found secondhand much cheaper. All the other items can be bought secondhand at a considerable discount if you search for them enough.
- Look for used equipment online. Check around on Craigslist, Facebook Marketplace and LetGo for used camera equipment that will save you money. Buying second hand isn’t a bad idea for someone who is just starting out, especially if you aren’t sure you want to pursue the hobby for very long.
- Check online retailers. The large online superstores have great photography sections that give you access to any product on the market. The range of products and prices they have available makes film development a cheap alternative in some instances. Take the time and get specific with the search to find the best deals. The more money you save on chemicals, the more money you can spend on something else, like an enlarger or lenses.
- Find student-owned equipment. An excellent place to look is on a college campus towards the end of the term. There are always some young photography students going home for the summer that will have darkroom equipment that they need to get rid of.
Purchase An Enlarger For Development
A negative enlarger is a machine used to cast the image taken from the film onto larger sheets of paper that are then processed by chemicals. It uses a tiny light to shine the image from the negative through a lens to focus it and onto light sensitive photographic paper. It also makes the small image from the negative larger, this is why it is called an enlarger. See a few recommended new enlarger models that each include a lens, lensboard, and negative carriers.
- Beseler Cadet II model – This enlarger model from Beseler available on B&H. com is great for the beginner. It is compact so it is a great option for a small darkroom in a garage or bathroom. This model is only for 35mm film size but can print up to 8×10″. It also includes a lens, lensboard, and negative carrier (which is where you put your film negatives).
- Beseler Printmaker 67 – This model of enlarger available on B&H.com from Beseler can print from 35mm and medium format negatives while producing up to 11×14″ prints. However, it can print larger if set up properly. It is compact so it is a great option for a small or portable darkroom in a garage or bathroom. It also includes a lens, lensboard, and negative carrier (which is where you put your film negatives).
- Beseler 6759K Printmaker 35 Enlarger with Lens Kit – This negative enlarger is one of best sellers on Amazon.com and can make prints from black & white 35mm negatives and be upgraded via a kit to handle medium format negatives. It is compact so it is great for smaller darkrooms and can be easily assembled for storage for use in portable darkrooms. It can make prints up to 11×14″ and larger prints by reversing the column and projecting the image onto the floor. The focus knob can also be set up for either the left or right side for convenience.
Chemicals: Purchase a Darkroom Kit
A darkroom kit is a pack of chemicals that you use to develop your film. Each type must not be mixed, or the results of the photographs could be in question. Using a darkroom takes time, and this time should be spent ironing out the kinks in your development process. As the process becomes familiar, taking chances with the solutions can provide effects that most digital photographers will find hard to duplicate.
All the chemicals should be handled with care, and the appropriate protection should be worn at all times. Doing this will keep the chemicals from becoming too toxic.
There are three basic types of darkroom chemicals, and they are: the Developer, Stop Bath, and Fixer. These three chemicals are used for both developing film (mostly by using a light-tight film developing tank) and developing photographic darkroom prints in the darkroom.
For developing film in a light-tight tank (like this one on Amazon.com) your chemicals will be poured in for a specific amount of time and them dumped out either in the sink or back into a storage bottle, followed by a water rinse.
For developing paper prints in the darkroom, these chemicals will go into trays where the paper exposed by light from the enlarger will be transfered from one tray to another in the order of developer, stop bath, and fixer. After this there is another tray of running water to help wash away excess chemicals, however, there may more steps depending on the type of darkroom paper you are using (for more information about darkroom paper, read this guide about darkroom papers I wrote). A good idea is to pair a specific set of tongs with the appropriate chemical. Cross-contamination of chemicals can ruin the film and paper prints.
One of the best innovations of the photography world is making the chemicals available in a set for newbies and younger enthusiasts. These darkroom kits will supply the student with everything they will need to develop their film. This set of chemicals can be hard to find if you don’t know what you are looking for, and selling them all together makes it cheaper.
- The Paterson Company makes a great set of darkroom chemicals and implements available on the B&H website. This starter pack includes everything you need to develop your own black & white film include the film tank and reels, all the chemicals, graduated cylinders, and film hangers.
- CineStill also makes a starting kit for developing black & white film. This kit includes the developing tank and reels, chemicals (monobath), and can develop up to 16 rolls of film.
Find a Safelight for the Room
While developing film begins in the dark while loading your film into the development tank, there is a light that can be used without overexposing your darkroom paper. This light is called a safelight because it is a light that is safe to use in the darkroom and is either an amber or red light. For more information on safelights and why you can use either amber or red and not ruin darkroom paper, read this other article I wrote.
These lights won’t be found in the lighting section at Walmart or the local hardware store. Search for them at sites like Amazon or eBay. I recommend either using a lightbulb rated for safelight use (like these that can fit in any lamp) or a dedicated darkroom light (like this one or this one on amazon.com). Here are a few tips when using a safelight:
- Make sure the safelight is close to power. The light should be hung somewhere that has a nearby cord or switch. Fumbling around in the dark could mean disaster around this many chemicals and moisture.
- Make it easy to get to. You want to be able to access it easily to so that nothing happens to your prints during the development process.
- Store it when not in use. Keeping your paper inside a paper safe (like this one on Amazon.com) or darkroom bag until the red light comes on is a safe move that protects the paper before use.
Ideas for Darkroom Upgrades
Once the items are in place and the room is operational, it could be time to think of ways to improve it. A few ideas for upgrades to your darkroom are:
- Sink – A sink on the wet side of your darkroom could be a lifesaver. Your own dedicated sink could also be helpful when developing your film because you’ll need the running water as well as catching the water drops from drying film negatives or prints. It will also be helpful when mixing your developing chemicals since most of them will need to mixed with water to be ready for use.
- Drying Cabinet – A drying cabinet for hanging and drying negatives or prints after they are processed can also be handy, especially if you don’t have the extra bathroom space. They are usually enclosed so dust and dirt don’t get on the negatives while they are drying.
Conclusion
Building a darkroom in your garage can be a cheap and easy way to develop your own film in a convenient way. Digital photography has dominated the landscape for so long that many younger photographers choose to develop their own film to have an edge in their work.
Keep the above tips in mind when creating a space to develop your own film. The main thing is to have fun while learning this process.