
Film photography has had a resurgence in the last few years. For me, part of the fun of film photography is developing film at home because you can save money and it can be fun and easy. Once you view your negatives after developing the film by yourself at home or getting your film develop at a store or online, it can be hard to diagnose problems if you are new to the process or if you come across something you haven’t seen before.
When developing film you may run into some surprising problems and you may have questions. The top 26 film developing problems are:
- Why Is My Film Clear?
- Should My Film Be Blurry?
- Why Did My Film Come Out Black?
- Why Is My Film So Grainy?
- Why Is My Film Green?
- Why Is My Film So Foggy or Hazy?
- Why Is My Film Underexposed?
- Why Does My Camera Film Have Light Leaks?
- Why Are There Horizontal Scratches On My Film?
- Why Are There Streaks On My Film?
- What Is Heat Damage And How Did My film Get It?
- Why Are There Spots On My Film Negatives?
- What Are These Half-Moon And Crescent Shapes On My Film?
- Why Are There Water Spots On The Film?
- Why Are There Clear Or Opal Patches On My Image?
- What Is A Weak / Thin Image?
- Should My Film Be Blank?
- What Are These Clear Circular Spots On My Developed Image?
- Why Are The Sprocket Holes Are Torn?
- Are Fingerprints On Negatives Bad?
- Why Is There Streaking Coming From The Sprocket Holes?
- Why Is My Development Uneven?
- Why Does It Only Show Part Of Negative And Black Bar On The Rest?
- Why Is My Image Crinkled Or Cracked?
- Why Is My film So Dark And Contrasty?
- Why Is My Film Cloudy / Milky?
To help, below I’ve compiled a list of the most common problems when developing film. Keep reading to find out what each problem looks like, information on the possible cause, if it can be fixed, and tips on how to prevent the problems from happening in the future.
1. Why Is My Film Clear?
When your film comes out clear, there can be several things that have happened. It can help to narrow down the cause by looking for numbers & information along the edge of the film. These marks are exposed to the film at the factory by the manufacturer and will appear if the film is developed correctly.
What it Looks Like:
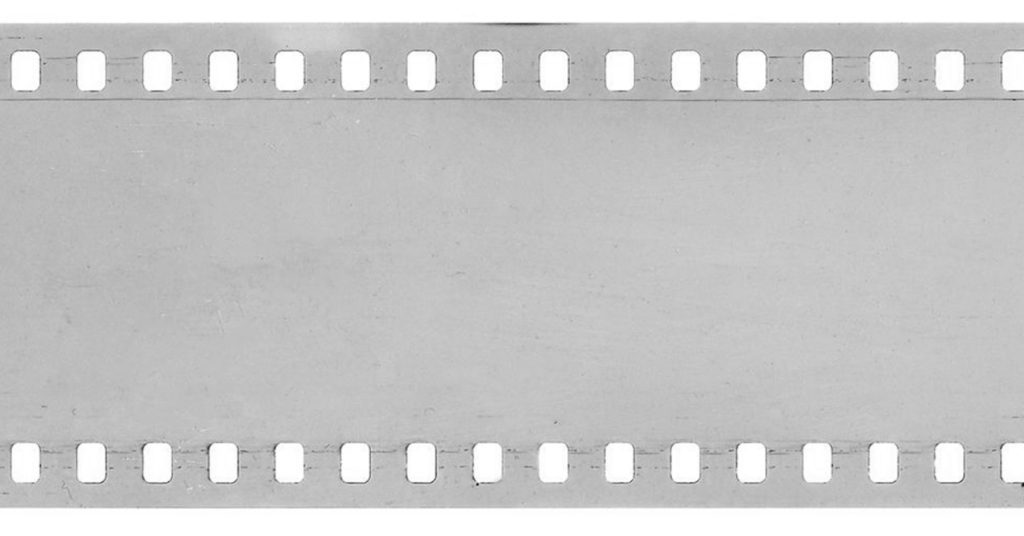
If No Numbers & Information Along the Edge Are Present
The film is completely clear with no image formed and no numbers or information along the edge.
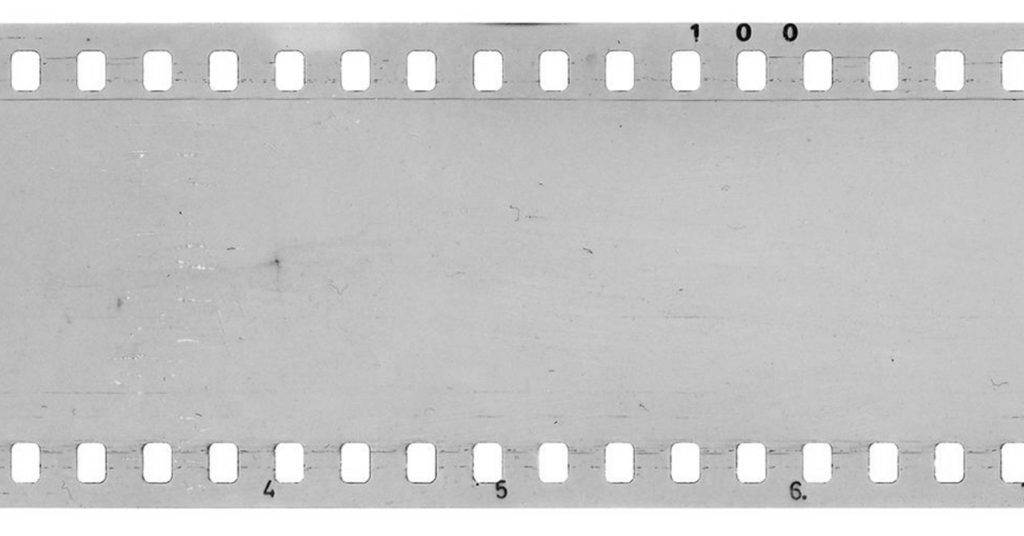
If Numbers & Information Along the Film Edge Are Present
The film is completely clear except for the markings of numbers and information along the edge.
The Cause:
No Numbers & Information Along the Film Edge Are Present
Since there are no markings along the edge of the film, this means it was a development issue. Most likely the fixer was poured in before the developer chemical during the development process, the developer wasn’t used at all, or the developer has gone bad and/or exhausted. Another possibility is the developer time was miscalculated (for example, the film needed to be in the tank for 15 minutes but only received 1 – 2 minutes).
Numbers & Information Along the Film Edge Are Present
Since the markings are present on the film, it is most likely the camera is at fault or the film wasn’t loaded correctly. It could be the camera did not wind the film back correctly or the shutter is malfunctioning (jammed or inconsistent).
It could also mean the lens cap was on when shooting the images or the meter does not work, or the entire roll of film was severely under-exposed, so no light hit the film (for example, 1/500 shutter speed in a very dark room).
How to Fix It:
Unfortunately, there isn’t any way to fix this once it happened in both instances.
Is it Preventable?
No Numbers & Information Along the Film Edge Present
Make sure to follow the correct film developing process. I recommend using a guide like the one below to follow when developing your film to limit mistakes when developing film:

Numbers & Information Along the Film Edge Are Present
To prevent this from happening in the future, make sure your camera is working correctly before taking shots and that you’ve loaded the film correctly into your camera. I recommend testing the shutter before putting film into a vintage camera by running film through it and developing it to check for inconsistencies.
I also recommend making sure you take the lens cap off before taking an image (it happens to the best of us!) and making sure your exposure matches your environment.
2. Should My Film Be Blurry?
What It Looks Like:
The main subject in your image is out of focus or looks smeared across the film. Nothing is in focus and it is hard to make out the intent of the image. The main subject in the images is a running pet or toddler (this is from experience!).
The Cause:
The cause of a blurry photo could fall into two categories: the camera settings or processing the film.
The camera could have been out of focus and/or the shutter speed of the camera wasn’t fast enough to capture the moving subject. It also could have been not a high enough f-stop or aperture (f1.8, f2.8, f4, f5.6, f8, f16, etc) for your main subject to be in focus. Motion blur is obvious streaking of your subject in your image caused by the movement of the subject and/or your camera.
It could also happen during development if the chemicals were not agitated correctly or the film was lightly exposed to light before the fixer stage.
How to Fix It:
Unfortunately, there is no way to fix this after the image is taken.
Is it Preventable?
To prevent this from happening in the future with your images, choose the correct camera settings.
- Setting a higher shutter speed (1/500th or faster) for fast-moving subjects.
- As a general rule, your shutter speed should be the same or set at a higher number than your focal length to reduce motion blur. (e.g. if you have an 80mm lens then set your shutter speed at least at 1/80s).
- If you choose a fast shutter speed you will need to let more light into the camera by taking images outside with more sunlight or you will need to compensate with your ISO or aperture by either a faster speed film or choosing a larger aperture. I recommend using a 400-speed film (vs 200 or 100-speed film) so your camera will need less light.
- Choose a higher f-stop or aperture (f1.8, f2.8, f4, f5.6, f8, f16, etc) to have more of the main subject in focus.
- Use a tripod or hold your camera correctly to reduce camera shake.
- If you don’t have a tripod one of the best ways to hold your camera more steadily is to use the hand-grip on the side of your camera with your right hand and place the camera body or lens in your left hand while squeezing your elbows against your body for support. Stand with your feet shoulder-width apart or with your feet slightly in front of each other to help balance yourself. I also recommend leaning against something very stable like a wall or car.
If you believe the problem happened during processing, then it is most likely due to little or no agitation. It could also be the film was lightly exposed to light before the fixing stage.
- Make sure to agitate your film correctly during film development based on the manufacturer’s guidelines. This is a great general tutorial about developing film.
- If you follow this link, step 5 talks about agitation. Also, watch this helpful video about how poor agitation can affect your film.
- Make sure you don’t open the back of your camera until your roll is finished to keep it from being exposed to light / fogging and turning green. Also, make sure your developing tank is tightly sealed when processing your film.
3. Why Did My Film Come Out Black?
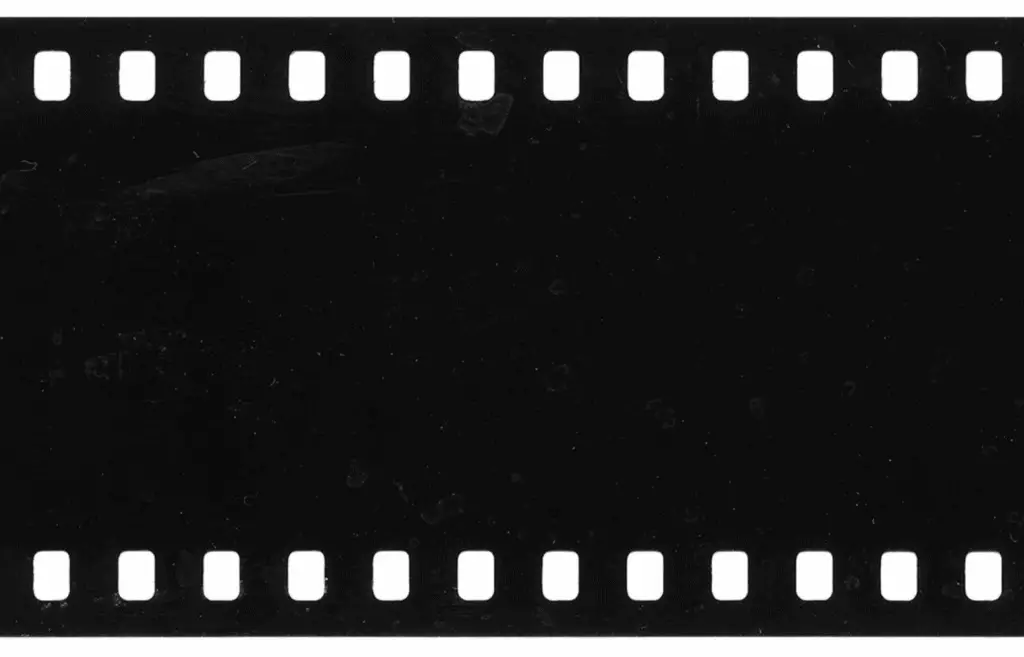
What it Looks Like:
The film is completely black to the point there are no identifying edge marks (e.g. the numbers or the manufacturer’s name).
The Cause:
The film was fogged (exposed to light) by light and/or exposed to light before or during development.
How to Fix It:
Unfortunately, there is no way to fix this once it is done.
Is it Preventable?
The good news is this is preventable in the future. Follow these guidelines to prevent film fogging:
- Don’t load and unload your camera film in direct light.
- Store your undeveloped film out of direct light and in a cool, dry place.
- Make sure you load the film in your camera correctly and is light-tight. You can test out how light tight your camera is putting a piece of darkroom paper in the camera where the film should go, close the back, walk around outside in bright light, and then develop it to see if it has any light leaks.
- Make sure to load your film tank in complete darkness and the lid is tightly sealed. Avoid even a little bit of light coming under or through the cracks in a door.
- Measure out your chemicals correctly according to the manufacture’s instructions.
- Measure the temperature of your developer with a thermometer to get the appropriate development time. See this website for information about film development times. Choose your film and developer to see dilution ratio, what temperature works best (68 F is generally what to aim for how, and long to develop (generally 7 – 10 minutes).
4. Why Is My Film So Grainy?
What it Looks Like:
Graininess in images refers to the visible silver crystals on the film and is related to how sensitive the film is to light.
The Cause:
The first cause could be your film is rated is high like 800 or 3200 ISO. Higher rated film by design has higher grain because these films contain more of the light sensitive material.
The second cause could be you are underexposing your image. This means less light is reaching the negative so more grain will show up in the shadow areas. It is also possible your film is old and/or expired and it needs more light than more “fresh” film.
How to Fix it:
You cannot fix too much once the image is taken or developed because the grain is a part of shooting film (some photographers prefer the look of grain in their film because it appears authentic, gritty, and real), especially with black and films.
However, you may be able to smooth out the grain if the negative is scanned and opened in a digital image editor like Adobe Photoshop or Lightroom.
Is it Preventable?
The good news is this is preventable. If you don’t like grain and prefer the cleaner look of low ISO rated film speed (also known as tighter grain film), then I recommend using 100 or 200 ISO rated film. I recommend using 400 ISO rated film since it is the best compromise between light sensitivity and low grain.
If the problem is related to underexposure, check that the light meter on your camera is working or consider using a camera with a working light meter. Always make sure you match the ISO setting on your camera to the film you are using. In addition, you could overexposure your film by 1-Stop (this is a good article explaining stops of light in photography if needed). This will make sure your film receives enough light for details in your shadows but won’t overexpose your film to the point of losing detail in the highlights.
If you are shooting expired film (color or black and white) the general rule of thumb is to overexpose it 1/2-stop per decade it is expired (this is a good article explaining how overexposure effect color film). If you don’t know how it was stored assume it wasn’t kept cold in a fridge (especially for color film) and out of direct sunlight. Also, keep in mind that color film is more susceptible to bad storing conditions than black and white film.
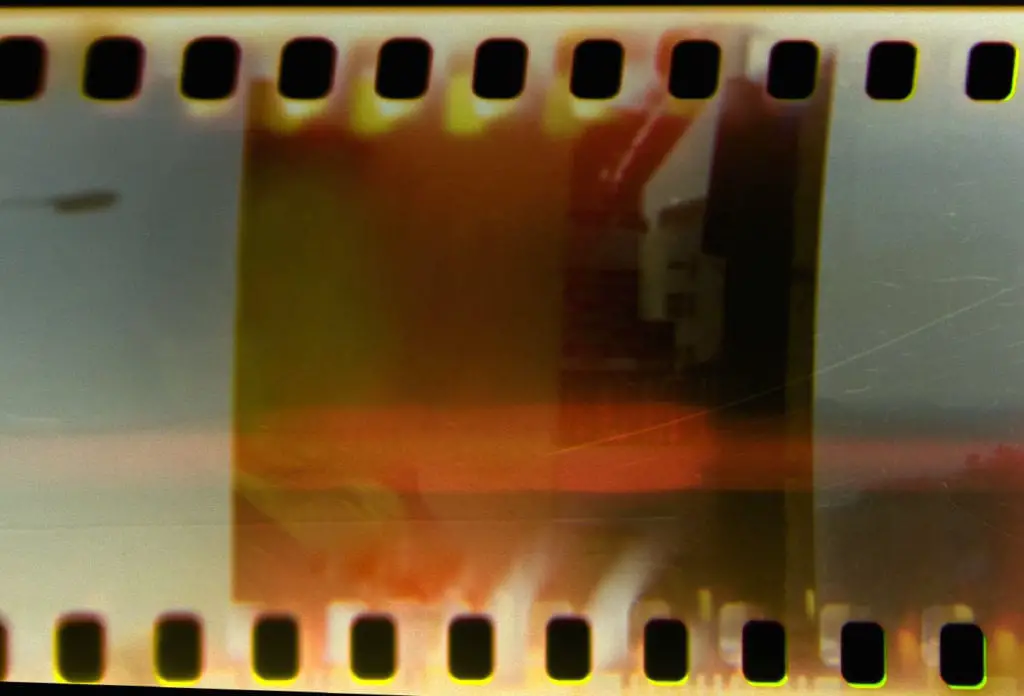
5. Why Is My Film Green?
What it Looks Like:
Your film has a green tint across the entire roll.
The Cause:
This can have several causes and most likely has to do with color film. It could have been caused by expired / improperly stored developing chemicals, the film might have been exposed to light (fogged) while in the camera or when developing, or the temperatures of the color chemicals (C-41) were too high during development. If the film was old or expired it probably wasn’t stored in a cool environment with consistent temperatures. If the images were scanned and they are green then the problem lies with improper color correction.
How to Fix it:
Unfortunately, this cannot be fixed on the film.
However, if the film was scanned and green then it can easily be fixed in an image editor like Adobe Photoshop or Adobe Lightroom. The easiest way to remove the orange color cast is to use Adobe Photoshop and the curves adjustment layer. I use landscape photographer Alex Burk’s method to great success and I can’t recommend it more.
Is it Preventable?
Luckily, green-tinted film is preventable. See the following list for how to prevent the problem in the future:
- Check to see the color of your developer. If it has turned yellow or black then it probably has expired or become exhausted (lost the ability to develop film).
- Properly storing your developing chemicals according to the manufacturer’s guidelines will help them last longer.
- Make sure you don’t open the back of your camera until your roll is finished to keep it from being exposed to light / fogging and turning green. Also, make sure your developing tank is tightly sealed when processing your film.
- When developing your color film at home, keep the temperatures of the color chemicals (C-41 process) within the manufacturer’s guidelines and consistent.
- If the film is old or expired it is hard to know how it was stored. So old or expired film can be fun because you aren’t sure how they will turn out!
- If your scanned images have a green tint, then the problem lies with the digital color conversion. See how to fix and/or prevent this above.
6. Why Is My Film So Foggy or Hazy?
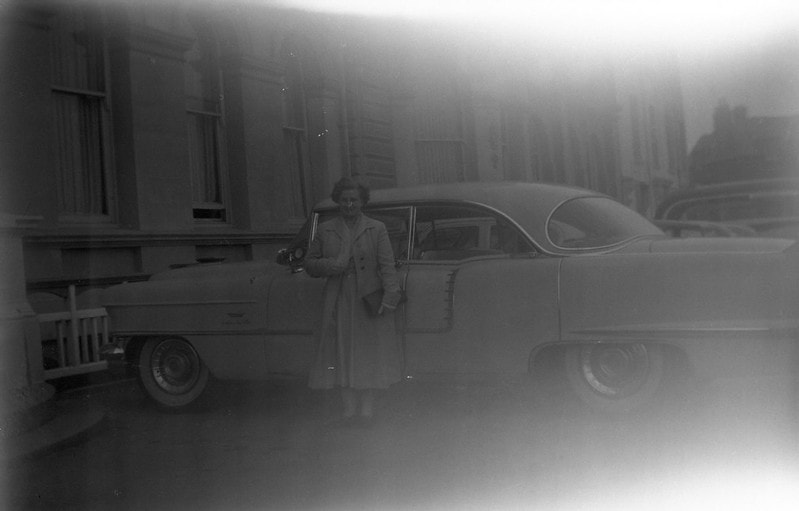
What it Looks Like:
The film has a gray fog and/or haze all over the film or on large parts of the image. The film has very low contrast with little to no detail in the shadow area or highlight areas.
The Cause:
There are several reasons why the fill was fogged.
- The film was fogged (exposed to light) either before or during the development process. This also could have happened while loading the film in the camera, if the film door was accidentally opened mid-roll, or when loading into the development tank. It could also mean your development tank wasn’t light-tight.
- It is also possible that your film is suffering from heat damage / direct sunlight or you are using old or expired film where you didn’t know how the film was stored.
- Another reason your film is foggy or hazy is it could have been overexposed (saw too much light) and underdeveloped (not long enough contact with the developer chemical).
How to Fix it:
Unfortunately, there is no way to fix this but it could be minimized with image editing software like Adobe Photoshop or Adobe Lightroom.
Is it Preventable?
The good news this is preventable. Follow these tips:
- Load your film in a development tank in a completely dark room with no light coming in under or around the door.
- Check to make sure your development tank is light tight and secure after loading your tank with film
- Make sure not to open the camera mid-roll and accidentally expose your film with light. I recommend using either black electrical tape or black gaffer’s tape like this to tape around the film door to block light any extra light.
- Store your film correctly – out of direct sunlight and heat
- If the film is old film or expired it is likely you don’t know how it was stored so be aware of the possibility of damaged film.
- If your film was overexposed and underdeveloped use a light meter when shooting to get the correct exposure and make sure to develop your film when processing for the appropriate amount of time. Follow the manufacturer’s instructions or see this website for information.
***If you are shooting expired film (color or black and white) the general rule of thumb is to overexpose it 1/2-Stop per decade it is expired. If you don’t know how it was stored assume it wasn’t kept cold in a fridge (especially for color film) and out of direct sunlight. Also, keep in mind that color film is more susceptible to bad storing conditions than black and white film.
7. Why Is My Film Underexposed?
What it Looks Like:
The film looks grey overall with low-contrast (flat). It is hard to make out some of the details in the shadow area with little to none. The image on the film is somewhat transparent (thin) and there are no areas that are dark with a lot of detail (dense). The grain is also more noticeable.
The Cause:
Underexposure occurs when there is a lack of light to brighten the subject and/or the film wasn’t exposed to light long enough to create a full image on the film. It could be a result of not developing the film long enough (underdeveloped).
How to Fix it:
Unfortunately, there is no way to fix this after the image is taken but you may be able to recover the image somewhat if you scan the film and edit the image in editing software like Adobe Photoshop or Lightroom.
Is it Preventable?
In the future to prevent this problem there a few things you could do:
- Set the ISO on the camera the same as the film in your camera.
- Use a flash to get more light on your subject.
- Using an external light meter (a digital camera works well too) or consider using a camera with a working light meter.
- I recommend shooting a cheap roll of film to practice using your camera and light meter before shooting anything important.
- If the cause is underdeveloped then make sure you are following all directions about development time based on developer temperature. See this website for development information.
- It can be more difficult to get a good print or image from underexposure than overexposure when it comes to film (this is different from digital cameras). Also, color film is more susceptible to underexposure or overexposure than black and white film.
8. Why Does My Camera Film Have Light Leaks?
What it Looks Like:
Light leaks on film appear as light flares or uneven exposures on the image. Some cameras, like the famous Holga camera, are prized for this effect and inspired the creators Instagram.
The Cause:
The most likely culprit of light leaks on your film is the foam light seals in your camera have become hard and deteriorated due to the age. It is also possible the film door doesn’t close evenly or the shutter doesn’t work properly.
How to Fix it:
Unfortunately, there is no way to fix the film but you may be able to remove or diminish the effects if you scan the film and use image editing software such as Adobe Photoshop or Lightroom.
Is it Preventable?
The good news is light leaks are preventable. Here are some ways to prevent light leaks in the future:
- Check the foam in your camera around the film door. If the foam has become hard and deteriorated it can easily be fixed with replacement foam. You can buy replacement foam here. This is a great tutorial on how to replace the foam in your camera
- Check that the film door closes evenly on your camera.
- Check your camera shutter to make sure it works properly.
- Buy black electrical tape or black gaffer’s tape like this to tape around the film door to block any light getting into the film compartment of your camera.
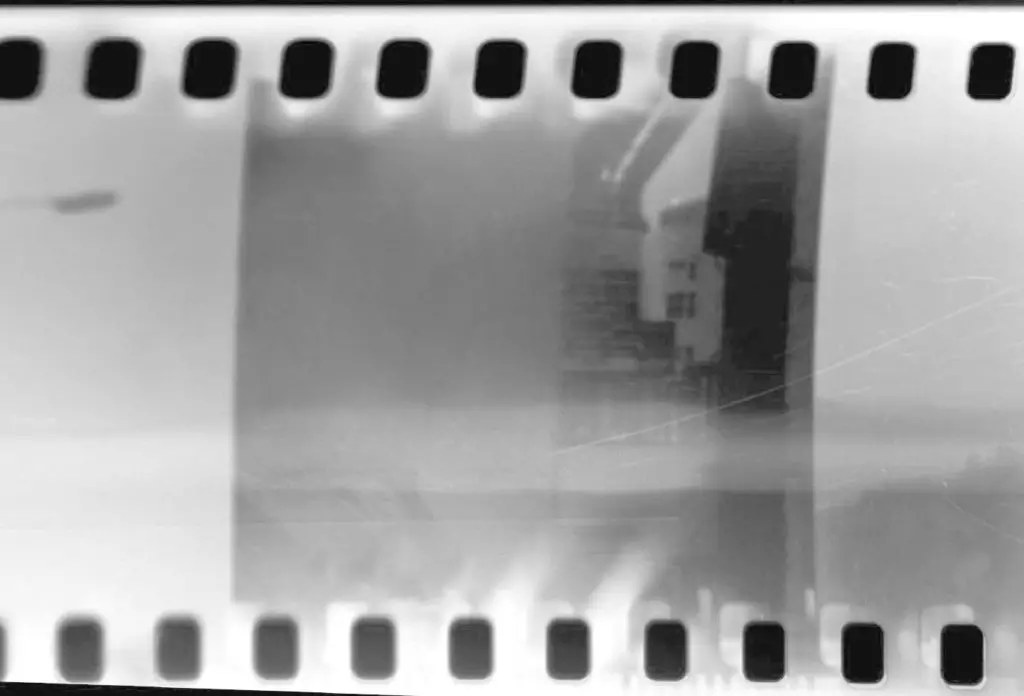
9. Why Are There Horizontal Scratches On My Film?
What it Looks Like:
Sharp, thin straight line(s) on the film that don’t change direction. These could be horizontal or vertical depending on which way the film goes through your camera.
The Cause:
The usual cause is scratching or tearing the film emulsion while squeegeeing off the water after developing the film. It is possibly caused by small debris caught between the film and the pressure plate on the film door that scratches your film as it advances. Other causes could be during the development process when the film is loaded too aggressively onto the film spool or if the film comes in contact with itself during development.
How to Fix it:
Unfortunately, there is no way to fix the film completely once it happens. However, you may be able to remove or diminish the effects if you scan the film and manipulate the image in editing software like Adobe Photoshop or Lightroom.
You may also be able to minimize the effects by gently rubbing skin oils from the nose or face into the scratches on the film. However, this technique has worked for me only part of the time when printing negatives in the dark room.
Is it Preventable?
Luckily, there are several ways to prevent scratches from showing up on your film in the future:
- Ensure there is no debris between the pressure plate on your camera’s film door and your film when loading your film. Also, check for damage to the pressure plate like sharp or raised areas that could scratch the film while the film advances or rewinds. I recommend using a vaccum to remove small debris out of the film compartment.
- If the film was loaded too aggressively onto the film spool before developing, it is possible the film spool made contact with the emulsion on the film (which can hard to prevent since this should be done in the dark). To prevent this, practice loading blank film with the light on to get the feel for how to load the film with the lights off.
10. Why Are There Streaks On My Film?
What it Looks Like:
Vertical or horizontal streaks on your film but the emulsion (the dull side of the film negative) is not scratched.
The Cause:
There are a couple reasons streaks are showing up on your film. These streaks most likely are caused by not agitating your film correctly. Either under agitation (bromide drag) or over agitation (surge marks). Another cause could be not pre-soaking or pre-washing your film before starting the film development process.
How to Fix it:
It is possible to reduce or remove the streaks on your film by re-wetting and drying it again using filtered or distilled water. Make sure that you fully submerge your film in the water as well as using Photo-Flo or Ilford Ilfotol ( Ilford’s version of the same thing) to minimize streaking or water marks.
If this does not fix the streaks on your film then you may be able to remove or diminish the streaks if you scan the film and edit the image in digital software like Adobe Photoshop or Lightroom.
Is it Preventable?
Here are the best ways to prevent streaks showing up on your film in the future:
- Make sure to agitate your film correctly during film development based on the manufacturer’s guidelines. This is a great general tutorial about developing film. If you follow the link, step 5 talks about agitation. Also, watch this helpful video about how poor agitation can affect your film.
- Also, make sure not to over agitate your film, which causes development surges, and follow the manufacturer’s guidelines.
- Another possible way to prevent streaks is to pre-soak or pre-wash your film in filtered or distilled water for 2 – 5 minutes before pouring it down the drain and beginning the normal development process. Be careful not to make your water too cold or too hot.
- Use Kodak Photo-Flo or Ilford Ilfotol as a step in your development process to prevent streaks to minimize streaking or water marks.
11. What Is Heat Damage And How Did My film Get It?
What it Looks Like:
Heat damaged film can have a unpredictable effect the film. It usually results in a low-contrast image from fogging in black and white film. With color film, it mutes the colors and add in color shifts of magenta (red) or cyan (blue) across the photos. In other instances, heat damage can cause red streaks or spots.
The Cause:
This usually occurs when the film canister is exposed to the sun during transport. It can also happen when the camera is left in the direct sun or in heat, like in a hot car.
How to Fix it:
Unfortunately, there is no fix once it happens but is usually easily corrected by scanning the film then editing the image in digital software like Adobe Photoshop or Lightroom.
On the bright side (pun intended) some photographers actually prefer this look on film because of how random it is.
Is it Preventable?
The best way to avoid heat damage to your film is to keep your unexposed film, exposed film, and camera with loaded film away from direct sunlight and long hours in a hot environment like a car trunk. If you know you’ll be in a hot environment put your camera out of the direct sunlight or cover it with a shirt or jacket. In extreme circumstances, I have used a cooler with bags of ice to keep the film and camera cool for long periods.
Consumer film is very robust and produced with consumers in mind so if you happen to leave your camera and film in the car for a few hours, most likely it won’t have any major effects.
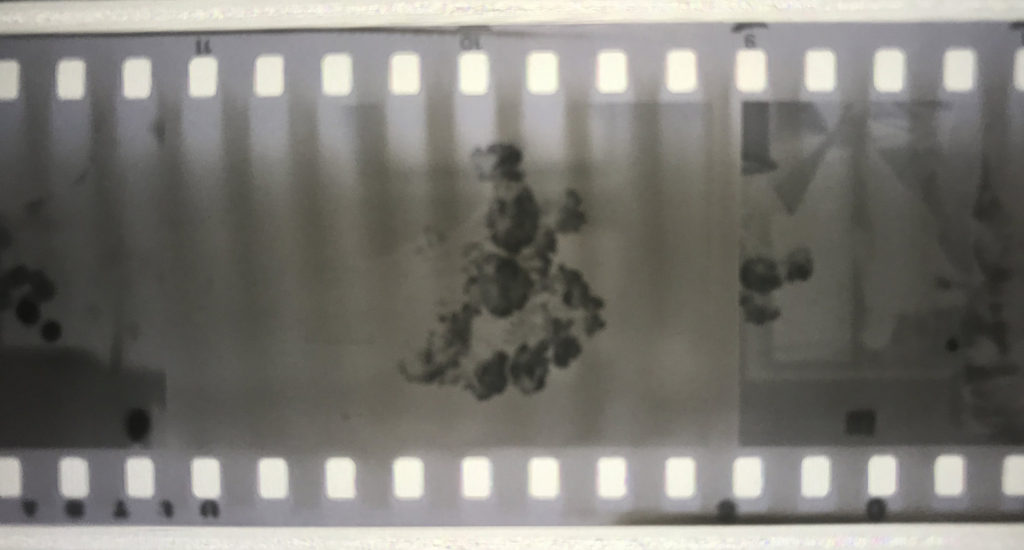
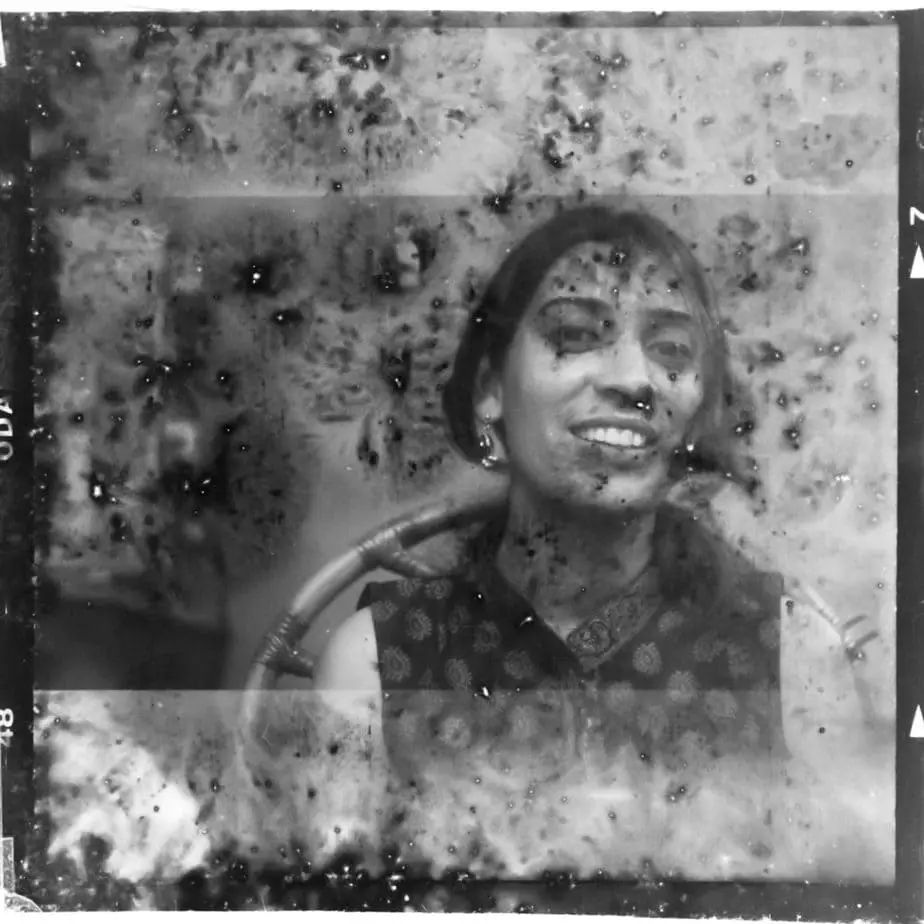
12. Why Are There Spots On My Film Negatives?
What it Looks Like:
Little white circular dots on the film negative.
The Cause:
There are a couple of reasons why spots appear on film negatives. The most likely cause for the white dots is called “air bells”. These are circular white dots that form on the negative where the developer wasn’t able to get to the film because of air bubbles on the surface of the film. Another possible cause is due to debris on the camera lens or in the camera film compartment.
How to Fix it:
Unfortunately, there is no fix once it happens but is usually easily corrected by scanning the film then editing the image in digital software like Adobe Photoshop or Lightroom.
Is it Preventable?
Whatever the cause of the white circles on your film, it is preventable.
If the cause was air bells or air bubbles, then make sure to tap the film tank on your work area during the developer phase of processing your film. Also, agitate your film appropriately according to your film manufacturer’s directions. Air bubbles can happen at any point during the film process (developing, stop bath, fixer) so make sure to agitate properly throughout. Make sure to agitate your film correctly during film development based on the manufacturer’s guidelines. This is a great general tutorial about developing film.
If the cause was debris on your lens or in your camera, make sure to clean your lens and film compartment between loading film with a soft cloth, soft brush, or a squeezable air blower like included in this lens cleaning kit.
13. What Are These Half-Moon And Crescent Shapes On My Film?
What it Looks Like:
Crescent-shaped marks, half-moons, or short straight creases anywhere on the negative in random places.
The Cause:
These marks are made when loading the film onto the film spool by creasing or kinked when loading the film into the developing tank. This usually happens when the film is not loaded correctly and/or forced onto the film spool. It can also happen when the film is being removed from the spools after development to prepare for being hung to dry.
How to Fix it:
Unfortunately, there is no fix once it happens but can be corrected by scanning the film then editing the image in digital software like Adobe Photoshop or Lightroom. However, depending on where the marks are on the negative it is possible to get a good print or scan if the marks don’t cover much of the image area.
Is it Preventable?
The good news is these marks are preventable. Just follow these tips:
- To avoid making creases or kinks on the when loading the film onto the film reels, don’t force the film onto the spools and load them slowly.
- Practice loading blank film with the light on to get the feel for how carefully and slowly load the film with the lights off.
- Also, practice taking the film out of the film reel using blank film to avoid marks after the development process.
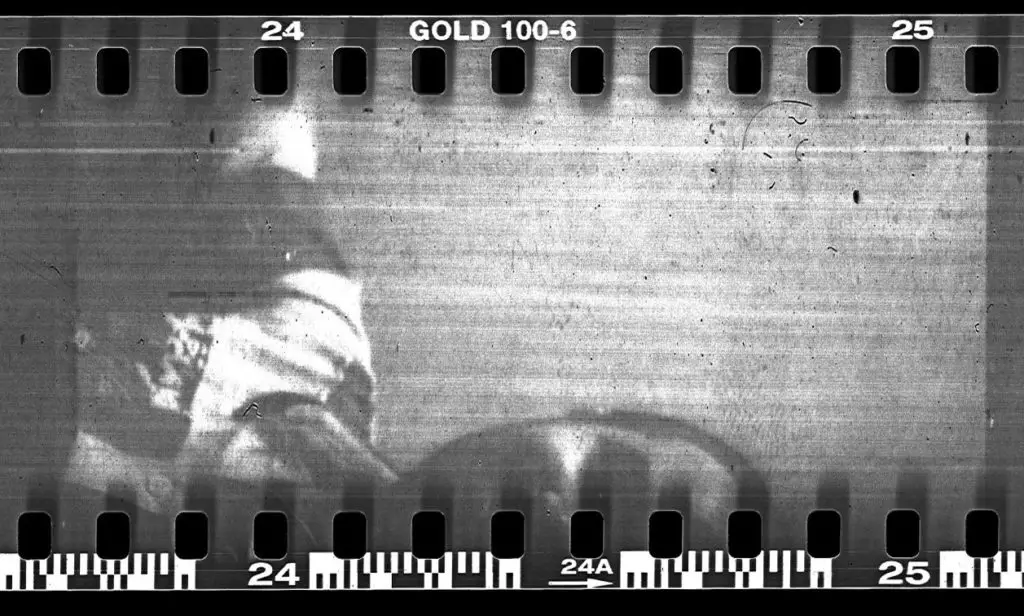
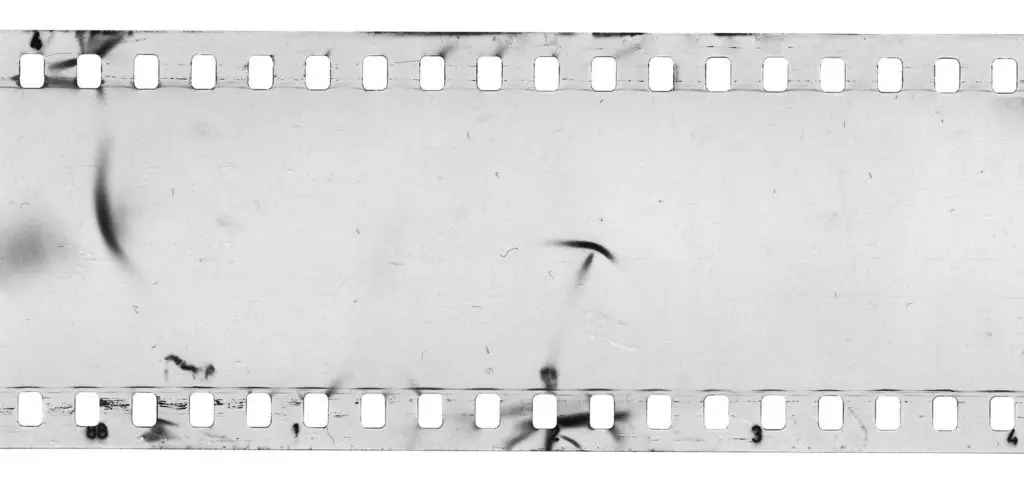
14. Why Are There Water Spots On The Film?
What it Looks Like:
Water spots are irregular warped dull marks or roundish patches that are also light or dark gray spots on an image.
The Cause:
There are several reasons why water spots may be on your negative. One cause of water spots can be the result of not washing your film correctly during the washing step of development. It can also occur when hard water dries on the dull side of the film (the dull side of the film has the emulsion where the image is held and the shiny side is the plastic film the emulsion is spread on). If the spots have a dark rim then water is getting on the film when it is being cut to fit into film sheets.
How to Fix it:
Fortunately, this can be fixed a few ways. Film with just a few water spots can be rewashed with distilled water and a wetting agent like Kodak Photo-Flo and dried. Once dried, if you still see water spots, you can also breathe on the film and wipe it off with a glasses lens cloth (or lens paper) to clean the negative before you print or scan. I recommend using an anti-static microfiber cloth like in this lens cleaning kit to keep dust and other debris from clinging to the film.
Is it Preventable?
There are several ways to prevent water spots on your negatives. Follow these tips:
- Get a waterproof camera bag or this camera rain cover to keep your camera and film from getting wet.
- To minimize hard water spots I recommend using a wetting agent such as Kodak Photo-Flo or Ilford Ifotol.
- Use distilled water throughout the development process but especially during the final washing stage with your wetting agent to minimize water spots. This is necessary if you live in an area with very hard water or if you have a soft water filter installed on your house.
- I also recommend using a squeegeeing, or film squeegee and wiper, to remove water from the film before the drying step but be careful not to scratch the film.
15. Why Are There Clear Or Opal Patches On My Image?
What it Looks Like:
Clear, dark, or opal-like shiny patches on your negatives in an irregular oval or circular shape.
The Cause:
This happens when your film has come into contact with another surface like your fingers or parts of the film when loading it onto the film spool for development. If the negative is touching itself during development then the developing chemicals can’t reach those areas on the negatives where the contact took place.
Another possibility is dried water marks on your film, especially if you notice it on the shiny side of your film. This are created by dried water droplets staying on the film while your film is drying and happens more frequently in regions with hard water.
How to Fix it:
Unfortunately, there is no fix once it happens. However, depending on the severity it’s possible that it could be corrected by scanning the film and editing the image in digital software like Adobe Photoshop or Lightroom.
Is it Preventable?
Whatever the cause, it is preventable. Follow these tips to avoid it in the future:
- Be careful not to touch the film when loading the film into the film spool. I recommend using an exposed roll of film to practice loading your film spool with the lights on so you can get the feel of it when you do it for real in the dark room.
- If you believe the cause of the patches to be hard water marks, then I recommend using a wetting agent to minimize water streaks and drying marks on film while the film drys such as Kodak Photo-Flo or Ilford Ifotol Wetting Agent.
- I recommend using distilled water and throughout the development process but especially during the final washing stage to minimize water marks and streaks. Especially if you live in an area with very hard water or if you have a soft water filter on your house.
16. What Is A Weak / Thin Image?
What it Looks Like:
The image is very light with little detail and too light to get an acceptable image. It is called “thin” or “weak” because there is not much detail on the negative.
The Cause:
There a couple of reasons why an image would be weak or thin. The usual culprit is due to being underexposed where not enough light hits the film during exposure. Another reason is due to problems when developing your film.
The errors in developing could be either the film wasn’t developed long enough, the temperature of the developer was too cold, the developer chemicals were not mixed correctly / too weak, or there was no agitation during the development process.
How to Fix it:
Unfortunately, there is no fix once it happens. However, depending on the severity it’s possible to save the image(s) by scanning the film and editing the image in digital software like Adobe Photoshop or Lightroom.
Is it Preventable?
Whatever the cause of thin or weak image it is preventable when you know how to avoid it.
If you believe the cause was due to underexposure, keep these things in mind:
- Use a higher ISO rated film. For example, if you are using 50, 100, or 200 rated film then choose 400 or 800 rated film. Higher rated films are more sensitive to light but the grain is more noticeable in the image.
- Make sure the ISO setting on the camera matches the film ISO number in your camera.
- Use a camera flash to get more light onto your subject if more light isn’t available.
- Use an external light meter (a digital camera works well to get a meter reading if you have one handy). I recommend shooting a throwaway roll of film to practice using your camera and light meter before shooting anything important.
- Understand that it can be more difficult to get a good print or scan from underexposure than overexposure when it comes to film (this is backward from digital cameras).
If the cause was due to an error in development keep these things in mind:
- Measure the temperature of your developer with a thermometer to get the appropriate development time. See this website for information about film development times based on temperature and chemicals. Choose your film and developer to see the mixture ratio with water, what temperature works best (68 F is generally what to aim for how), and long to develop (generally 7 – 10 minutes).
- Follow the manufacturer’s guidelines on the proper ratio to mix your chemicals
- Test your developer to make sure it hasn’t expired or exhausted. If the developer has turned brown then it needs to be replaced. You can also test it by cutting off some film and dropping it in a clear cup with a small amount of developer and seeing how long it takes to turn black.
- Follow the film and developer manufacturer’s instructions on agitating your film throughout the development process. This is a helpful tutorial on developing film.
17. Should My Film Be Blank?
What it Looks Like:
Your film is completely blank and clear with no images or edge markings along the edges.
The Cause:
Most likely the cause is pouring the fixer in the development tank before the developer chemicals when developing your film. It is also possible that poured in water instead of film developer.
How to Fix It?
Unfortunately, there isn’t any way to fix this once it has happened.
Is It Preventable?
The good news is that this is simple to prevent. Make sure to pour the right film developing chemicals in the correct order. Also, pay close attention to the instructions when mixing your developing chemicals. I recommend using a general guide to developing film like this to follow when developing your film so you don’t have to think about it.
18. What Are These Clear Circular Spots On My Developed Image?
What it Looks Like:
It looks like clear circular spots on the negative.
The Cause:
There are several reasons why spots appear on film negatives. The most likely cause for the clear circular spots are called “Air Bells”. These are white, circular dots that form on the negative. They are white because the developer wasn’t able to get to the film because of the air bubbles on the surface of the film. Another possible cause is due to debris on the camera lens or in the camera film compartment.
How to Fix it:
Unfortunately, there is no fix once it happens but is usually easily corrected by scanning the film then editing the image in digital software like Adobe Photoshop or Lightroom.
Is it Preventable?
The good news is whatever the cause, it is preventable. If the cause was air bells or the result of air bubbles, then make sure to lightly tap the film tank on your work area during the developer phase of processing your film. These air bubbles can happen at any point during the film process (developing, stop bath, fixer) so make sure to agitate properly throughout. This is a great general tutorial on developing film. If you follow the link, step 5 talks about agitation.
If the cause was debris on your lens or in your camera, make sure to clean your lens and film compartment with a soft cloth, soft brush, or a squeezable air blower like included in this lens cleaning kit before loading your film.
19. Why Are The Sprocket Holes Are Torn?
What it Looks Like:
The sprocket holes on your film are torn either completely or in certain places. Sprocket holes are the little perforated edge along the top and bottom of your film that moves your film through your camera to create exposures.
The Cause:
There a few reasons why sprocket holes on your negatives are torn.
- Most likely, the problem is not pressing the film rewinding button before trying to rewind the film inside the camera. This button is usually on the bottom of the camera and disengages the gears that advance the film forward in the film compartment.
- Another possible cause is that you are trying to advance the film even when getting to the end of the film roll (especially in older cameras).
- It is also possible that the film holes are torn because the sprocket holes got caught in the film spool when loading or unloading the film too quickly.
How to Fix it:
Unfortunately, there is no way to fix torn sprocket holes once it happens. However, in most instances the holes won’t be included in a print or scan unless you are using a specialized camera.
Is it Preventable?
The good news is whatever the cause, it is preventable.
- When rewinding the film after finishing taking images, make sure to find and press the rewind button so you don’t tear the sprocket holes on your film or break something in your camera.
- When you reach the end of your film roll don’t try to advance the camera longer than it should according to the number counter on top of the camera. In general, don’t force the advance level or wheel if it gives you resistance.
- If the cause is due to the sprocket holes getting caught in film spool, then practice loading and unloading a film spool with a blank roll with the lights on so you can eventually do it well with the lights off.
20. Are Fingerprints On Negatives Bad?
What it Looks Like:
Fingerprints on a the negative can either look like oval shaped marks or smudges. They can either dark or lighter colored fingerprints depending on what was your fingers at the time.
The Cause:
The most common cause is touching dry film with wet or damp fingers, especially when the emulsion hasn’t completely dried and is still soft. The oils on your fingers can also damage to the negatives.
How to Fix it:
Fortunately, there are some instances when it can be fixed. If the fingerprints are caused by fingers with fixer, oil, or grease the prints can be cleaned by re-washing the film, by breathing on the film and using an anti-static microfiber cleaning cloth, like this one, or by using a film cleaning solution.
Is it Preventable?
To avoid fingerprints in the future follow these tips:
- A good practice for avoiding fingerprints on your film is to wear clean cotton gloves (like these) when handling the negatives.
- Always handle your negatives while touching only the sides so you don’t get dust or fingerprints on your negatives.
- When handling film negatives be sure to wash and dry your hands completely before touching your film – especially if they have been exposed to chemicals. It is a good practice to wear powder-free, nitrile disposable gloves (like these on Amazon.com) when developing film to keep your hands clean.
21. Why Is There Streaking Coming From The Sprocket Holes?
What it Looks Like:
Repetitive streaking coming from the sprocket holes (the holes on the edge of your film) that are going both downward and upward toward the middle of the image.
The Cause:
The main cause is too much agitation is happening during the development process. Agitation makes sure that enough developer is reaching the film evenly. This happens because too much fresh developer is reaching the image and causing over-development in those areas.
How to Fix it:
Unfortunately, there isn’t any way to fix this once it happens.
Is it Preventable?
To avoid this in the future, make sure to agitate your film correctly during film development based on the manufacturer’s guidelines. This is a great general tutorial on developing film. Also, watch this helpful video about how poor agitation can affect your film.
22. Why Is My Development Uneven?
What it Looks Like:
Uneven development can look like light patches, clear streaks, or a lighter band across the entire roll on one side of the film. The opposite side of the film appears to be correctly developed. It can also appear as partially developed frames.
The Cause:
There are two main causes of unevenness. The first is when there isn’t enough agitation happening during the development process. While too much agitation can cause repetitive streaks coming from the sprocket holes on the image, the lack of agitation can cause uneven development. The second cause is when there isn’t enough developer in the tank to reach all of the film.
How to Fix it:
Unfortunately, there isn’t any way to fix this once it happens.
Is it Preventable?
Follow these steps to prevent uneven development on your negatives:
- Make sure to agitate your film correctly during film development based on the manufacturer’s guidelines. This is a great general tutorial about developing film.If you follow the link, step 5 talks about agitation. Also, watch this helpful video about how poor agitation can affect your film.
- Be sure to measure the amount of developer you will need to completely submerge your film while in the developing tank. Most developing tanks, like this one, have the amount necessary listed on the bottom or the sides for easy reference.
23. Why Does It Only Show Part Of Negative And Black Bar On The Rest?
What it Looks Like:
A think and uniform black bar that divides your image where one side is completely black and other has image information.
The Cause:
The cause of the black bar on your image is your shutter when you exceed the flash sync speed of your shutter on your camera. The sync speed is the fastest shutter speed where the shutter is completely open. The light from your flash(es) reaches the film faster than the shutter can get out of the way and casts a shadow onto your film.
How to Fix it:
Unfortunately, there isn’t any way to fix this once it has happened.
Is it Preventable?
Most be film cameras have a mark next to the sync speed on the dial where you choose your shutter speed. If you don’t have a mark or can’t find it, know that for most older film cameras the sync speed is between 1/60 – 1/250s depending on the age and style of camera.
If you aren’t sure what your film speed is then you can easily check. Do this by opening the film door without film in it, cock the shutter and fire it using different shutter speeds looking for when the shutter is completely out of the way of the opening in the front of the camera.
24. Why Is My Image Crinkled Or Cracked?
What it Looks Like:
The image on the negative looks cracked or crinkled like dirt that has been in the sun without water.
The Cause:
This is called reticulation and it happens during film processing when the temperature of the chemicals varies wildly. This most likely happens when the developer is too hot right after mixing and is used for developing right away.
How to Fix it:
Unfortunately, there is no fix once it happens. However, depending on how much the film is overexposed it is possible to get a passable print or scan by editing the image in digital software like Adobe Photoshop or Lightroom.
Is it Preventable?
The good news is whatever the cause, it is preventable. Follow these tips:
- Keep all of your chemicals roughly the same temperature throughout the development process based on temperature of your developer.
- See this website for information on film development times by temperature. On the website, choose your film and developer to find the water dilution ratio, what temperature works best (68 F is generally what to aim for), and how long the developer should be in contact with the film (generally 7 – 10 minutes).
- Follow the manufacturer’s guidelines on the proper ratio to mix your chemicals. This is a helpful tutorial on developing film.
25. Why Is My film So Dark And Contrasty?
What it Looks Like:
The image is dark, dense with image information, and has high contrast. It can also appear sooty with no detail in the highlights with extremely dark shadows. The grain is also very noticeable.
The Cause:
There are two main stages when this could to happen to a negative. During Overexposure and/or film processing:
- It could be caused by too much light hitting the negative (overexposure) when taking an image in the film camera or by a faulty light meter.
- The film was in the developer for too long.
- The temperature of the developer was too high.
- The developer mix was too strong.
- There was too much agitation during the development phase.
How to Fix it:
Unfortunately, there is no fix once it happens. However, depending on how much the film is overexposed it is possible to get a passable print or scan from the negative by editing the image in digital software like Adobe Photoshop or Lightroom.
Keep in mind that color film loves light and can be pleasing when overexposed. In fact, most photographers prefer overexposing film for a specific look. The key is not to overexpose so much that you lose information in the highlight areas and create a flat or low-contrast negative.
Is it Preventable?
If you believe the problem was related to exposure, follow these tips to avoid it in the future:
- Set the ISO on the camera the same as the film in your camera.
- Consider using a camera with a working light meter or using an external light meter. I recommend shooting a throwaway roll of film to practice using your camera and light meter before shooting anything important.
If you believe the problem was related to development, follow these tips to avoid it in the future:
- If the cause is overdevelopment of the negatives then make sure to follow all directions about development time based on your film and developer. See this website for information about film development times based on chemicals.
- Measure the temperature of your developer with a thermometer to get the appropriate development time. On this film development by times website, choose your film and developer to see dilution ratio with water, what temperature works best (68 F is generally what to aim for how), and long to develop (generally 7 – 10 minutes).
- Follow the manufacturer’s guidelines on the proper ratio when mixing your chemicals.
- This is a helpful tutorial on developing film. If you follow the link, step 5 talks about agitation.
26. Why Is My Film Cloudy / Milky?
What it Looks Like:
The film has a white-ish, cloudy or milky appearance over the entire image area. The film is also very flat or low-contrast with little to no details in the shadow area or highlight areas.
The Cause:
There a few possible reasons why your film appears white-ish, cloudy, and/or milky:
- This usually occurs when the fixing procedure is incorrect. It can occur by not fixing your film long enough or an incorrect temperature of the fixing chemical.
- Another possibility is your fixer was mixed too weakly, has exhausted, or is too old.
- It is also possible that your film is suffering from heat damage / direct sunlight or you are using old or expired film where you don’t know how the film was stored.
- Your film also might have suffered from light leaks.
- It also could have been exposed to X-rays at the airport.
How to Fix it:
Fortunately, depending on the severity you might be able clear your negatives by repeating the fixing process before the final wash with fresh fixer, the correct time, and temperature. If necessary, keep your film wet in water while you make fresh fixer.
If the film was fogged by x-rays then unfortunately, there is no fix once it happens. However, depending on how much the film is fogged it is possible to get a passable print or scan from the negative by editing the image in digital software like Adobe Photoshop or Lightroom.
Is it Preventable?
The good news this is preventable. Follow these tips:
- Always check your fixer for exhaustion. The easiest way is to use Hypo-Check, a chemical that lets you know if your fixer is exhausted. Squeeze a couple drops of it into a small amount of fixer poured from your larger bottle into a clear cup or beaker to test. If it turns milky white then it needs to be replaced.
- Another quick way to test your fixer is to keep small pieces of film (I suggest the film leader that is cut off when loading your film onto the film spool when developing) and put it into a small cup of fixer. If it clears between 30 – 45 seconds then it is good for rapid fixer or 2 – 3 minutes for regular fixer. If it takes twice that long then it needs to be replaced. However, the general rule is about every 6 months if stored correctly.
- If you suspect heat damage then make sure to store your film and camera out of direct sunlight and heat.
- Always, load your film in a development tank in a completely dark room. Check to make sure your development tank is light tight and not cracked after loading your tank with film
- Don’t open the camera mid-roll. This will accidentally expose your film with light. I also recommend using either black electrical tape or black gaffer’s tape like this to tape around the film door to block light any extra light.
- If you believe your film was damaged by X-rays at the airport. See this article I wrote on how to fly confidently with film and how to prevent x-ray damage to your film it in the future.
***If you are shooting expired film (color or black and white) the general rule of thumb is to overexpose it 1/2-Stop per decade it is expired. If you don’t know how it was stored assume it wasn’t kept cold in a fridge (especially for color film) and out of direct sunlight. Also, keep in mind that color film is more susceptible to bad storing conditions than black and white film.