
The Instax Mini 9 is a camera that prints stunning photos, whether selfies or landscapes, on the spot. You don’t have to wait long for your pictures to develop, and you can share them with your friends immediately.
To use your Instax Mini 9, first insert alkaline batteries and Instax Mini film. Next, turn on the power by pressing the narrow button below the lens of the camera. Finally, take a picture by pointing the camera at your subject using the viewfinder and pressing the round shutter button on the front of the camera below the viewfinder
Despite the Instax Mini 9 being an easy camera to use , there is much more to know about it such as the initial setup, loading film, how to take a good picture, if you can turn the flash off, and common problems or questions you may have while using the Instax Mini 9. Read below for these tips!
How to Set Up Instax Mini 9 for the First Time?
The Instax Mini 9 is one of the most popular instant cameras on the market, and it’s perfect for anyone who wants to start taking instant photos. But if you’ve never used an instant camera before, it can be a bit daunting to figure out how to set it up and start using it. Here’s a quick guide to help you out, step by step.
1. Load The Batteries
The Instax Mini 9 uses two alkaline AA batteries, which can easily be purchased at most stores or online. Start by loading the batteries into your camera and opening the battery lid, near the lens, on the side. Once the batteries are loaded, insert the film into the camera.
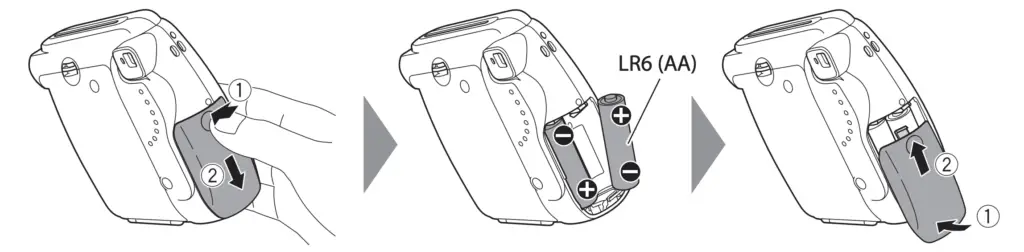
NOTE: The Instax Mini 9 camera is designed to be used with Alkaline batteries so other kinds of batteries might give less than desirable results and might even cause the orange light to blink. Also, batteries may corrode the Mini 9’s interior if left inside the camera for long periods of time, so you’re better off removing them when not using the camera for weeks or months.
2. Load The Instax Mini Film into the Instax Mini 9
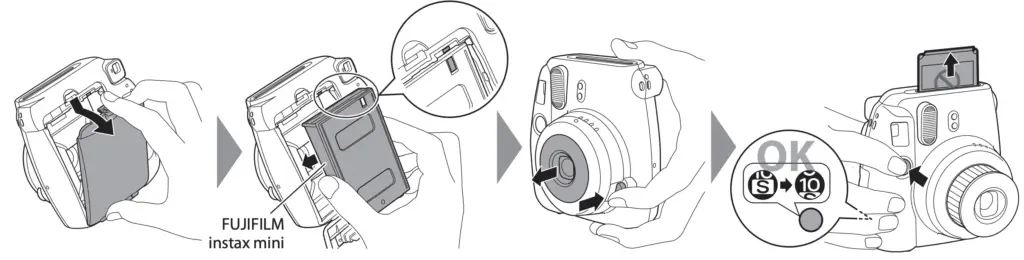
Before you begin, make sure there is film in the camera by checking the film counter window on the back of the camera. If it says anything other than “0” then there is film in the camera. If there is not film in the camera, open the film pack window at the back of the camera. Open the film package, unwrap it, and place it in the Instax Mini 9. The film side must be inserted face down. Note the yellow mark on both the camera and the cartridge, and both must be aligned when inserting the film.
Now that you’re done, close the film door on the back of the camera. You’ll notice a small window at the back of the Instax on the film door. When it displays a yellow stripe, it means that your film is loaded correctly – otherwise it will be just dark if the camera has no film or no yellow mark will be there if the film is loaded in correctly. Also, if there is anything other than a “0” showing up in the film counter, than there is film in the camera.
Instax cameras don’t come with a film cartridge inserted in the camera, so if that’s your first time setting up the Instax Mini 9, the window on the film door will be empty.
What Film Does the Instax Mini 9 Use?

The Instax Mini 9 can only use the Instax Mini Instant film. Instax Mini film is the smallest of the Instax instant film made by Fujifilm at 3.33 x 2.13 inches. Instax mini film is the cheapest Instax film available at around $.95 USD per sheet (find the Mini film here on amazon.com) but sometimes can be found for less. The most popular versions of Instax Mini film are color and black & white film but there are many other versions of Instax Mini film on the market.
3. Turning the Camera On
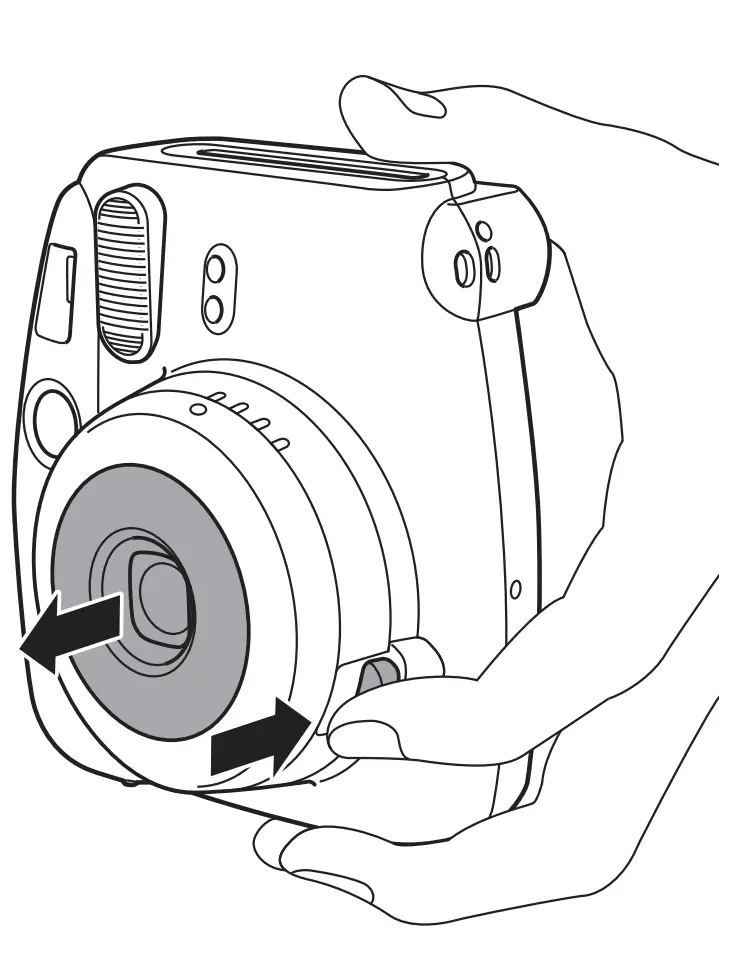
With the batteries and film loaded, the next step is to turn on the camera by pressing the power switch located near the lens. When the camera is turned on, the lens will fully extend and you will hear a small whine of the flash charging. You will also see that the flash charging light next to the viewfinder on the back of the camera will flash. When the flash charging light is not flashing anymore and solid the camera is ready to take a picture. (NOTE: the camera will not take an image until the flash has charged and ready so make sure you use fresh alkaline batteries).
Once the film is loaded correctly in the camera and the camera is turned on for the first time (or with a new cartridge of film) the film counter on the back of the camera will say “S”. This means there is film inside the camera but you need to eject the darkslide. The darkslide is used to protect the film from light when loading the film cartridge into the camera. To eject the darkslide from the camera, press the shutter button and the film counter will show a “10” and now you are ready to take images.
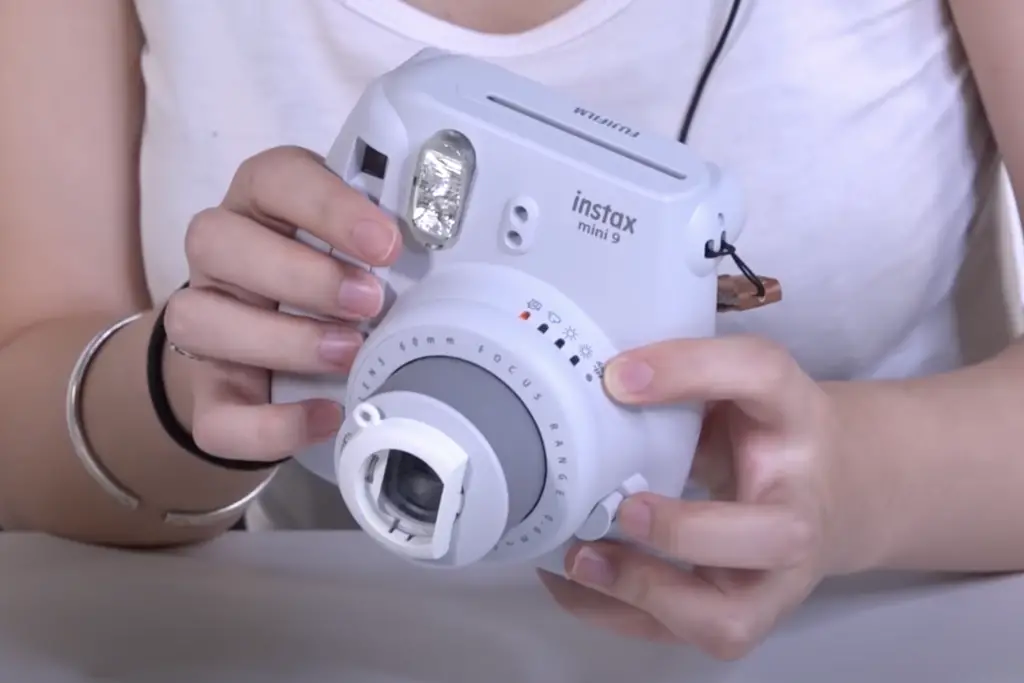
4. Adjust the Exposure
The exposure settings on the Instax Mini 9 are semi-manual, which means the camera indicates the correct exposure setting but that you must physically switch between the different modes. The Instax Mini 9 will indicate which exposure mode is best for the current situation using an orange light but you have to manually change move the dial so the small dot on the lens aligns with the orange light. However, you don’t have to use the setting the camera suggests, which makes the Instax Mini 9 different from the Instax Mini 11.
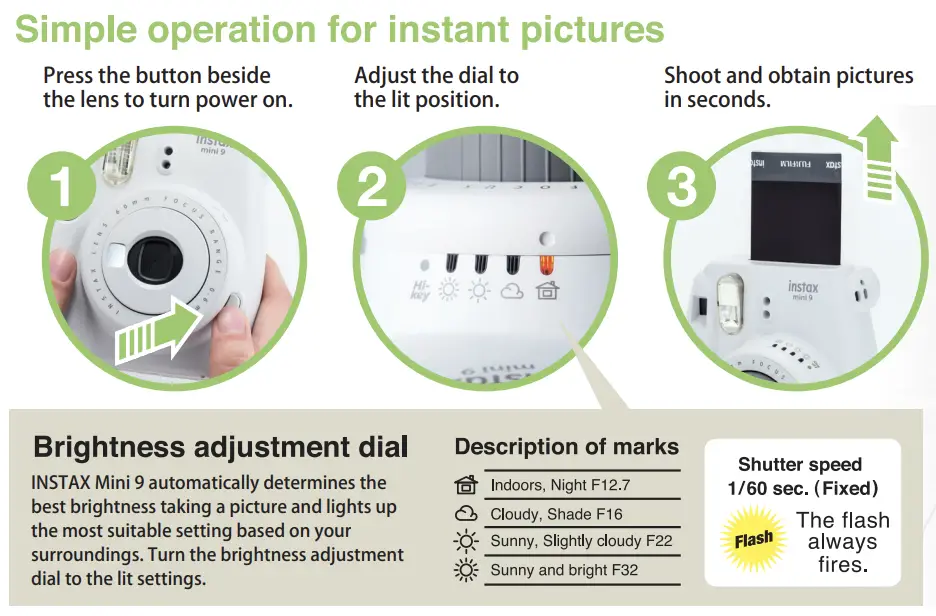
The five exposure settings on the Instax Mini 9 that are suggested by an orange light on the camera and are:
- The house (used as default) – for indoor and low-light situations
- The cloud – Used for outdoor takes on a cloudy day
- The sun – Used for outdoor takes on a sunny day
- The strong sun – Perfect for very bright situations
- Hi-Key – Ideal for low-light photography and for portraits (only one not indicated by an orange light)
Read this article for more information about how and when to use the Hi Key mode on the Instax Mini 9.
5. Shooting Photos
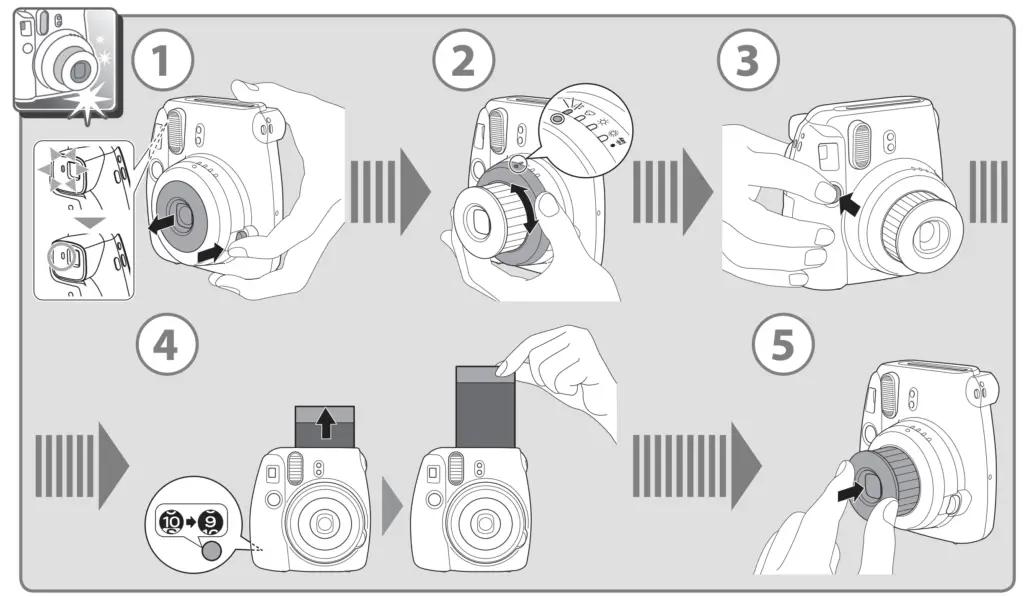
To take good pictures with the Instax Mini 9, follow these steps.
- Press the shutter button located below the viewfinder on the front of the camera to take an image
- The film will eject from the camera and the film counter window will go down by one. Wait until the film has fully ejected before pulling it the rest of the way out of the camera. The film will fully developing around 90 seconds (keep the film facedown in direct sun for optimum results
- To turn off the camera after taking an image, press the extended lens back into the camera until it clicks.
Extra Tips After Setting Up Your Instax Mini 9
Now that you know how to set up your Instax Mini 9, it’s time to start snapping away. But before you do, here are a few extra tips to get the most out of your new camera.
1. Don’t Open Your Film in Direct Sunlight
Don’t load new film into your instant camera film in direct sunlight. When you do this the direct sunlight can expose your film and create light streaks on the film and even ruining it. Instead, load your film in shade, under a cover like a jacket or shirt, wait until it’s cloudy, or a room without windows and the lights off to load your film into your camera. This way, you’ll get the best possible results with your film.
For Instax images to develop well, once the film is ejected it should be covered by the hand to keep out more direct light and then laid flat in a dark space. Touching the space where the image appears or shaking the picture will damage it.
2. Remember the Maximum Flash Range
One of the best features of the Instax Mini 9 is the flash, as it adds a nice look to the shots and allows to take correctly exposed photos in pretty much all situations. But the flash range is only 8.8 ft (2.7 meters). This means anything past this distance won’t be lit up by the flash, which is something to remember when shooting in low light situations like at outside or indoors at night or in the dark.
3. Keep the Minimum Focus Distance In Mind
The Instax Mini 9 has a minimum focusing distance of 22.7 inches (0.6m) from the camera. This means that anything closer to the camera won’t be in focus or blurry and will be overly bright as well so it best to maintain this distance when taking images.
However, the camera also comes with a close-up focusing adapter that clips onto the front of the lens and allows the camera to focus at 13.7 – 19.6 inches (35cm – 50cm), which is 9 inches (22.8cm) closer than the normal focusing distance and makes it easier to take selfies that are in focus.
See this guide on using the close up focusing adapter on the Instax Mini 9.
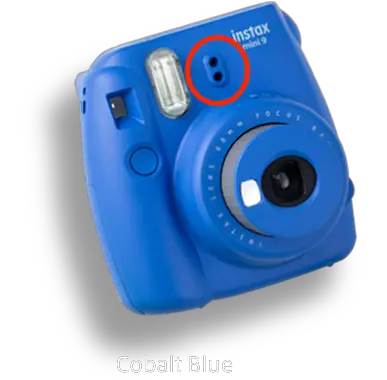
4. Don’t Cover the Holes on the Front of the Camera
When taking an image with the Instax Mini 9 make sure not to cover up the two small holes next to the camera flash or the image will be completely dark or completely white.
5. Don’t Panic If Lights On Your Camera is Blinking
If you’ve recently purchased a new Instax Mini 9, you might be wondering why the light is blinking. There’s no need to worry, as this is perfectly normal behavior. The front light will blink orange or red when it is first turned on, which means that the flash is charging. Once the charge is complete, the flash will stop blinking and remain on.
If the flash continues to blink after being turned on, it generally means that the batteries are running low and need to be replaced. If your camera is still blinking after you replace the batteries, make sure to replace the batteries with alkaline batteries only. Another tip is replace the batteries when the camera is on (the lens is extended) may also help the blinking to stop.
For more about common problems with the Instax Mini 9 and how to fix them, see this article about the Instax Mini 9.
Instax Mini 9 FAQ
The Instax Mini 9 is a great camera to use for fun and creative photos. Below are answers to the common questions you may have.
How to Turn the Instax Mini 9 on?
To turn on the Instax Mini 9, press the power button near the lens at the bottom of the front of the camera. After pressing the on button the lens will extend and you will see the orange light blinking, which means the flash is charging. Once it stops blinking, you’re ready to take photos.
How to Insert Film in the Instax Mini 9?
Follow these steps to put film into a Instax Mini 9 instant camera:
- First, make sure there isn’t any film currently in the camera or you will exposure your film and ruin it. Do this by looking a the small window to the left of the viewfinder. If it is yellow, then there is film inside your camera.
- Also, make sure the film counter on the bottom right of the camera is at 0, which means all the film has been shot.
- To load film in the camera, open the film door of the instax camera by pull down on the notch on the film door and pulling the film door away from the camera. Be careful to hold the film camera by the body and not the film door as it could break.
- Place your new film pack (without the protective foil) with the yellow mark on the film pack lined up to the yellow mark on the camera
- Close the film door until you hear a click
- Turn on the camera by pressing the large button on the front of the camera near the lens. After you press the button the lens should extend from the camera
- Press the shutter button on the camera to eject the black sheet from the camera. When this is done the film counter window on the back of the camera will change from “S” to “10”, indicating the film is ready to shoot and there is 10 sheets of film in the camera
NOTE: After the black sheet is ejected from the camera, do not open the back of the camera until the film counter window on the back of the camera reads “0”, or you will ruin the film that is in the camera.
How to Turn the Flash off on the Instax Mini 9?
The flash on the Instax Mini 9 is always on and can’t be turned off. If you want to capture an image with your Instax Mini 9 but don’t want to use the flash, cover the flash with black tape, thick paper, or with your finger. However, be careful not to cover the two small holes which control light exposure on the front of the camera or your images will come out either all black or all white.
Is There a Timer on the Instax Mini 9?
Unfortunately, there is no timer on the Instax Mini 9 nor does it have a tripod mount, which both would be handy for taking selfies or group photos. For a list of which Instax cameras do have a self-timer and how long there are, see this article.
How to Remove the Film Cartridge on the Instax Mini 9?

Follow these steps to remove film from your Instax Mini 9:
- First, make sure there isn’t any film currently in the Mini 9 camera or you will exposure your film and ruin it. Do this by looking a the small window to the left of the viewfinder. If it is yellow, then there is film inside your camera.
- Also, make sure the film counter on the bottom right on back of the Mini 9 is at “0”, which means all the film has been shot and it safe to open the film door without ruining your film.
- Open the film door of the camera by pulling down on the notch on the film door and pulling the film door away from the camera. Be careful to hold the Mini 9 by the body and not the film door as it could break.
- Hold your used film pack on the two large notches with your forefinger and thumb and pull it straight out of the camera.
What Does Hi Key Mean?
The Hi Key mode is a brightness mode that is used for indoors and night photography. While the Instax Mini 9 features a flash it is sometimes does not use enough light and the Hi Key is there to add more light to fill the shadows.
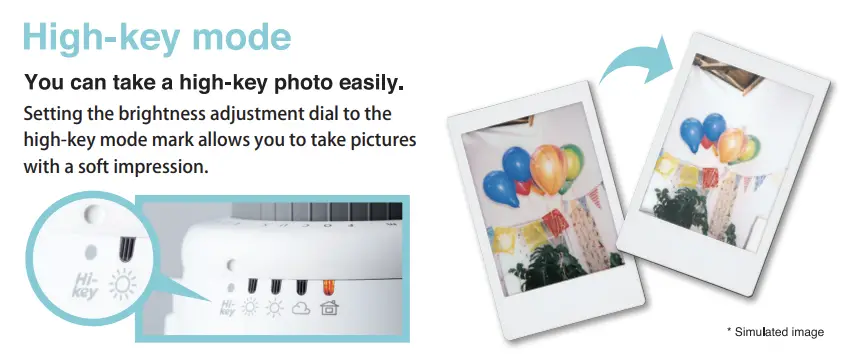
The Hi Key is indicated on the exposure selection dial and a small orange icon located on the top of the camera lens. This mode is typically used for close-up shots or when you want to create a softer, more dreamy look with less shadows.
See this article for more about Hi Key mode on Instax cameras such as which Instax cameras have Hi Key mode, what it does, and how to use it.
Conclusion
The Instax Mini 9 is a great camera for capturing memories and fun moments with friends. With its easy-to-use design, the Instax Mini 9 is perfect for anyone who wants to start taking photos with an instant camera – even kids!