
One of the most popular Instant film cameras of the last few years has been the Instax Mini 9 by Fujifilm. There are a few, common problems that users of the Instax Mini 9 can run into but the good news is most problems with the Instax Mini 9 can be fixed quickly and easily.
The most common problems with the Instax Mini 9 are it not turning on, not taking an image, prints are all white or black, and the camera lights blink. Images coming out white or black can mean the right exposure mode wasn’t selected or the sensors were covered when taking an image. Blinking lights on the Mini 9 can mean the flash is charging or the batteries need replacing.
So there are the two most common problems people have with the Instax Mini 9 camera. Below we’ll cover the six most common issues with the Instax Mini 9 and how to fix them. But there’s much more to know. Whether you’re new to instant photography or an experienced user, these tips will help you get the most out of your camera.
7 Common Problems with Your Instax Mini 9 Camera
If you’re a fan of instant photography, the Instax Mini 9 camera is a fantastic option. However, like any camera, you may run into issues when taking images. Here are six of the most common issues with the Instax Mini 9 and solutions on how to fix them. Let’s get started!
1. Why Does My Instax Mini 9 Not Turn On?

What Does the Instax Mini 9 Not Turning on Look Like?
Usually, to turn on the Instax Mini 9 you press the large button below to the right of the lens on the front of the camera. The lens of the camera will extend with a pop once the button has been pressed and the flash will should begin charging. A red light to the left of the viewfinder on the back of the camera will begin flashing to indicate the camera is charging. The camera is fully charged once the red light to the left of the viewfinder stops blinking, turns off, and the an orange light appears on the brightness indicator on the front of the camera is completely lit.
If there is no blinking light next to the viewfinder or the brightness indicators around the lens barrel on the front of the camera do not light up after you pressed the on button on the bottom right of the front of the Instax Mini 9, then the camera is not turning on.
What is the Cause of the Instax Mini 9 Not Turning On?
Most likely the reason that your Instax Mini 9 is not turning on when you press the on button on the front of the camera is that the batteries are dead and need to be replaced or you need to use Alkaline batteries.
Another possible reason the Instax Mini 9 camera won’t take an image is because the batteries are not loaded correctly.
If you have installed fresh alkaline batteries or replaced old ones, and your camera is still not turning on after being dropped on a hard surface or being dropped in a swimming pool, an ocean, or used in the rain it is possible it has suffered some kind of internal damage. The Instax Mini 9 is not waterproof and the camera has electronics on the inside which can be ruined by water.
How to Fix an Instax Mini 9 Not Turning on?
If you believe main reason for you Instax Mini 9 not turning on is because the batteries are dead, you will need to replace the old batteries with 2 fresh AA Alkaline batteries. Fujifilm film Instax camera are calibrated to be used with Alkaline batteries for best exposures and results with their cameras.
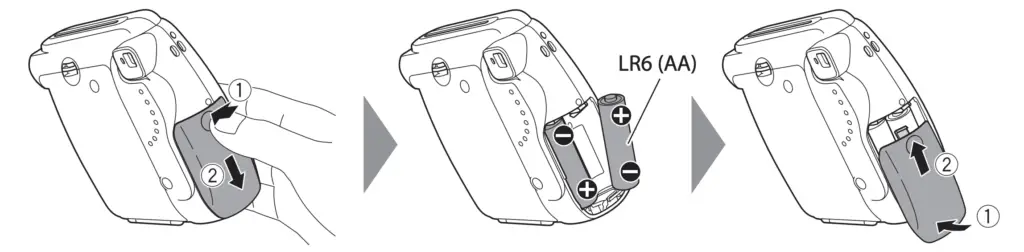
Also, make sure to load the batteries in the correct orientation by matching the “+” and “-” symbols on the batteries to those on the camera. See this article more more information about how to load batteries into the Instax Mini 9 .
.
If you suspect the reason your camera won’t turn on is because it was dropped on a hard surface or has water damage, the only fix is to reach out to a Fujifilm repair center to get your camera working again. You will find a list of Fujifilm repair centers at this website.
2. Why is My Instax Mini 9 Blinking Orange?
What Does the Instax Mini 9 Blinking Orange Look Like?
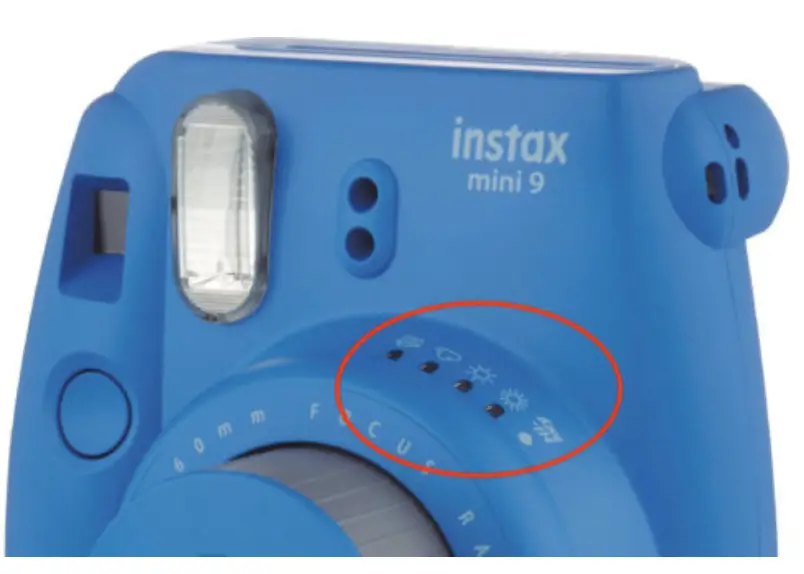
All of the brightness indicators on the front of the Instax Mini 9 are blinking orange.
What Causes the Light on your Instax Mini 9 to Blink Orange?
Normally, one of the brightness indicators will light up orange to show the flash is fully charged or to indicate which brightness mode to choose for your lighting situation. However, if all of the brightness indicators on the front of your camera blink orange at the same time, this could mean either the batteries in the camera are too low and need to be replaced, the film was not loaded correctly, or there is a paper jam inside of the camera.
How to Fix an Instax Mini 9 Blinking Orange?
To fix the blinking orange lights on the Instax Mini 9 depends on the cause.
The Batteries Are Dead and Need to be Replaced
If you believe the batteries are low then you will need to replace the batteries in the camera. Fujifilm instax cameras are calibrated to Alkaline batteries and therefore, 2 AA Alkaline batteries are recommended for use in the camera.
NOTE: Remember to replace the batteries only while the power is turned on or the lens is extended. If you replace the batteries while the power is turned off (the lens is fully in the camera) the lamps on the brightness adjustment dial will blink after turning on the power even with new batteries.
Film Not Loaded Correctly
If all of the lights on the front of the camera all flash it may be the film pack is faulty or the film pack was not loaded into the camera correctly. In most cases it is because the film pack was not loaded correctly into the camera. To check, look into the film window on the back of the camera next to the viewfinder and see if there is a large yellow mark on the film packet. If you don’t see a large yellow mark in the window the film may be loaded in upside down.
You can also see this article about how to use the Instax Mini 9 for how to load film properly into the camera.
The Film In the Camera Is Jammed
If the brightness indicators continue to blink orange after inserting fresh 2 AA alkaline batteries, then there is possibly a paper jam. To fix the paper jam remove the batteries, reinsert them, and press the shutter button once the camera is turned on – this should eject the stuck film.
If you’ve tried replacing the old batteries with a new set of 2 AA alkaline batteries and the camera is still blinking orange and won’t take an image after pressing the shutter, try resetting camera by removing and reinstalling the fresh batteries while the lens is extended (or the camera is turned on).
If you have tried all all of the above and lights on the front of your camera continues blinking orange, you may need to contact a Fujifilm repair center to fix your camera. You will find a list of Fujifilm repair centers at this website.
3. Why is My Instax Mini 9 Blinking Red?
What Does the Instax Mini 9 Blinking Red Look Like?
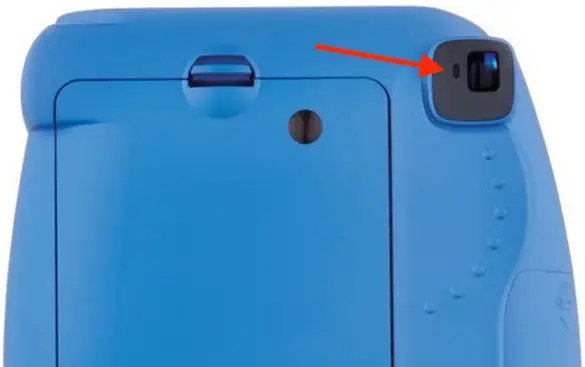
The small light to the left of the viewfinder (the flash charging lamp) on the back of the Instax Mini 9 will sometimes blink or stay red. You also won’t be able to take an image when you press the shutter button on the camera.
What Causes the Light on Your Instax Mini 9 to Blink Red?
Normally, the light to the left of the viewfinder (called the flash charging lamp) on the back of the Instax Mini 9 will blink orange to indicate that the flash on the camera is charging. However, sometimes it will blink or stay red to indicate that the batteries are too low to charge the flash. Keep in mind that the camera won’t take a picture unless the flash is fully charged.
How to Fix an Instax Mini 9 Blinking Red?
Since the red light next to the viewfinder on the Instax Mini 9 is blinking or lit means the batteries are too low to charge the flash, in order to fix this issue you will need to replace the dead batteries with 2 new AA Alkaline batteries in order fix the red light and to take an image.
NOTE: Remember to replace the batteries only while the power is turned on or the lens is extended. If you replace the batteries while the power is turned off (the lens is fully in the camera) the lamps on the brightness adjustment dial will blink after turning on the power even with new batteries.
4. What Does It Mean If All the Lights Are Flashing on my Instax Mini 9?
What Does All the Lights are Flashing on My Instax Mini 9 Look lLike?
All of the brightness indicator lights on the Instax Mini 9 continue to flash orange and won’t stop.
What Causes All the Lights Flashing on my Instax Mini 9?
There are 3 reasons why all the lights flashing on the front of the Instax Mini 9 are flashing. The first is because the batteries in the camera are too low to charge the flash. However, remember to only replace the batteries in the Instax Mini 9 while the power is turned on or when the lens is extended. The second reason is the film wasn’t loaded correctly in the camera. The third reason is because there may be a paper jam inside the camera.
How to Fix All the Lights are Flashing on my Instax Mini 9?
There are 3 reasons why the lights are flashing on your Mini Instax Mini 9 – the batteries are low, the film was not loaded correctly, or there is a paper jam inside the camera.
Batteries Are Low
If the batteries are low, the red light next to the viewfinder on the back of the camera lights up. If all the lights blink on the camera, you may need to replace the batteries while the lens is extended and while the camera is turned on.
NOTE: Remember to replace the batteries only while the power is turned on or the lens is extended. If you replace the batteries while the power is turned off (the lens is fully in the camera) the lamps on the brightness adjustment dial will blink after turning on the power even with new batteries.
Film Not Loaded Correctly
If all of the lights on the front of the camera all flash it may be the film pack is faulty or the film pack was not loaded into the camera correctly. In most cases it is because the film pack was improperly loaded into the camera. To check, look into the film window on the back of the camera next to the viewfinder and see if there is a large yellow mark on the film packet. If you don’t see a large yellow mark in the window the film may be loaded in upside down.
If the package was loaded incorrectly, you should try again. It’s worth noting the right order to load the cartridge:
- As soon as you open the package keep it away fro direct light while inserting it into the camera – the film is light-sensitive and could be damaged by sunlight.
- Do not open the back door until you’ve shot all the film to keep the film from turning all white.
- When loading the film, ensure the yellow mark on the film aligns with the yellow mark on the camera.
If you decided to continue to use the same film from the camera, go to a dark room out that is out of direct sunlight to remove the film pack, rotate the film pack to line up the yellow marks on it and the camera correctly to reload it back into the camera.
There is a paper jam inside the camera
If the brightness indicators continue to blink orange after inserting fresh 2 AA alkaline batteries, then there is possibly a paper jam. To reset the camera and fix the paper jam, remove the batteries, reinsert them, and press the shutter button once the camera is turned on – this should eject the stuck film.
If you have tried all all of the above and lights on the front of your camera continues blinking orange, you may need to contact a Fujifilm repair center to fix your camera. You will find a list of Fujifilm repair centers at this website.
5. Why is my Instax Mini 9 printing white?

What Does White Instax Film Look Like from Instax Mini 9?
The instax film is completely white and there is no image on the film.
What Causes White Instax Film in Instax Mini 9?
There are several possible causes for this:
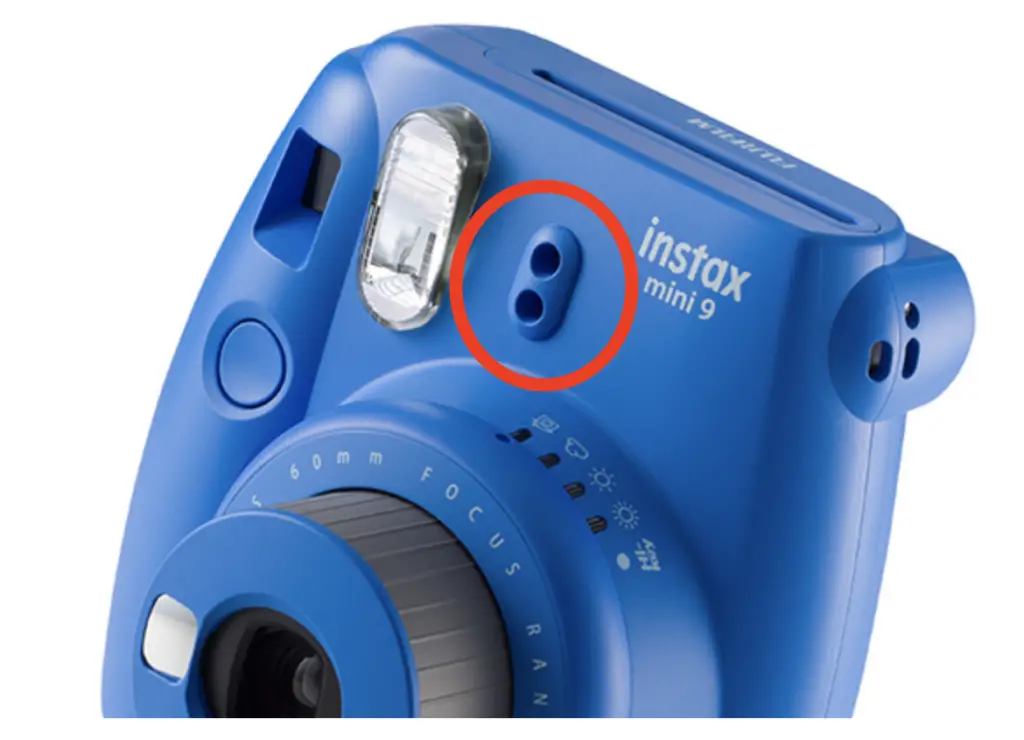
- The 2 small, parallel holes / sensors on the front of your Instax Mini 9 are covered. Both the AE Light and Flash Light sensors on the camera body and the lens are designed to measure light in the environment so the camera captures the right amount of light when you press the shutter button. When these sensors are covered, your Instax thinks there needs to more light than it actually needs.
- Wrong brightness setting was selected
- Your film was exposed to light while loading the film into the camera or the film door was opened while there was film still in the camera.
- The film was stored incorrectly and/or is expired
- The temperature of the environment is too low (below +5°C/+41°F).
How To Fix White Instax Film from Instax Mini 9?
The good news is having all white film is generally preventable in the future. Follow these steps to prevent your Instax Mini 9 from taking completely white images.
Light Sensors Were Covered When Taking an Image
If you think the light sensors where covered and this it the reason your film is white, be careful where you are holding the camera so you don’t cover them when taking an image.
Wrong Brightness Setting Was Selected
The most likely reason why your photos are coming out all white from the Instax Mini 9 is you chose the wrong brightness setting. While the instant camera suggests the ideal setting based on the environment around it using an orange light around the lens barrel on the front of the camera, you may not have chosen the best one.
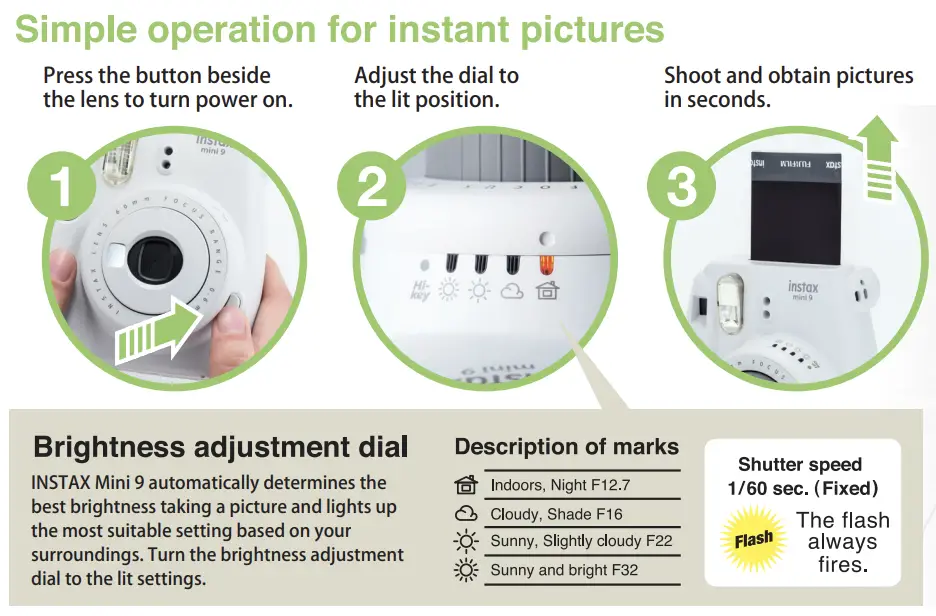
These are the different brightness settings on the Instax Mini 9 in order of bright sun to indoors:
- Very Sunny and bright: aperture of f/32 (little light goes in)
- Sunny, slightly cloudy: aperture of f/22 (some light goes in)
- Cloudy, Shade: aperture of f/16 (more light goes in)
- Indoors, Night: aperture of f/12.7 (a lot of light is allowed in, ideal for darker surroundings)
- High Key Setting: The ideal setting for a very dark environment. Note – you must choose this setting because the camera won’t choose it itself. See this article I wrote for more details on when and how to properly use the High Key setting on Instax Mini 9.
If the brightness setting indicated by the camera was not chosen when the image was taken, it is possible the image will come out very white because the camera thought it needed more light, for example when the background is too dark compared to the subject. It is also possible that your subject is too bright, make the print all white (for instance, a white car in bright sun). To fix this issue, just select the next darker brightness setting on the camera.
Film Was Exposed When Loading Into Camera or While In Camera
If you think your film was exposed while placing it into the camera or before, then in the future make sure to not load your instant film in direct sunlight (such as a dark shadow, dark room or a low-light environment).
Once the film has been loaded, you should avoid opening the film compartment at all since instant film is light-sensitive once the dark slide has been ejected from the camera. Keep in mind if you exposed your film by accident while loading it into the camera or by opening the film door while film was in the camera, the other first few film sheets will be exposed but the others in the compartment should have been protected from the light by the other film sheets and still be usable. However, this will depends on how much and long your film was previously exposed to light.
The Film Was Stored Incorrectly and/or is Expired
If your film is printing completely white It is also possible that your has expired or has something wrong with it. Because of the way Instax Instant film processes itself, sometimes the chemicals in the film become expired or lose their potency. This can happen if the Instax film is expired or if the Instax film was not stored correctly.
Instax film can be used up to 2 to 3 years after the production date, but for the best results, it should be used 1 year after production and you can see the expiry date on the package or the aluminum foil. Also, instax film should be stored in cool environment and out of heat and direct sunlight. If it isn’t stored correctly, meaning it got too hot or too cold, it can cause poor performance from the film like being all white.
The Temperature of the Environment is Too Low
While Fujifilm Instax film works well in a wide range of temperatures, you will get the best results with Instax film when used when the ambient temperature is around 41 – 104 F (or 5 – 40 C). If you are using your Instax Mini 9 and film in an environment where the ambient temperature is below 41 F (or 5 C), then your Instax print will not be able to develop correctly and turn out completely white.
6. Why Are My Instax Mini 9 Photos Black?

What Does Black Instax Mini 9 Photo Look Like?
The instax film is completely black with no image on the film at all.
What Causes Instax Mini 9 Photos Coming Out Black?
There are 5 possible causes for why your instax image is completely black:
- The lens wasn’t fully extended when you turned the camera on or the lens barrel was held when the image was taken so the shutter wasn’t able to fire correctly. The image is too dark because no light was able to hit the image.
- Your Instax film is expired or wasn’t stored correctly
- You are taking an image at night or in a dark environment and the subject is too far away at night or the flash was covered
- Brightness adjustment dial setting is incorrect.
- The camera miscalculated the exposure or has malfunctioned and needs to be reset
- The temperature of the environment is Too Low
How To Fix Your Instax Mini 9 Photos Coming Out Black?
The good news is having black images can be fixable for the future by following the each suggestion below:
Lens Wasn’t Fully Extended or The Lens Barrel Was Held When Taking An Image
The lens wasn’t fully extended when you turned the camera on so the shutter wasn’t able to fire correctly. In the future, make sure that your lens clicks into place before taking an image while using either the normal mode or selfie mode. It could also be that you held the lens barrel when taking an image so the shutter did not work properly.
Instax Film Is Expired And/Or Was Not Stored Correctly.
One reason why the film is all black is your film has expired or has something wrong with it. Because of the way Instax Instant film processes itself, sometimes the chemicals in the film it can lose its potency. This can happen if the Instax film is expired or if the Instax film was not stored correctly.
Instax film can be used up to 2 to 3 years after the production date, but for the best results, it should be used 1 year after production and you can see the expiry date on the package or the aluminum foil. Also, instax film should be stored in cool environment and out of heat and direct sunlight left inside of the foil pouch.
Taking an Image at Night or Too Far Away from Subject Or The Flash Was Covered
Another cause for your Instax image being too dark or black is because the subject was too far away (farther than 8.8 ft or 2.7m) from your subject while taking an image at night, which is outside of the effective flash range of the camera and wasn’t strong enough to fully light your subject. Remember that the effective flash range of the Instax Mini 9 is 23.6 inches – 8.8 ft (0.6 to 2.7 m).
Also be careful when holding your camera not to cover the flash on the front of the camera with your finger or hand when taking an image. This will block light from the flash hitting the subject and cause a dark or black image.
Brightness Adjustment Dial Setting is Incorrect.
One of the most likely reasons why your photos are coming out all black from the Instax Mini 9 is you chose the wrong brightness setting. While the instant camera suggests the ideal setting based on the environment around it using an orange light around the lens barrel on the front of the camera, you may not have chosen the best one.
These are the different brightness settings on the Instax Mini 9 in order of bright sun to indoors, which for the darkest setting:
- Very Sunny and bright: aperture of f/32 (little light goes in)
- Sunny, slightly cloudy: aperture of f/22 (some light goes in)
- Cloudy, Shade: aperture of f/16 (more light goes in)
- Indoors, Night: aperture of f/12.7 (a lot of light is allowed in, ideal for darker surroundings)
- High Key Setting: The ideal setting for a very dark environment. Note – you must choose this setting because the camera won’t choose it itself. See this article I wrote for more details on when and how to properly use the High Key setting on Instax Mini 9.
If the brightness setting indicated by the camera was not chosen when the image was taken, it is possible the image will come out completely dark because the camera thought it had enough light, for example when the background is too bright compared to the subject. To fix this issue, just select the next brighter brightness setting on the camera or use the Hi Key camera setting to lighten up the image. On the other hand, when shooting outside on a bright day, Sunny or Very Sunny are the ideal settings.
The Camera Miscalculated the Exposure or Has Malfunctioned and Needs to be Reset
It is possible that the microcomputer in your camera miscalculated the light in your environment and gave you the wrong brightness settings. To fix this you need to reset your camera by taking out the batteries and inserting them or replacing them with 2 new Alkaline double AA batteries. If this doesn’t work, then you may need to take the batteries out with the lens fully extended and reinsert them.
The Temperature of the Environment is Too Low
While Fujifilm Instax film works well in a wide range of temperatures, you will get the best results with Instax film when used when the ambient temperature is around 41 – 104 F (or 5 – 40 C). If you are using your Instax Mini 9 and film in an environment where the ambient temperature is above 104 F (or 40 C), then your Instax print will not be able to develop correctly and be dark or completely black.
7. Why Won’t My Instax Mini 9 Take Pictures or Photos?

What Does It Look Like When Your Instax Mini 9 is Not Taking Photos?
The Instax Mini 9 camera won’t take an image despite pressing the shutter button.
What Causes My Instax Mini 9 to Not Take Photos?
The most common cause for your camera not taking photos is that the camera batteries are too low or dead. This is because the camera won’t take an image if there isn’t enough power to fully charge the flash. However, there are some other reasons such as:
- The Flash is Charging
- The batteries are not loaded correctly
- Camera is not turned on
- Camera has remained idle for roughly 5 minutes with the power turned on
- Film pack not loaded correctly
- No more film in the camera
How To Fix Your Instax Mini 9 When It Won’t Take Photos?
The good news is it should be easy to fix why your Instax Mini 9 is not taking photos by following one of the suggestions below:
The Camera Flash Is Charging
The Instax Mini 9, like almost all Instax Mini cameras, won’t take a picture until the flash is fully charged. So, if there is a flashing red light to the left of the viewfinder on the Instax Mini 9, this means the flash is charging and the camera won’t take an image until the red light goes out and an orange light on the front of the camera indicating the correct brightness setting is lit up.
Batteries Are Low or Dead
If you are sure you have film in your camera and your Instax Mini 9 still won’t take photos, then it may just be that the batteries in the camera are dead and need to be replaced. Dead batteries are indicated on the Instax Mini 9 if the red light to the left of the viewfinder keeps blinking or stays lit. Another indicator that the batteries need to be replaced is all of the brightness indicator lights on the front of the camera flash. Remember to only use 2 AA Alkaline batteries in Instax cameras since any others batteries (such as rechargeable / NiMH, Zinc Carbon, or NiCd) won’t give optimum results.
Also, remember to replace the batteries only while the power is turned on or the lens is extended in the Instax Mini 9. If you replace the batteries while the power is turned off (the lens is fully in the camera) the lamps on the brightness adjustment dial will blink after turning on the power even with new batteries.
The Batteries Are Not Loaded Correctly
Another possible reason the Instax Mini 9 camera won’t take an image is because the batteries are not loaded correctly. When loading in the 2 AA alkaline batteries into your camera, make sure to match up the “+” and “-” symbols on the batteries to those on your camera.
Camera is Not Turned On
It is possible that the camera has not been properly turned on and, therefore, won’t take any images. Turn the camera by pressing the large button on the bottom right of the front of the camera below the camera lens. When this button is pressed, the camera lens will pop out and extend.
Camera has Remained Idle for Roughly 5 Minutes With the Power Turned On
If the camera has been turned on and sat idle for about 5 mins, the camera will turn itself off to save battery power. To turn the camera back on, press the shutter button halfway down or press the lens back into the camera and press the shutter button to turn the camera back on.
Film Pack Not Loaded Correctly
If the film pack was not loaded correctly in your camera, the camera will not take an image. To check to see if the film was correctly loaded, look into the film window on the back of the camera next to the viewfinder and see if there is a large yellow mark on the film packet. If you don’t see a large yellow mark in the window the film may be loaded upside down or backward. See this article I wrote for more information about how to properly load film into an Instax Mini 9.
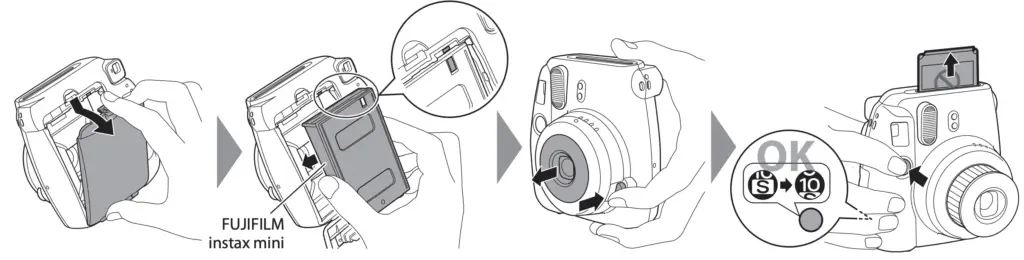
If you decide to continue to use the same film from the camera, go to a dark room out that is out of direct sunlight to remove the film pack, rotate the film pack to line up the yellow marks on it and the camera to reload it back into the camera correctly.
Need to Reset the Camera
If you’ve tried replacing the old batteries with a new set of 2 AA alkaline batteries for the Instax Mini 11 and it still won’t work. Try resetting the microcomputer in the camera by removing and reinstalling the fresh batteries while the lens is fully extended. Depending the camera, you may have to wait 2 hours before reinstalling the batteries.
No More Film In the Camera
One reason why your camera won’t take any more images is because the film pack in the camera is spent. To check and see if this is the issue, look at the film counter on the back of the camera at the bottom counting from 10 to 0. When it reaches 0, you need to replace the film. See this article for how to replace the Instax film in an Instax Mini 9
Once you figure out how to take images with your Instax Mini 9, see this article for tips on taking better images with your Instax Mini 9.
Where can I fix my Instax Mini 9?
If you’re still having trouble, you may have a bad camera and it might be best to take your Instax Mini 9 to a camera specialist or a Fujifilm repair center. If there are no repair centers near your location, Fujifilm has an evaluation process to follow, and you will have to send your camera over to them by mail. You will find a list of Fujifilm repair centers at this website here.