
The Instax Mini 11 was released in March 2020 and is a great camera to for Instant photography and it can produce amazing images. However, there are some tips and tricks you need to know when using the camera to make sure you get the best images out of the camera.
To get the best pictures with the Instax Mini 11 avoid contrasty scenes, be aware of the minimum focusing distance, don’t cover up the small holes or the flash on the front of the camera when taking an image, use the built-in selfie mode, and making sure there are 2 fresh AA Alkaline batteries in the camera when needed.
While these are some of the more common tips for getting the best images out of the Instax Mini 11, they are not the only ones. See the list of 12 tips below for making sure the images you take with your Instax Mini 11 are better than what you’ve been getting so far.
1. Make Sure Not To Cover Up the Two Small Holes On the Front of the Camera When Taking Images
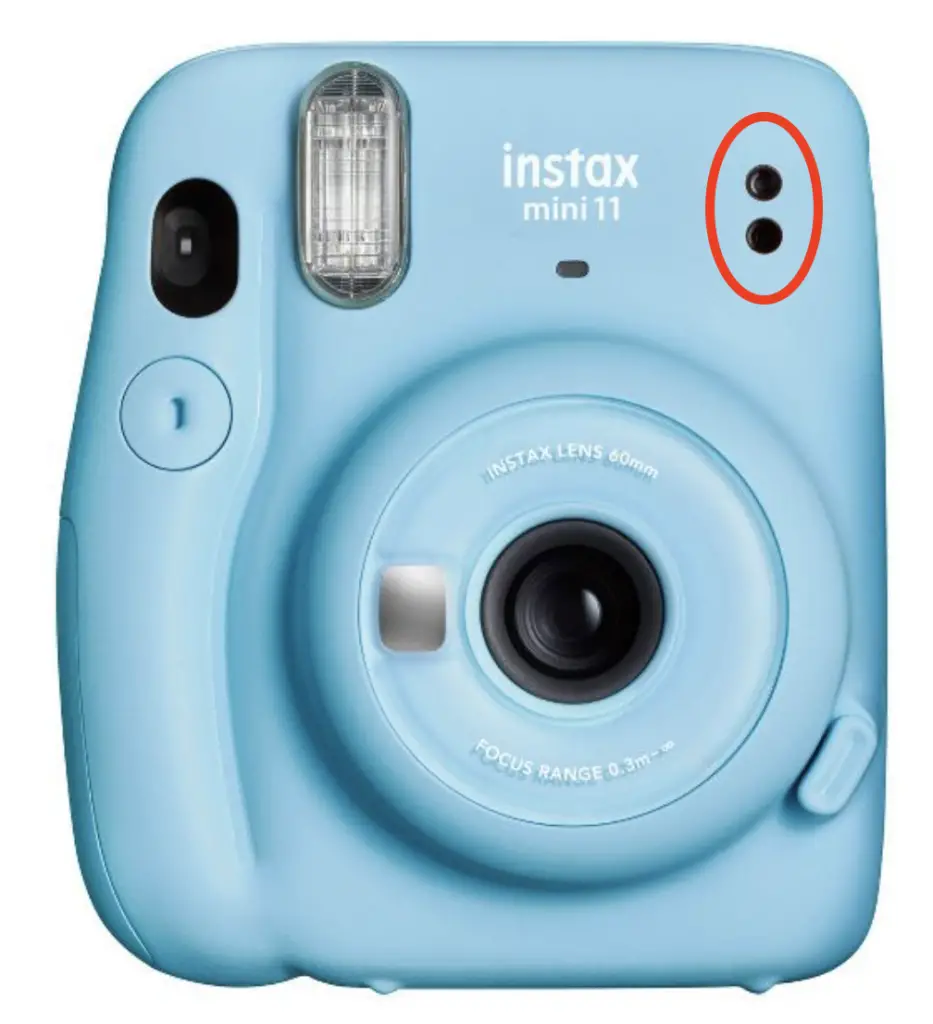
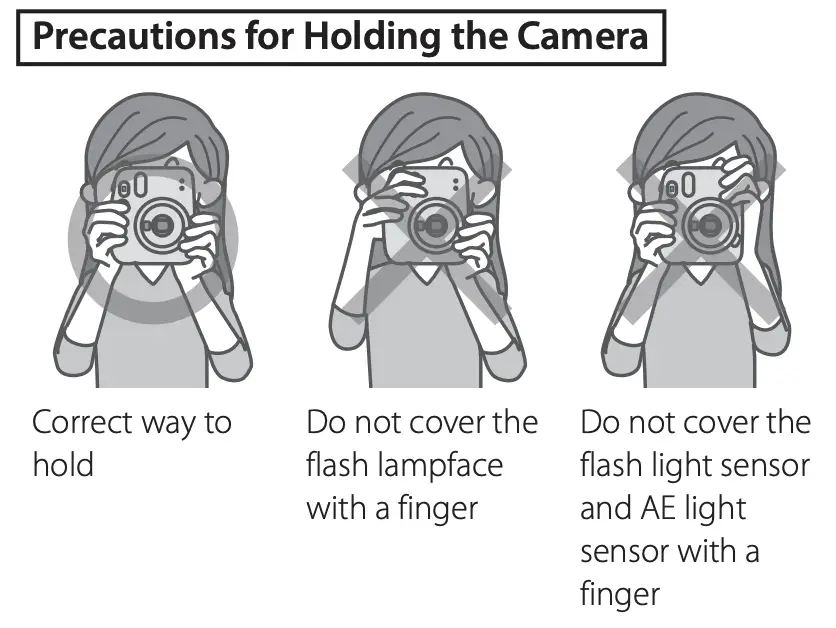
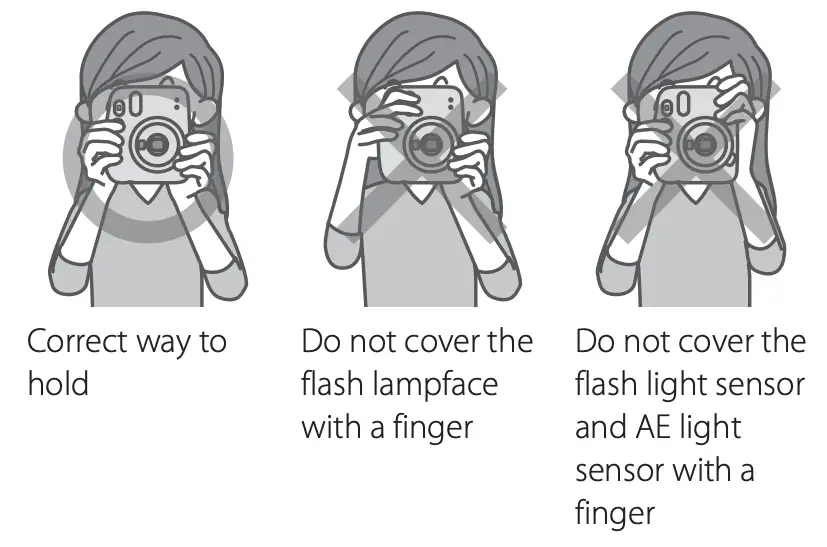
When taking images with the Instax Mini 11 be aware not to cover the two small holes on the front of the camera with your fingers, hand, or camera strap. The two holes on the camera is how the camera measures the amount of light in the environment in order to calculate the correct exposure (top hole) and how much flash power to use (bottom hole). If you cover up both of these holes, the camera will be tricked into thinking it needs more light than in reality and the resulting image will be washed out and overexposed or, in the worst case, completely white.
See the graphic below for how to hold your camera correctly:

2. Make To Not Cover Up The Flash When Taking An Image
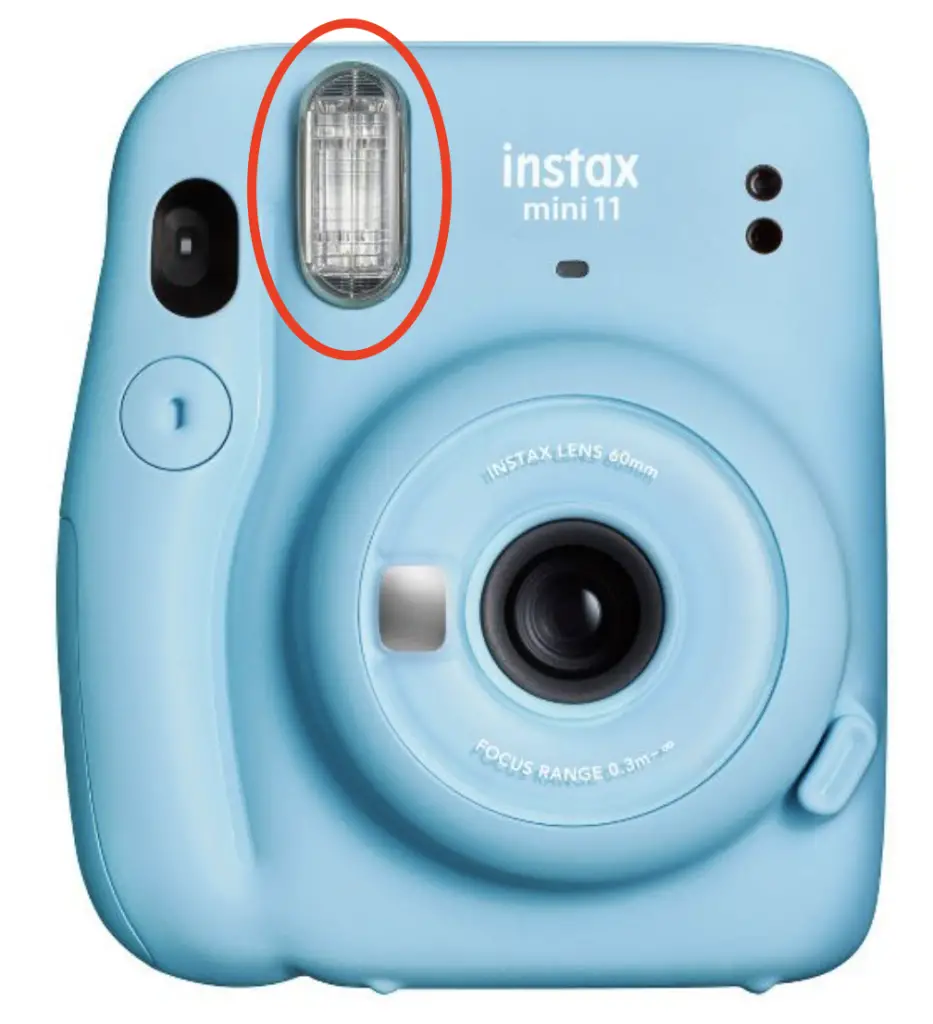
The Instax Mini 11 has an auto exposure system with a built-in flash on the front of the camera that fires each time an image is taken and, unfortunately, cannot be turned off.
When taking an image, make sure to not cover up the flash with your finger, hand, or the strap. This will result in an image that is too dark or underexposed since the camera thinks the subject is getting more light than it actually is.
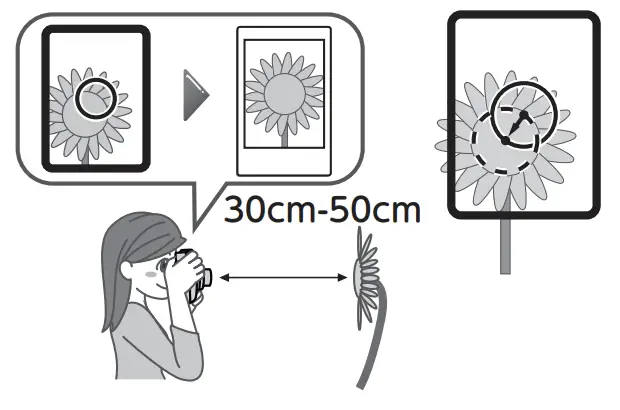
3. Be Aware of the Instax Mini 11 Minimum and Maximum Focus Distance
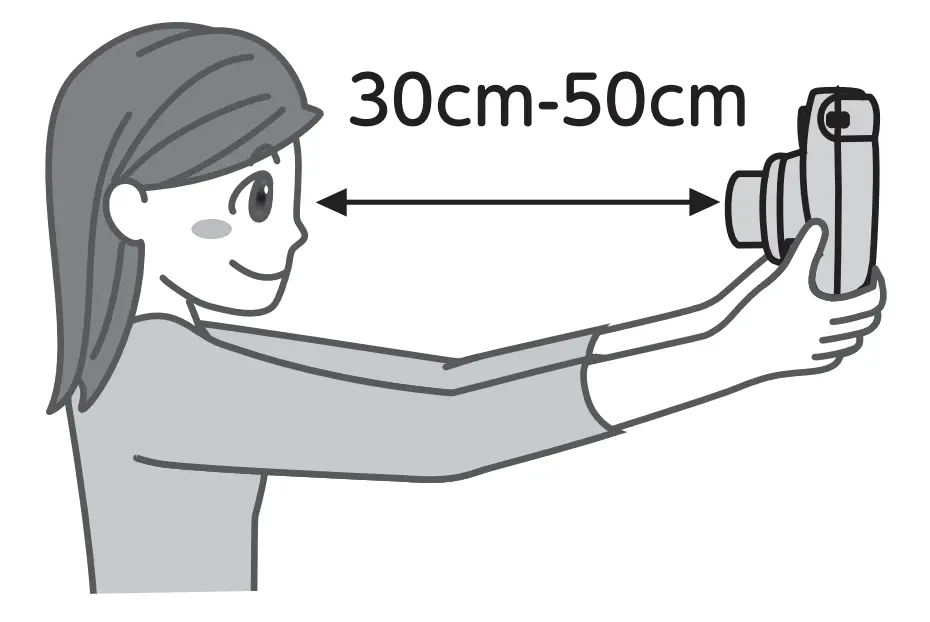
The Instax Mini 11 has a minimum focusing distance of 11.8 inches (30 cm) or a little less than 1 foot. This means that you need your subject to be at least 11.8 inches (30 cm) from the camera and not farther away than 19.6 inches (50 cm)or your image will be blurry and out of focus. To give you an idea of the distance, this would be about the same distance of your arm from your wrist to your elbow.

If you are too close to your subject than it will appear blurry in the image. On the other hand, if you are too far away from your subject (including very far away since the Instax Mini 11 doesn’t have a landscape mode) the main subject of your image will also be slightly blurry if you don’t get closer.
4. Keep your Subject in the Center of the Frame to Avoid Lens Distortion and Keep Your Subject Sharp
Since the Instax Mini 11 has a focal length of 60mm (which is a standard but slightly wide lens), keep the subject of your image in the middle of the frame using the circle guide in your viewfinder and away from the edges of the frame so you don’t get lens distortion. However, this may be a good idea if you are going for abstract images.
It is also a good idea to keep your subjects in the middle of the frame because that is the sharpest area of the lens. This will make sure your subject is in focus (along with maintaining the correct minimum focusing distance of at least 11.8 inches or 30 cm).
5. The Effective Flash Range For the Instax Mini 11 Is Between 11.8 inches – 8.8 ft (0.3m to 2.7 m)
The flash on the Instax Mini 11 fires with every shot and adjusts power automatically depending on the light in your environment and distance from your subject. It is ready to fire within 6.5 seconds or less and has a large range of effectiveness between 11.8 in. – 8.8 ft (0.3m to 2.7 m).

This means that you need to make sure your subject is at most 8.8 ft (2.7m) from the camera in a dark environment or they won’t be bright enough. Or on the other hand, if the subject is closer than 11.8 inches (0.3m) than the subject will appear overly bright and washed out. The image will also appear blurry since this is also the minimum focus distance as well.
6. Use A Different Type of Instax Mini Film
This tip is more about the film than the camera itself but it can help you achieve better images by thinking about what images will best go with your film style. Most associate Instant film like Instax film with color film and white borders. However, Instax has been making other types of film for their Instax mini cameras for a while.
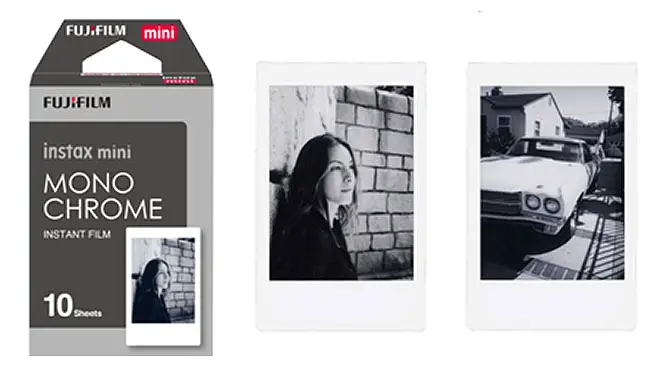
While it is true that often the Instax Mini color film with the white border is the cheapest film, there are many other types of Instax Mini film available including black & white mini film with different border options like white as well as black and color film with many border color options. There are even some limited edition Instax mini films are available.


See this article for all the different types of Instax Mini films are available, how much they cost, and where to purchase them.
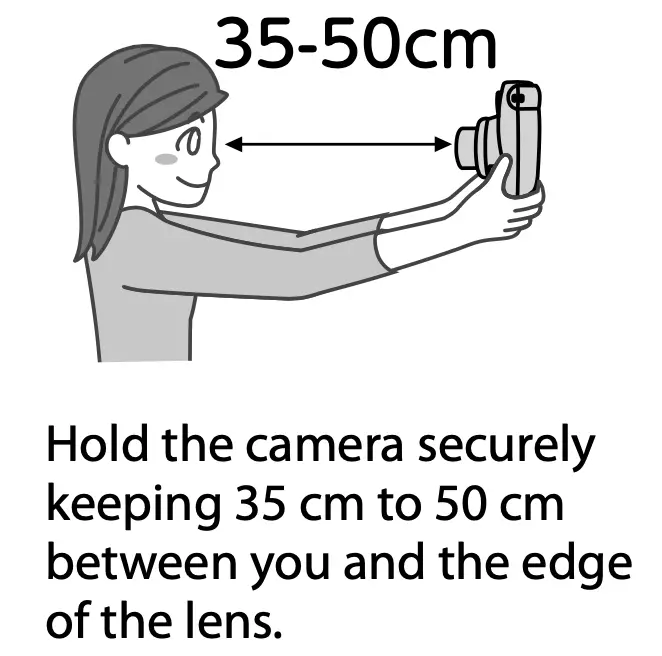
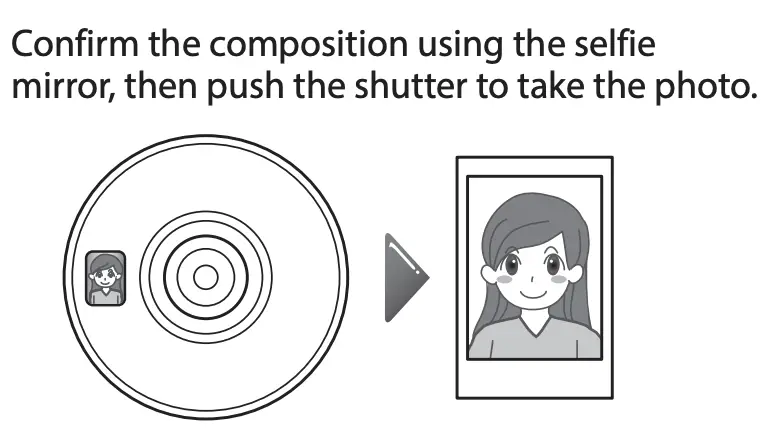
7. Use the Selfie Mode On Instax Mini 11 to Take A Selfie
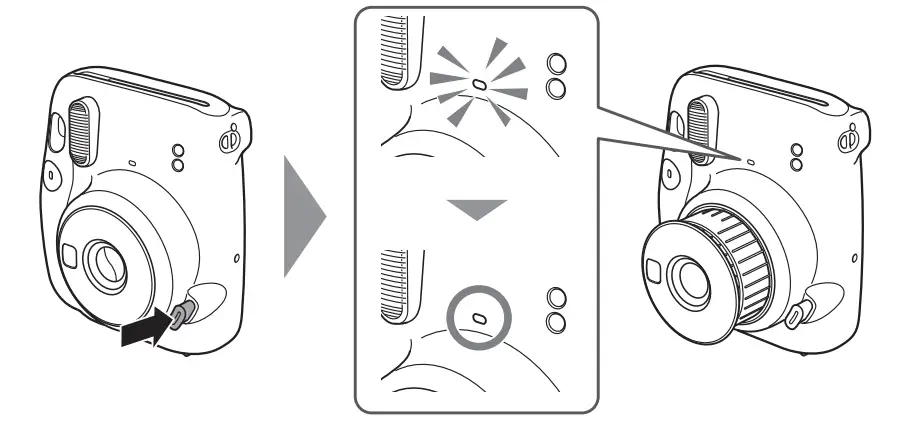
The Instax Mini 11 is one of the few Instax cameras with a built-in selfie mode rather than using an adapter, like the Instax Mini 9. While the Instax Mini 11 already can focus down to 11.8 inches, the selfie mode allows the camera to focus between 11.8 in. – 8.8 ft (0.3m to 2.7 m), making the camera great for taking selfies. The built-in selfie mirror on the front of the Instax Mini 11 also removes a lot of the guesswork out of lining up your self-portrait.
To activate the selfie mode on the Instax Mini 11, turn on the camera by pressing the narrow button next to the lens. Once the lens extends, pull the edge of the lens barrel so the lens pops out and reveals the words “Selfie On” on the top of the lens barrel.
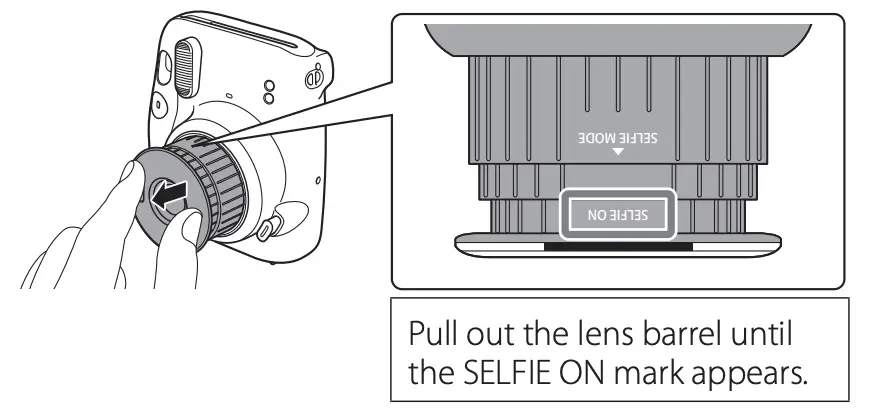
When you are finished using the selfie mode, just push the edge of the lens back until the words “Selfie On” is hidden or push the lens fully into the camera to turn the Instax Mini 11 off entirely.
See this article for more about the selfie mode on the Instax Mini 11.
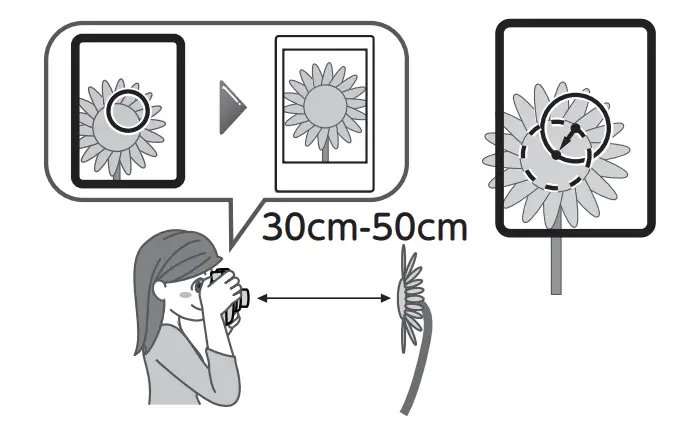
8. Use the Selfie Mode on Instax Mini 11 To As A Macro Mode to Photograph Small Objects
The Instax Mini 11 is one of the few Instax cameras with a built-in selfie mode rather than attaching an adapter, like the Instax Mini 9. The selfie mode is mainly used for taking selfies, but the selfie mode on the Instax Mini 11 can also be used a Macro Mode to take close up images of small objects, to focus on small details, and to fill your frame.
However, when using selfie mode on the Instax Mini 11 to shoot things up-close, remember there will be a small discrepancy between what the viewfinder sees and what will be on the film. This is called parallax error and is easily adjusted for on the Instax Mini 11 by moving your subject slightly off center (the small circle in the viewfinder) to the upper-right in the camera’s viewfinder.
To activate the selfie mode on the Instax Mini 11 to be used as a macro mod, turn on the camera by pressing the narrow button next to the lens. Once the lens extends and the camera is on, pull the edge of the lens barrel so the lens pops out and reveals the words “Selfie On” on the top of the lens barrel. When you are finished, just push the edge of the lens back until the words “Selfie On” is hidden or push the lens fully into the camera to turn the Instax Mini 11 off entirely.
9. Install 2 Fresh Alkaline AA Batteries Before Loading Film Into the Camera
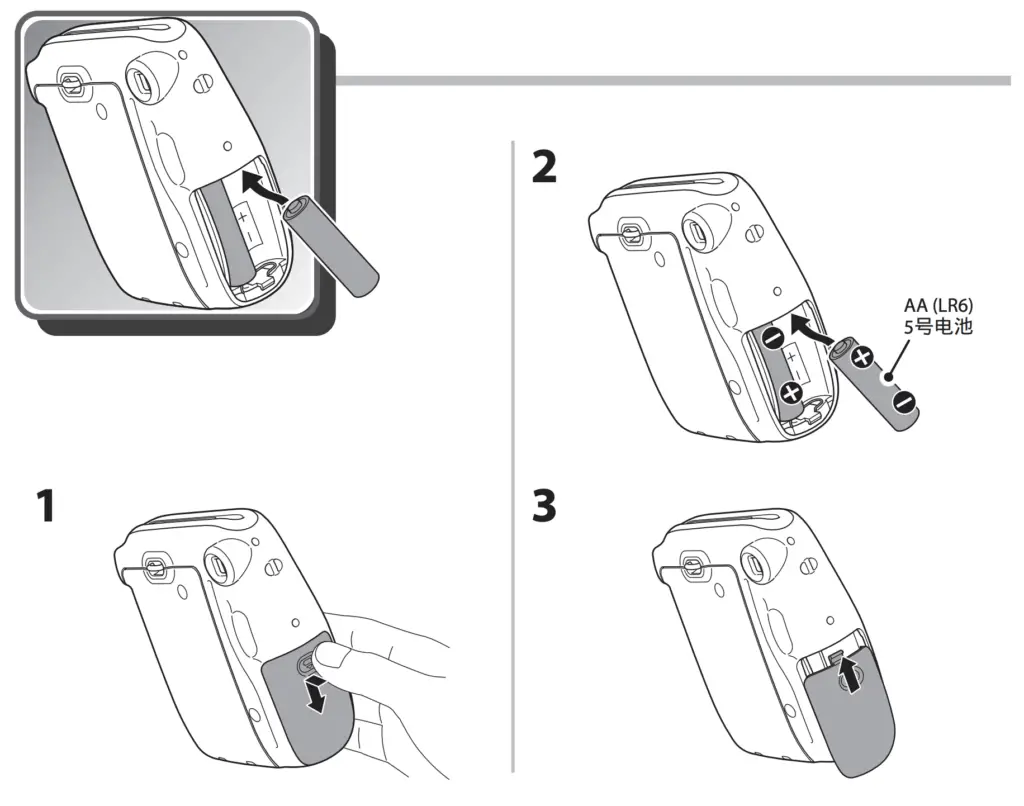
Fujifilm recommends only using 2 Alkaline AA batteries in your camera and installing them before you load the film pack into your Instax Mini 11. Using other battery types in your camera may cause problems with the flash charging correctly and the light on the front of the camera may quickly flash.
Putting fresh batteries in your camera is one of the handful of steps needed to be taken when setting up your Instax Mini 11 for the first time. Read this article for the correct steps for setting up your Instax Mini 11 for the first time or this guide if you run into any problems using the Instax Mini 11.
10. Avoid Direct Light When Loading Film Into Your Camera
Like all instax film used in the Instax line of cameras, the film used in the Instax Mini 11 is sensitive to light. Avoid direct light when loading your film pack into the camera to avoid accidental exposure and light leaks. Fujifilm recommends seeking out low light environment like a room without windows (such as a bathroom) to load more film into your camera and closing the film cover immediately after loading to avoid accidental light exposure to your film. This also means that once the dark paper has ejected from the camera, not to open the film door or your film will be exposed and be usable.

See this guide for how to load film into an Instax Mini 11.
11. Make Sure Not To Touch the Camera Lens or Cover the Film Ejection Slot on the Top of the Camera When Taking Pictures
When holding the camera to take an image, make sure not to touch and cover the lens of the camera with your finger or cover the film ejection slot on the top of the camera.. You will obstruct the view of the camera with some of your finger and you will most likely smudge the lens can cause your image to be blurry.
If you smudge the lens you can clean the plastic lens with a dry, microfiber cloth meant for glasses. You don’t want to use your t-shirt, since it may scratch the lens.
If you cover the film ejection slot on top of the camera while taking an image, you may damage the mechanical elements inside the camera when the film isn’t able to eject. It may also damage your film since the chemicals won’t be spread across the film evenly if the film isn’t able to eject properly.
12. Avoid High Contrast Scenes
Instax film and cameras are not the best at capturing images with big difference in the amounts of light in them. To get better images overall with the Instax Mini 11, be aware of this limitation and avoid taking images with a contrasty scenes.

The Instax Mini 11 does come with a flash and automatic exposure system that is good for lighting up the background indoors due to the slow sync speed on the camera’s shutter. However, this feature of the Instax Mini 11 is best used inside and doesn’t help so much outdoors with long focusing distances.

One way to get well lit images outside is to take images on overcast or cloudy days when there isn’t harsh and contrasty shadows. However, if you do find yourself outside on a bright sunny day, one option is to only take images in shadows but avoiding shooting either into a shadow from a bright area or into a bright area from inside a shadow.


13. No Worries If The Light On The Front of Your Instax Mini 11 Camera is Blinking
If you’ve recently purchased a new Instax Mini 11, you might be wondering why the light on the front of your camera is blinking. There’s no need to worry, as the light blinking is perfectly normal behavior. The front light will slowly blink orange when the Instax Mini 11 it is first turned on and indicates the flash is charging. Keep in mind that camera won’t take an image until the flash is completely charged. Once the charge is complete, the flash will stop blinking and remain lit to show the camera is ready for taking images.
If the light on the front of the camera quickly blinks after being turned on, it most likely means that the batteries are running low and need to be replaced but it could also mean their is a film jam inside the camera.
If your camera is still blinking after you replace the batteries, make sure to replace the batteries with alkaline batteries only. If this doesn’t stop the light on the front of the camera from blinking, than you will need to replace the batteries when the lens is extended (the camera is on).
If you suspect there is a film jam, don’t try to pull the film out yourself since this may damage the mechanical components of the film advance system inside the camera. The best thing to do is to remove and reinsert the batteries when the camera lens is extended (the camera is on). This is reset your camera and the jam should sort itself out.
See this guide about common problems with the Instax Mini 11 and how to fix them for more information.
In Summary
The Instax Mini 11 is a popular instant camera because of how easy it is to use and the low price of Instax Mini film. The way to get the best picture with the Instax Mini 11 are by following these 13 tips listed in the article as well as below:
- Don’t Cover Up the Two Small Holes On the Front of the Camera When Taking Images
- Don’t Cover Up The Flash When Taking An Image
- Be Aware of the Instax Mini 11 Minimum and Maximum Focus Distance
- Keep your Subject in the Center of the Frame to Avoid Lens Distortion and Keep Them Sharp
- The Effective Flash Range For the Instax Mini 11 Is Between 11.8 inches – 8.8 ft (0.3m to 2.7 m)
- Use A Different Type of Instax Mini Film
- Use the Selfie Mode On Instax Mini 11 to Take A Selfie
- Use the Selfie Mode on Instax Mini 11 To As A Macro Mode to Photograph Small Objects
- Install 2 Fresh Alkaline AA Batteries Before Loading Film Into the Camera
- Avoid Direct Light When Loading Film Into Your Camera
- Make Sure Not To Touch the Camera Lens or Cover the Film Ejection Slot on the Top of the Camera When Taking Pictures
- Avoid Harsh Contrast to Prevent Unflattering Shadows
- No Worries If The Light On The Front of Your Instax MIni 11 Camera is Blinking
Each one of these tips will help you make consistent images and help make taking images with the Instax Mini 11 an enjoyable experience!