
The Fujifilm Instax Mini 11 is a Polaroid-style camera that uses film to create physical, original, and beautiful prints. The camera is simple to use and has a variety of settings that can be customized depending on the photo you want to take. But first, you will want to set up your Instax Mini 11, and we will go into the details in this guide.
To set up the Instax Mini 11 for the first time, follow these steps:
- Load two alkaline AA batteries into the camera
- Load Instax Mini film into the camera
- Turn your Instax Mini 11 on by pressing the narrow power button below the lens
- Choose either the automatic or selfie mode
- Use the viewfinder or selfie mirror to line up your shot
- Take a picture by pressing the shutter button beneath the viewfinder on the front of the camera.
But of course, there’s more to know than just getting the camera ready so read on find out more essential points and tips for getting a good images with the Instax Mini 11.
Steps for Setting Up Instax Mini 11
These are the steps needed to set up the Instax Mini 11 for the first time in more detail:
1. Load Batteries Into the Instax Mini 11

The Fujifilm Instax Mini 11 is powered by two AA Alkaline batteries, which lasts for about 100 prints. The first step when getting the camera ready to shoot for the first time is to open the battery lid is by pressing it and sliding the battery lid down. Then, load the 2 batteries into the camera matching the correct orientation, and the sliding the battery lid back into place.
2. Load Film in the Instax Mini 11
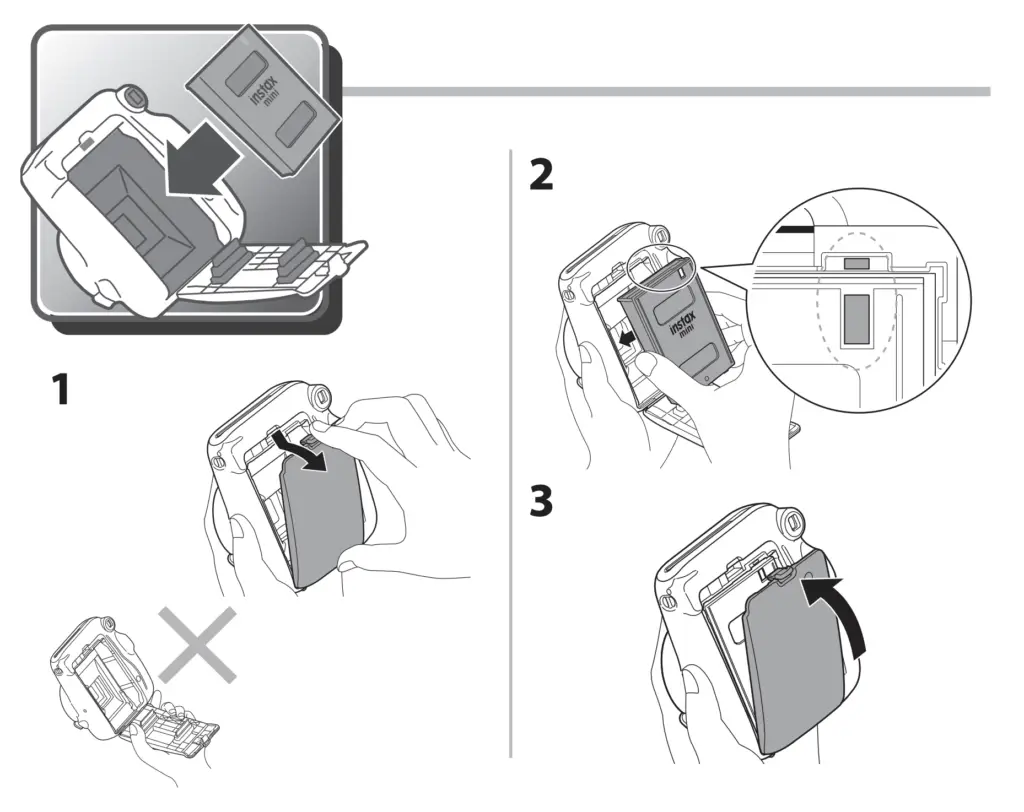

- First, make sure there isn’t any film currently in the camera or you will exposure your film and ruin it. Do this by looking a the small window to the left of the viewfinder. If it is yellow, then there is film inside your camera.
- Also, make sure the film counter on the bottom right of the camera is at 0, which means all the film has been shot.
- To load film in the camera, open the film door of the instax camera by pull down on the notch on the film door and pulling the film door away from the camera. Be careful to hold the film camera by the body and not the film door as it could break.
- Place your new film pack (without the protective foil) with the yellow mark on the film pack lined up to the yellow mark on the camera
- Finally, close the film door until you hear a click.
3. Turn The Instax Mini 11 On And Eject The Darkslide
Now that the batteries and film are loaded, you can turn on the camera and prepare it to take images by following these steps:
- Push the narrow power button located on the bottom of the camera near the lens. The lens will then extend, and an orange light will start blinking on the front.
- Once the light stops blinking and remains on, the flash is fully charged.
- Before you can start taking images you will need to eject the darkslide and will be indicated when a “S” showing in the film counter window on the back of the camera. To do this press the shutter button to eject the covering that protects your film from light while loading it into your camera. Once the darkslide has been ejected from the camera, it is ready to take images.
NOTE: If you’re willing to test the camera, to see if everything is in order, you can do so by not loading film beforehand. Once you know the camera functions properly, add the film following the steps above.
4. Take Photos
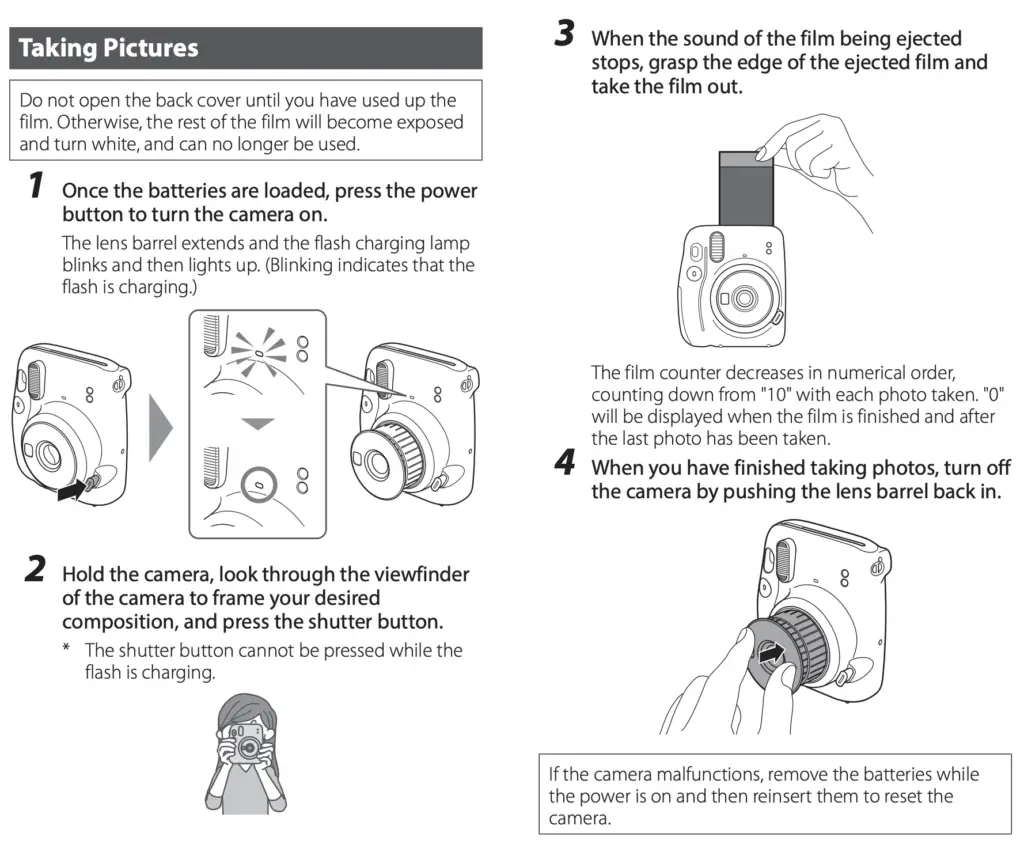
Taking pictures is straightforward with the Instax Mini 11. To take an image using the Instax Mini 11 follow these steps:
- Turn the camera on by pressing the power button next to the lens on the bottom of the camera
- Hold the camera and look through the viewfinder to line up your camera with your subject. Keep in mind that the shutter won’t be able to be pressed while the flash is charging
- Press the shutter button located below the viewfinder on the front of the camera to take your picture
- When the sound of the ejected film stops, touch the end of the film on the largest white part and pull the film out of the camera
- To turn off the camera, press the lens barrel back not the camera until you hear a click or until it is fully inserted
NOTE: Remember that for Instax images to develop well once they are ejected, they should be covered by the hand to keep out of direct light and then laid flat in a dark space. Touching the image on the Instax film or shaking the picture will damage it.
Tips After Setting Up Your Instax Mini 11
Below are some tips on setting up your Instax Mini 11 camera. If you run into problems with using your Instax Mini 11, once you setup your camera see this article how to how to fix the most common problems with the Instax Mini 11.
Don’t Open Your Film in Direct Sunlight
Don’t load new film into your instant camera film in direct sunlight. When you do this the direct sunlight can expose your film and create light streaks on the film and even ruining it. Instead, load your film in shade, under a cover like a jacket or shirt, wait until it’s cloudy, or a room without windows and the lights off to load your film into your camera. This way, you’ll get the best possible results with your film.
For Instax images to develop well, once the film is ejected it should be covered by the hand to keep out more direct light and then laid flat in a dark space. Touching the space where the image appears or shaking the picture will damage it.
Remember the Maximum Flash Range of Instax Mini 11
Keep in mind when shooting images with the Instax Mini 11 that is the flash range is only 9 ft (2.8 meters). This means anything past this distance won’t be lit by the flash, which will result in underexposed or completely dark subjects when shooting in low light situations like at outside or indoors at night or in the dark.
Keep the Minimum Focus Distance of the Instax Mini 11 In Mind
The Instax Mini 11 has a minimum focusing distance of 1.6 ft (0.5m) from the camera. This means that anything closer to the camera won’t be in focus or blurry and will be overly bright as well so it best to maintain this distance when taking images.
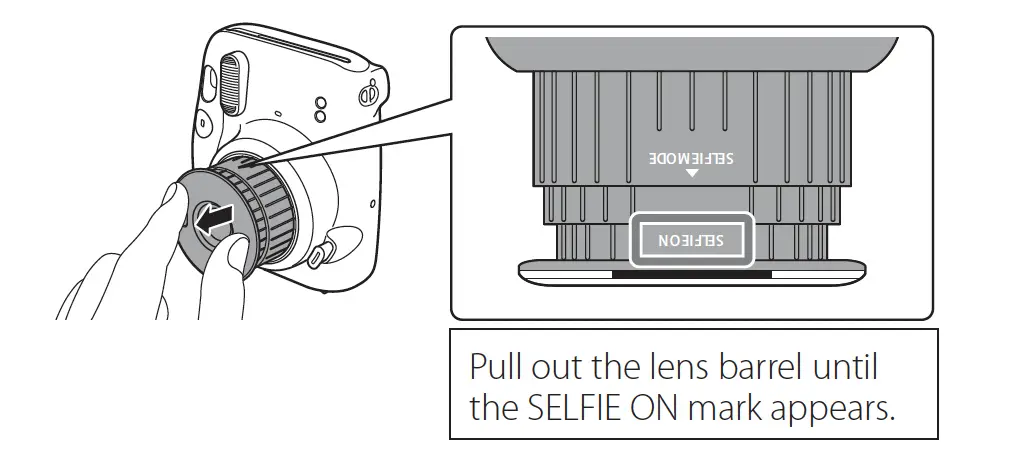
However, the camera has a built-in selfie mode that allows the camera to focus at 11.8 inches – 1.6 ft (30-50 cm), rather than using a focusing adapter like the Instax Mini 9. To activate the selfie mode on the Instax Mini 11, pull out the the front of the lens barrel until “Selfie On” appears on the top of the lens barrel.
Be Aware that You Cannot Turn the Flash of the Instax Mini 11 Off
The flash on the Instax Mini 11 automatically controlled (unlike the Instax Mini 9) and cannot be switched off. However, it can be covered with tape or thick paper but I recommend using the flash since Fujifilm’s instant film needs a lot of light to make good images, and having a flash on is essential in any low-light or indoor scene.
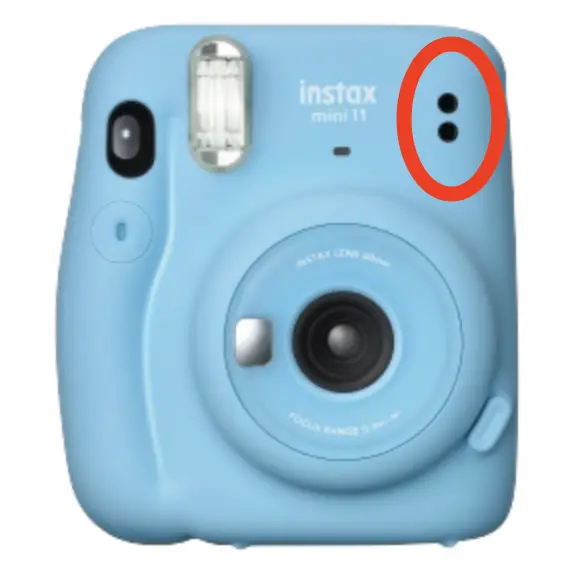
Don’t Cover the Holes on the Front of the Instax Mini 11
When taking an image with the Instax Mini 11 make sure not to cover up the two small holes next to the camera flash or the image will be completely dark or completely white.
Don’t Panic If Lights On Your Instax Mini 11 Are Blinking
If you’ve recently purchased a new Instax Mini 11, you might be wondering why the light is blinking. There’s no need to worry, as this is perfectly normal behavior. The front light will blink orange or red when it is first turned on, which means that the flash is charging. Once the charge is complete, the flash will stop blinking and remain on.
If the flash continues to blink after being turned on, it generally means that the batteries are running low and need to be replaced. If your camera is still blinking after you replace the batteries, make sure to replace the batteries with alkaline batteries only. Another tip is replacing the batteries when the camera is on (the lens is extended) may also help the blinking to stop.
For more about common problems with the Instax Mini 11 and how to fix them, see this article about the Instax Mini 11.
Instax Mini 11 Frequently Asked Questions
How To Turn On Instax Mini 11?
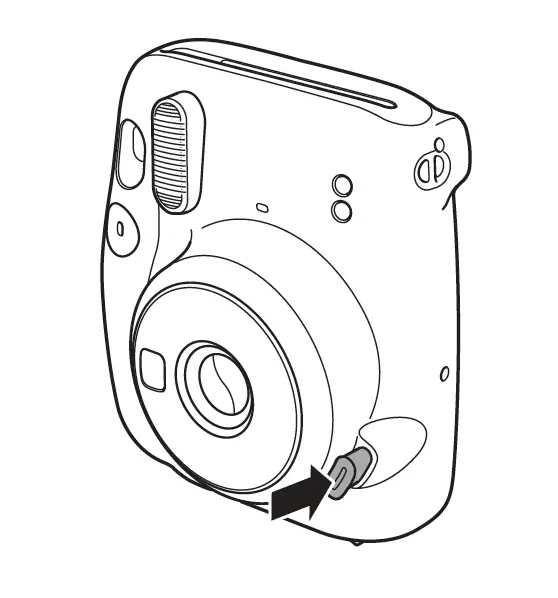
To turn on your Instax Mini 11, insert 2 AA Alkaline batteries at the bottom of the camera then click the small narrow power button located near the lens at the bottom of the camera. When the button is pressed the lens will extend and the flash will begin to charge.
How To Put Film In Instax Mini 11?
To put film into a Instax Mini 11 instant camera, follow these steps:
- First, make sure there isn’t any film currently in the camera or you will exposure your film and ruin it. Do this by looking a the small window to the left of the viewfinder. If it is yellow, then there is film inside your camera.
- Also, make sure the film counter on the bottom right of the camera is at 0, which means all the film has been shot.
- To load film in the camera, open the film door of the instax camera by pull down on the notch on the film door and pulling the film door away from the camera. Be careful to hold the film camera by the body and not the film door as it could break.
- Place your new film pack (without the protective foil) with the yellow mark on the film pack lined up to the yellow mark on the camera
- Finally, close the film door until you hear a click.
What Does S Mean In Instax Mini 11?
When you first put film into the Instax Mini 11, you’ll notice that the film counter window on the back of the camera, which shows the number of remaining shots, is set to “S”. This is because the black film cover (which protects the film from light when loading the film into the camera) must first be ejected before you can use the camera. To eject the darkslide, turn the Instax Mini 11 on and then press the shutter button. The film counter window on the back of the camera should now show a “1”.
How To Put Shutter Button Accessory On Instax Mini 11?
To make your Instax Mini 11 stand out and easier to use, you can install Install the shutter button accessory on the camera, which is included in the box. To put the shutter button on the Instax Mini 11, place the accessory on the shutter button aligned with the short slit, push the accessory in the small hole, and rotate it slightly to secure it.
How Do I Turn On My Instax Mini 11 Selfie Mode?
To turn on Selfie Mode with the Instax Mini 11, turn on your camera and it will be in automatic mode. Once the lens is fully extended, pull the front of the lens forward until it has fully popped out and the text “Selfie On” appears on top of the lens barrel. After that, you are ready to take selfies using the small mirror on the front of the camera. This also allows the camera to focus closer to the camera between 11.8 inches – 1.6 ft (30-50 cm) rather than the normal 1.6 ft (0.5 m)
To turn off the selfie mode on the Instax Mini 11, push the barrel back into place on the front of the camera. Now the camera is back in automatic mode.
How do I center my Instax Mini 11?
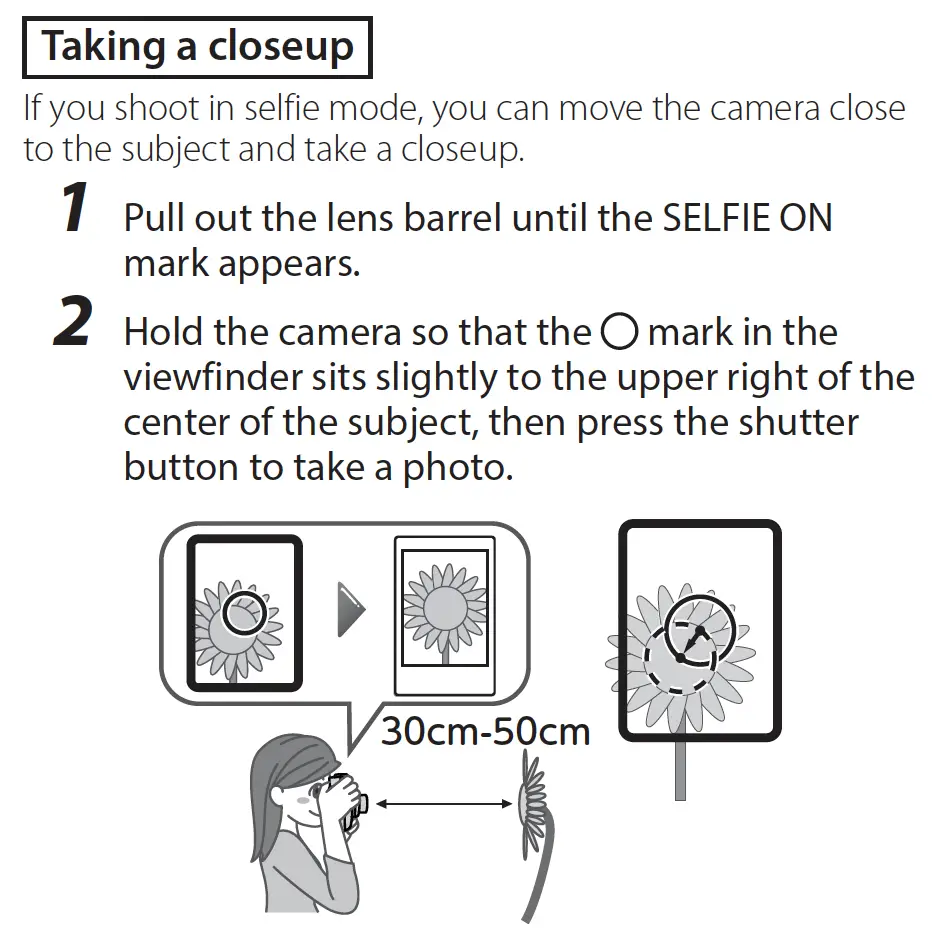
Keep in mind when using the selfie mode on the Instax Mini 11 the viewfinder may center up exactly since the camera is focusing so close. This is called parallax error and is something that happens to cameras when they focus closely. To correct this and make sure your images are aligned correctly when using the selfie-mode, you will need to hold the camera so the circular mark in the viewfinder is slightly more to the upper-right of the center of the subject.
How To Reset Instax Mini 11?
Your camera may experience problems when using it which may cause bad images or not being able to take an image at all. If that is the case, it is recommended to remove the batteries while the camera is in the on position (while the lens is extended) and replace the batteries with fresh batteries, or reinsert them back into the camera to reset your Instax Mini 11.
Conclusion
Setting up your new Instax Mini 11 for the first time can seem daunting, but with this simple guide, you’ll be snapping photos in no time. We’ve discussed how to install the film, insert the batteries and even use the Selfie mode. With all of these tips, you’ll be able to confidently use your camera!
Once you get your camera set up, you may run into problems with your camera. See this article about the 6 most common problems with the Instax Mini 11 and how to fix it.