
The Instax Mini 8 is a great camera to for Instant photography. However, there are some tips and tricks when using the camera to make sure you get the best images.
The way to get the best picture with the Instax Mini 8 is to make sure your camera gets enough light by not covering the small holes or the flash on the front of the camera when taking an image, choosing the correct exposure mode indicated by the camera, and making sure there are 2 fresh AA Alkaline batteries in the camera.
While these are some of the most common tips for getting the best images out of the Instax Mini 8, they not the only ones. See the list below for 12 tips for making sure the images you take with an Instax Mini 8 are consistently great!
1. Keep Your Subject in Center of the Viewfinder When Adjusting Exposure Modes
To make sure your camera get the correct exposure measurement when taking an image, keep the camera pointed in the center of your subject in the camera’s viewfinder while adjusting your brightness setting on the camera. If you point the camera in a different direction while changing the exposure mode on your camera you may end up a brighter or darker image than expected.

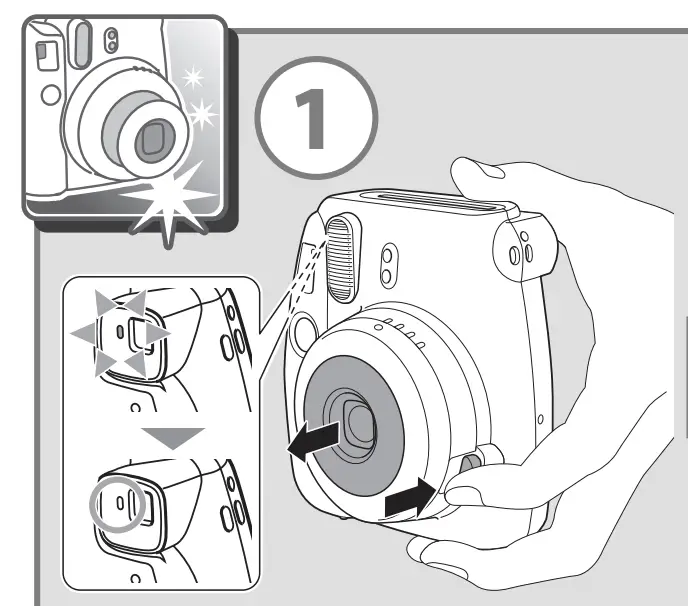
2. Make Sure Not to Cover Up the Two Small Holes On the Front of the Camera When Taking Images
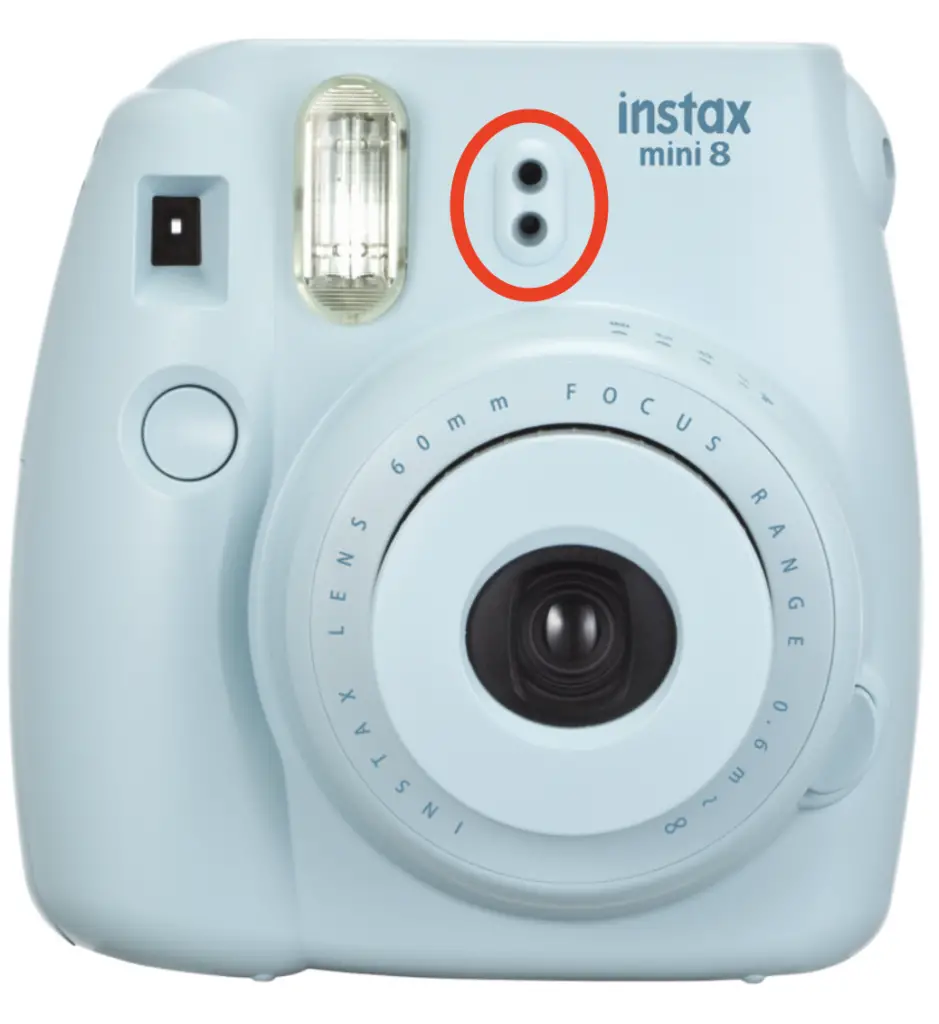
When taking images with the Instax Mini 8 be aware not to cover the two small holes on the front of the camera with your finger or camera strap when taking images. Doing so will result in an image that is overly white and bright.
The camera uses these two holes to measure the amount of light in the environment in order to calculate and indicated the correct exposure mode when taking an image as well as calculate for the camera flash.

3. Instax Film Needs A Lot of Light to Look the Best
in general, Instax instant cameras need a lot of light to get the best images, so one tip to get good images with the Instax Mini 8 is to choose the darker brightness setting than the camera suggests. This is because the camera will get more light since this will give you a larger aperture.
For example, choosing the Indoors or Night (looks like a house and has an aperture of f12.7) when the camera indicates the Cloudy or Shade (looks like a cloud and has an aperture of f16) setting. You could also choose the Hi-Key setting to get a brighter image overall.

4. Don’t Cover Up The Flash When Taking An Image
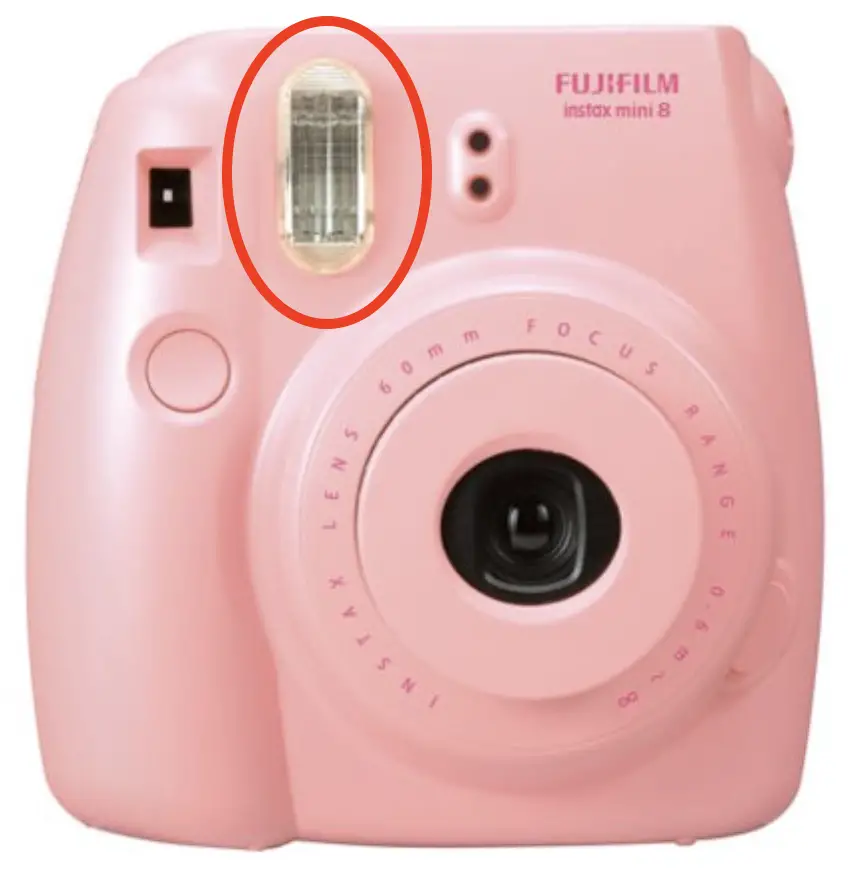
The Instax Mini 8 has an built-in flash that fires each time an image is taken and cannot be turned off. When taking an image, make sure to not cover up the flash with your finger, hand, or the strap. This will result in an image that is too dark since the camera thinks the subject is getting more light than it actually is.
5. The Effective Flash Range For the Instax Mini 8 is between 1.9 – 8.8ft (0.6m – 2.7 m)
The flash on the Instax Mini 8 is strong and consistent. It has an effective range of between 1.9 – 8.8ft (0.6m – 2.7 m). This means that you need to make sure your subject is at most 8.8 ft (2.7m) from the camera in a dark environment or they won’t be bright enough. On the other hand, if the subject is closer than 1.9 ft (0.6m) than the subject will appear overly bright, washed out, and not in focus (since the minimum focus distance is 1.9ft or 0.6m without a focusing adapter). Since the shutter speed on the Instax Mini 8 is fixed at 1/60 seconds, only objects or people near the camera will be lit when taking a picture at night or in low light situations.

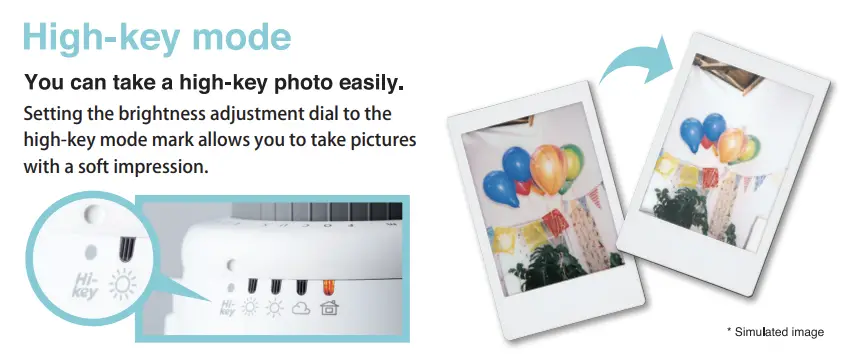
6. If You Are In A Low Light Situation When Taking An Image, Use the Hi-Key Camera Setting
Like the Instax Mini 9, the Hi Key setting on the Instax Mini 8 is useful for taking images outside in the shade, indoors to brighten up the image, or outside at night when there isn’t enough light in the environment. It is also useful for making pleasing looking portraits by filling in shadows.
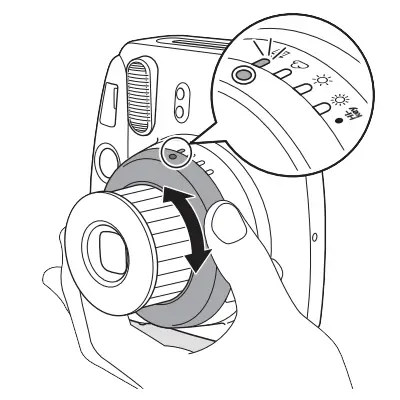
To activate the Hi Key mode on the Instax Mini 8, rotate the exposure dial on the lens until the notch reaches the Hi Key mode.
Note: If the camera suggests using the Indoor setting (the little house) with the orange light, then you’re most likely to have great results with Hi-Key setting as well. However, don’t use the Hi Key feature outside in bright daylight as the resulting images may be overly white, bright, and the details will be washed out.
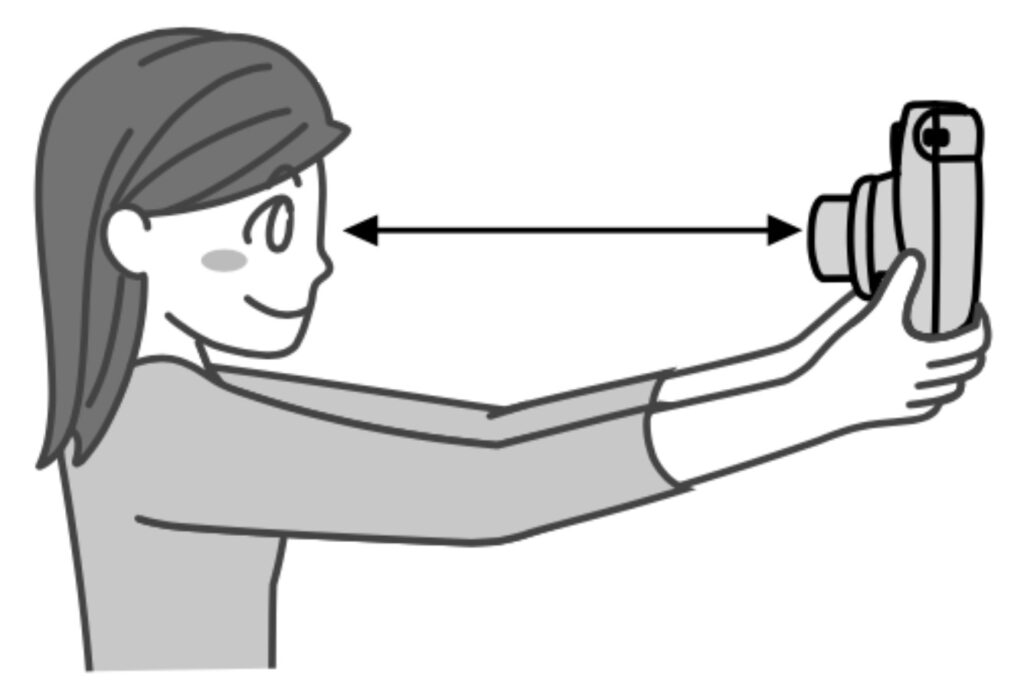
7. Be Aware of the Minimum Focus Distance of The Instax Mini 8
Similar to the Instax Mini 9, the Instax Mini 8 has a minimum focusing distance of 22.7 inches (0.6m) or 1.8 ft. This means your subject should be at least 22.7 inches (0.6m) from the camera or your image won’t be in focus. If you don’t have a measuring tape, a good indicator for this distance is about the same distance of your arm from your shoulder to your fingers.
Though the Instax Mini 8+ has built-in selfie mirror, the Instax Mini 8 does not. However, you can purchase a 3rd party close-up adapter that fits the Instax Mini 8 that fits onto the lens of the camera, adds a selfie-mirror, and changes the focusing distance to 15.7 – 23 inches (40-60 cm) down from the minimum focusing distance of 22.7 inches – infinity (0.6m – infinity).
8. Install Alkaline batteries Before Loading Your Film Into the Camera
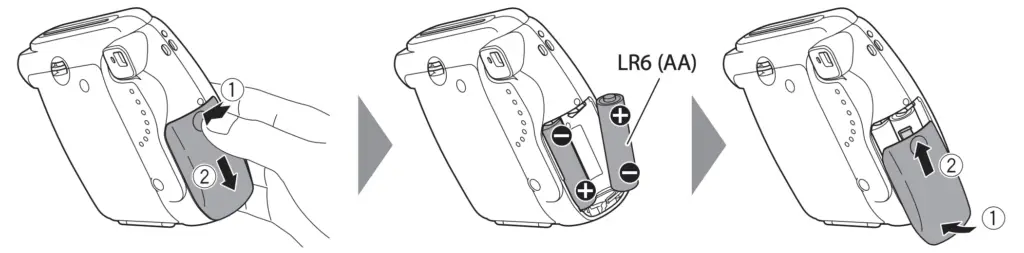
Fujifilm highly recommends using fresh Alkaline batteries in your camera and installing them before you load the film pack into the camera. This allows your camera’s flash to charge and be ready for your film to load properly into the camera before taking images.
NOTE: The Instax Mini 8 won’t take an image until the flash is fully charged so not using the correct type of batteries might keep the camera from taking images.
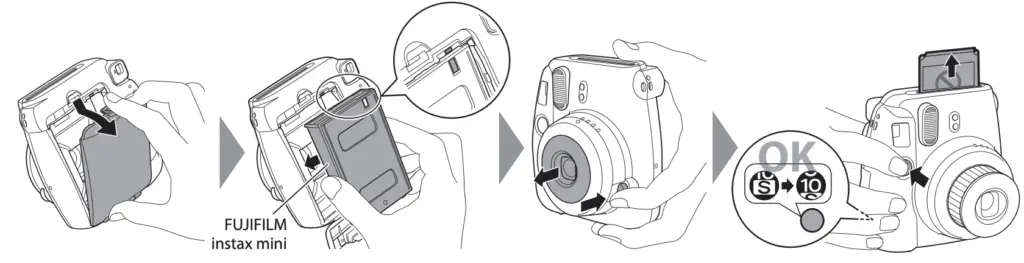
9. Avoid direct light when loading film into your camera
Since the film used in the all Instax cameras (including the Instax Mini 8) is sensitive to light, you need to avoid direct light when loading your film pack into the camera to avoid accidental exposure and light leaks. It is also a good idea to close the film cover immediately after loading film, even in a low light environments like a room without windows (such as a bathroom).
For how to load film into a Instax Mini 8 follow the steps below:
10. Don’t Open the Film Door Once Film Is Loaded Into the Camera
Once you have loaded film into the Instax Mini 8 and the dark paper has ejected, don’t open the film door for or your film pack will be exposed. If you need to open the film door because the film is jammed or for another reason, you need to find a room that is completely dark (without any lights on at all) and then you can open the film door without fear of exposing your film.
However, if you accidentally opened the film door there is a possibility that you only exposed the first 2 – 3 sheets and the rest of the film will still produce an image.

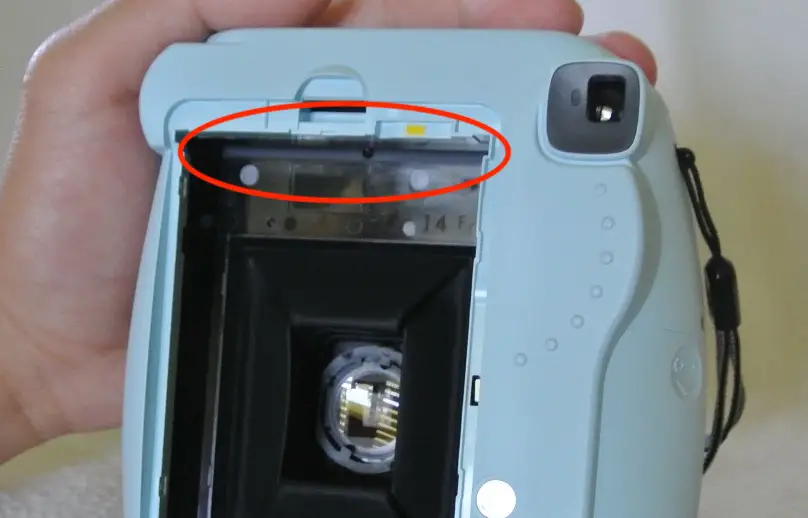
11. Keep the Rollers Clean
Unclean film rollers on instant cameras are one of the most common cause of marks on prints. The rollers are used to spread the development chemicals across the film as the film is ejected from the camera. If the rollers have something on them, the debris will get on the image and the development chemicals won’t be spread evenly on the print.

You can access the rollers by opening the film back on the camera making sure there is NO film in the camera. Clean the film rollers by taking an image with the camera and while the rollers are rolling, take slightly damp Q-tip dipped in clean water and rubbing the rollers back and forth until the rollers are all silver without any black. Make sure the rollers are completely dry before using your camera again.
12. Don’t Panic If Lights On Your Camera is Blinking
If you’ve recently purchased a new Instax Mini 8, you might be wondering why the light is blinking. There’s no need to worry, as this is perfectly normal behavior. Light next to the viewfinder on the back will blink when it is first turned on, which means that the flash is charging. Once the charge is complete, the flash will stop blinking and remain on.
If the flash continues to blink after being turned on, it generally means that the batteries are running low and need to be replaced. If your camera is still blinking after you replace the batteries, make sure to replace the batteries with alkaline batteries only.
NOTE: If the light won’t stop blinking even if you’ve replaced the batteries, the microcomputer inside the camera needs to be reset. To do this replace the batteries in the camera when the lens is extended (the camera is on).
In Summary
The Instax Mini camera series by Fujifilm is a popular instant camera because of the low price of Instax Mini film and how easy the camera is to use. The way to get the best picture with the Instax Mini 8 are by following these 12 tips listed in the article as well as below:
- Keep Your Subject in Center of the Viewfinder When Adjusting Exposure Modes
- Make Sure To Not Cover Up the Two Small Holes On the Front of the Camera When Taking Images
- Instax Film Needs A Lot of Light to Look the Best
- Don’t Cover Up The Flash When Taking An Image
- The Effective Flash Range For the Instax Mini 8 is between 1.9 – 8.8ft (0.6m – 2.7 m)
- If You Are In A Low Light Situation When Taking An Image, Use the Hi-Key Camera SettingBe Aware of the Minimum Focus Distance of The Instax Mini 8
- Keep Your Subject In Focus When Using the Close-Up Lens Adapter on the Instax Mini 8
- Install Alkaline batteries Before Loading Your Film Into the Camera
- Avoid direct light when loading film into your camera
- Don’t Open the Film Door Once Film Is Loaded Into the Camera
- Keep the Rollers Clean
- Don’t Panic If Lights On Your Camera is Blinking
Each one of these tips will help you make consistent images as well as make taking images with the Instax Mini 8 an enjoyable experience!