
Developing your own film has become a bit of a lost art, but if you’re interested in developing your own color 35mm or medium format film in your own home, then the process can be surprisingly simple. Once you acquired the right equipment and practiced the trickier steps, having access to at-home film development can enhance the satisfaction and efficiency of your film photography.
So, what exactly does it take to develop color 35mm or medium format film at home? Keep reading as we discuss the advantages of developing your film, as well as what equipment you’ll need and how to make sure your pictures turn out perfect every time.
What Are the Advantages of Developing Film at Home?
Setting up at-home film development can seem like a daunting task, especially when you start to tally up the prices for the equipment you’ll need. But, if you’re seriously interested in film photography, having the ability to develop at your home can be reasonably cost-effective in the long run.
Additionally, it will allow you to get your hands on your developed photos much faster. Although film photography is starting to trend once again, its popularity has certainly taken a hit with the widespread adoption of digital photography. That means there are fewer chemical film developers on the market, so it is possible that sending your film out by mail for development may be your only option. This is especially true for color film where developing it at home can be tricky because of the precise steps that need to be followed. However, there are kits you can purchase that make the process much easier than it used to be.
Assuming that you already have a good quality film camera (like this Canon AE-1 Program on Amazon.com), the most expensive items you’ll need will all be purchased at the beginning of setting up your darkroom. Once you have the basic set up, you’ll only need to purchase color film and color film developing chemicals, which don’t cost much and have a fairly long shelf-life if stored properly. Some of the processing chemicals can even be reused (like the stop bath and fixer), which will also save money.
If you plan on developing film often, doing it yourself can save you the recurring costs of around $10 to $20 depending on postage) of dropping your film off or mailing in your film to be developed. See this guide on places to get your film developed online that goes over what film they can process, turnaround time, and how much it costs. I recommend using the the mail-in lab, TheDarkroom.com. At the time of writing and according to their website, TheDarkroom.com charges about $20.95 to develop one roll of 35mm or medium format film (with shipping) including enhanced-level scans (without tax), it generally takes 3 – 6 days for your film to be processed and your digital scans to be uploaded to the web. It also takes about a week for you to receive your negatives in the mail.
Developing your own negatives not only costs less over time, but it also spares you the long wait to see the finished negatives and/or photos. And, you’ll have a skill set that’s becoming rarer to find, something that you may find useful if you decide that you want to pursue film photography for a long-term hobby or even a career.
How Long Does It Take to Develop Film?
From start to finish, the entire film development process can take anywhere between 3 – 8 hours including processing and drying times depending on variables like humidity, size of the negatives, chemicals used, and development process. However, that amount of time is a bit misleading because your pictures are only “developing” during the first 10 to 15 minutes or so.
The rest of 4 – 8 hour processing time is taken up by the rest of the chemicals that includes stopping the developing process, fixing the film negatives so they aren’t damaged by light, washing in a wetting agent like Photo-Flo, and washing the film in running water. The final step is the part of the process that takes the longest, which is drying the film. The film is dry when you can touch the start (the film leader) or the end of the film negative with your finger and thumb. If it feels dry and smooth when touching it, then the film is dry. However, the drying process can take anywhere between 2 – 5 hours depending on humidity and other variables.
Waiting the full amount of drying time is important because wet film is very fragile and susceptible to damage like scratches and fingerprints. It won’t lay flat for scanning as dry film does. However, there are ways to shorten the wait time, for example, building or using a film drying cabinet. A professional film drying cabinet can be fairly expensive (like this one on bhphotovideo.com) but it can save you a lot of time by getting the drying time down to around 30 minutes or shorter.
An Overview of the Process For Developing Color Film
We’ll be going over each of the steps of developing color film in more detail, but first, let’s discuss a brief outline of the overall process so you can better follow along when we list the equipment you’ll need to purchase.
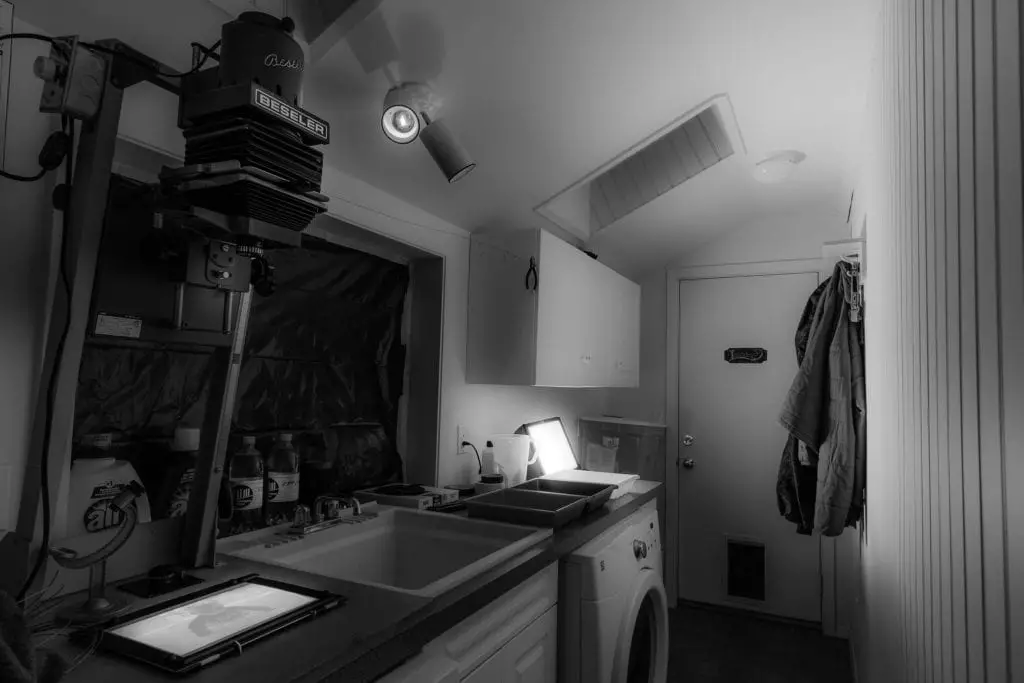
Each step of the process involves washing the film in various solutions in a specific order. Remember, the film is light-sensitive and needs to be handled in complete darkness when loading into the development tank. Usually, this is accomplished by working in a room with the lights turned off, without windows, and with the door-edges taped to keep the extra light from coming in. I recommend using gaffers tape like this on amazon.com for taping doors because it is thick enough to stop light from coming through and it won’t leave behind a sticky residue or damage your walls.
NOTE: If you haven’t ever loaded a film tank before, then I suggest you try the steps below with the lights on and with a blank roll of film first so you can get a feel for what needs to happen. It is best to do this with a blank roll of film so you don’t ruin your images. Once you feel comfortable loading a tank with the lights on, try it with the lights off to get the feel of it before trying it with a exposed roll of film.
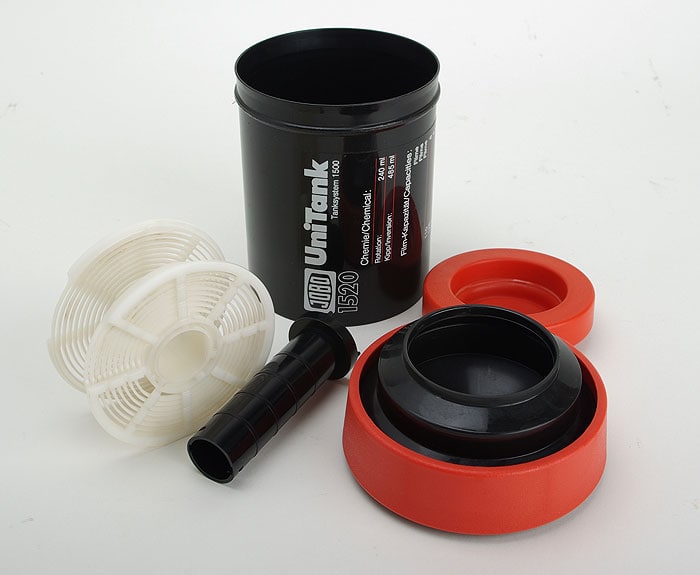
First, enter the darkroom with no light whatsoever. It is important there is no light at all because it will ruin your film. If you are developing 35mm film, it should first be removed from the canister. If you are developing medium format then the paper backing should be first removed. Next, load the film onto a developing tank reel that is set to accept that size of film you have. It will be smaller for 35mm and wider for medium format film (I recommend this Patterson Film Developing Tank on Amazon.com because it can do both 35mm and medium format). The reel allows for all of the film surfaces to be exposed to the various solutions that it will be washed in order to develop it. If you loaded the film properly on the film reel then it shouldn’t be touching (if the film is touching those parts won’t get enought developer and won’t turn out correctly). Place the reel with the film loaded on it into the film developing tank and close the lid.
Once you have the tank correctly put back together with your film loaded in it, the film is safe from light and you can turn the lights back on and continue the process.
Next, follow these general steps for developing film:
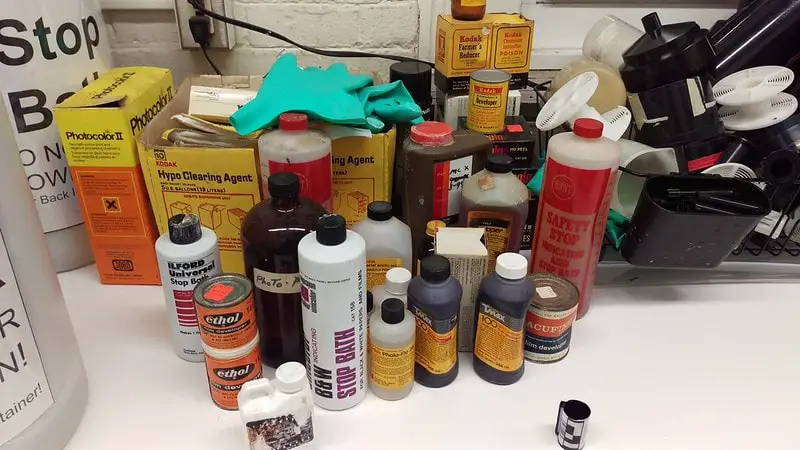
- Mix the chemicals by following the directions on the packages and have them ready to go in the storage bottles
- Place the chemical storage bottles in a large water bath (large shallow tub or large sink with water to fit all of the bottles and development tank) and heat the water bath to 102°F (43.5°C).
- This can be done with a thermometer in the solution and adding hot and cold water until a correct temperature is reached or with an automatic immersion water heater and circulator (like this one on amazon.com)
- Pre-soak the film in the development tank for 1 minute with 102°F (or 43.5°C) with distilled water or clean tap water without agitation
- You can do this by heating up the water in a separate container using the water bath first then pouring it into your development tank
- Pour the water out of your development tank while leaving the main lid on the development tank (your film is still sensitive to light!)
- First, make sure your developer solution is at the correct temperature (102°F or 43.5°C) in its storage bottle and pour the developer solution into the tank for 3.5 minutes. Place the secondary lid onto your development tank to keep the solution from spilling out during agitation. Agitate your film in the development tank continuously for the first 10 seconds, then 4 complete tank inversions every 30 seconds.
- 1 complete tank inversion is turning your tank, with the lid securely on the top of your tank so chemicals don’t leak out, upside down, and then right-side up again at a consistent pace.
- Remove the secondary lid while keeping the main lid on the development tank (your film is still light sensitive!). Pour the developer solution back into its storage bottle with the rest of the solution.
- Make sure your Blix solution is at the correct temperature (102°F or 43.5°C) in its storage bottle and pour the Blix solution into the tank for 6.5 minutes. Place the secondary lid onto your development tank to keep the solution from spilling out during agitation. Agitate your film in the development tank continuously for the first 10 seconds, then 4 complete tank inversions every 30 seconds.
- See the previous steps for how to invert your development tank.
- Remove the secondary lid while keeping the main lid on the development tank (your film is still light sensitive!). Pour the Blix solution back into its storage bottle with the rest of the solution.
- Wash the development tank with clean, running water between 95° – 105°F (or 35° – 40.5°C) for 3 minutes.
- The main lid can be removed from the development tank at this point because the film is not sensitive to light anymore.
- Make sure your stabilizer solution is at room temperature (68°F or 20°C) in its storage bottle and pour the solution into the tank for 30 sec. to 1 minute. Agitate your film in the development tank continuously left and right for 15 seconds turning the short agitation piece included in your development tank connected to the film reel.
- Wash the development tank with clean, running water between 95° – 105°F (or 35° – 40.5°C) for 1 minute to remove any excess chemicals.
- Tank your film reel from the development tank and carefully pull your film out of the reel while taking the reel apart while pinching the top of your negative over a sink
- Hang your film to dry!
From there, all that’s left is to let your color film completely dry, which can vary based on humidity. Now, let’s take a more detailed look at the equipment you’ll need to get all this done. While the overall process is fairly straightforward, there’s still a precise order of steps that need to occur. So, it’s important that you have all the right tools from the start.
What Equipment Will You Need to Develop Color Film?
While the decrease in the use of color film photography might have made it harder to find local film developing shops, it’s made some of the equipment more affordable than it was in the past.
Below is a general list of equipment and materials with links to Amazon.com that you’ll need to develop color film, along with a general idea of what you can expend to spend on each item:
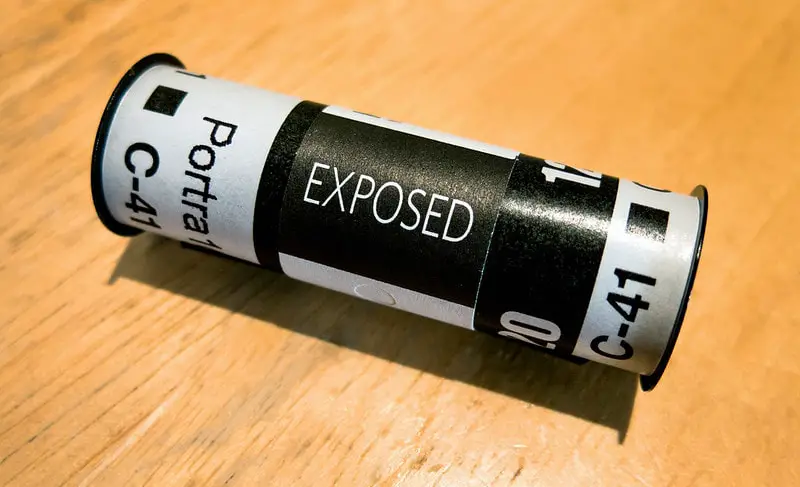
- Film – color 35mm or Medium Format – Varies depending on brand but around $7 a roll (cheaper, if bought in bulk)
- Bottle Opener (to open the 35mm film canister) – $5.99
- Developing Tank and Film Reels (can do both 35mm and medium format film) – $33.70
- Measuring cups / Graduated Cylinders (for mixing and measuring chemicals) – $8.99
- Distilled water – $24.69 (12-pack of 16.9 oz bottles)
- Stainless Steel Thermometer – $11.99
- Drying Rack with Film Clips (or bathtub with shower curtain and clothespins) – $17.99
- Clothespins, heavy paper clips, or large chip clips – $9.99
- Scissors – $10.99 (pack of 3)
- Paper towels – $29.89 (16 rolls)
- Plastic Funnels – $5.81
- Rubber Gloves (optional, but recommended) – $29.99 (black nitrile, box of 100)
- Apron – $12.99
- Kitchen Timer / Phone – $7.99 (two-pack)
- Running water (should have this at your house, I recommend a bathroom sink) – free
- A Dark Room (should find this at your house, I recommend a basement bathroom, if not then I suggest the changing bag listed below) – free
- Film Changing Bag (optional but helpful) – $22.88
- Bottles to Mix and Store Developing Chemicals – $18.99 (3-pack with lids)
- Ultrafine Unicolor C-41 Powder 35mm / 120 Film Home Developer Kit (1 Liter) – Kit for developing color film (Develops about 8 rolls of 35mm film or medium format film) – $47.95
- Immersion Water Heater And Circulator – This will help to keep the water bath temperature constant during the development process – $79.99
The estimated total: $334.94 (without optional items)
However, the overall price could be lowered significantly to $181.82 if you found things around the house to use like scissors, a bottle opener, kitchen timer, paper towels, thermometer, distilled water, measuring cups, clips for hanging drying film, rubber gloves, funnels, or an apron.
NOTE: Keep in mind that any of the items that come into contact with photographic development chemicals should not be used again for food preparation like the funnels, measuring cups, or thermometer.
There are several places you can purchase photography-specific equipment for reasonable prices online, including:
For most reusable items, including the developing tank and measuring cups, don’t forget that buying used items is always an option, especially on platforms like Facebook Marketplace, Craigslist.org, or eBay.com. I am always amazed at what can be found and the prices people want for quality darkroom items. These sites can be a great way to get started with at-home film development without over-spending a budget that’s reasonable for you.
Recommendation for Color Developing Chemicals
After purchasing your film developing tank and color film, the next most important item to buy will be your developing chemicals for color film. Fortunately, there are many reliable brands out there that sell quality products for reasonable prices including CineStill, Arista, Unicolor, among others that are great for beginners. For this article I will be discussing the Ultrafine Unicolor C-41 Powder 35mm / 120 Film Home Developer Kit (find it here on Amazon.com). This kit is great for beginners because it includes all of the chemicals you will need, it is in powder form so shipping is cheap, and it is only 3 steps. Also, it has great reviews on amazon with a majority of reviewers stating it has great results and how easy it is to use because of the clear directions.
Recommendations for Color Film
When purchasing color film, you’ll usually find the best prices online, and we recommend these film options for beginners:
- 35mm Kodak Portra 400 ($52.95 – 5 rolls with 36 exposures on Amazon.com)
- 35mm Lomo Color Negative 400 ($23.90 – 3 rolls with 36 exposures from Amazon.com)
- 35mm Fuji Pro 400H Color Film ($69.99 – 5 rolls with 36 exposures from Amazon.com)
All three of these companies also make medium format film:
- Kodak Portra 400 Medium Format ($46.79 – 5-pack from Amazon.com)
- Lomo Color Negative 400 Medium Format ($23.90 – 3-pack from Lomography.com)
- Fuji Film Pro 400H Medium Format ($69.99 – 5-pack from Amazon.com)
**Fujifilm recently announced they are discontinuing Fuji Film Pro 400H in both 35mm and 120mm formats in 2021. There should still be some left to purchase on the sites listed above but the stock might run out soon and consequently, the price might go up. In that case, I’d recommend purchasing either the Kodak Portra or Lomo films.
All three options produce sharp and colorful images. However, Kodak Portra 400 is still the number one choice for film photographers because of the faithful recreation of skin tones and beautiful overall color saturation. The film overexposes well while creating softer, warmer, more pastel colors which is difficult to recreate with a digital camera without editing. The Portra 400 also works well in many different lighting situations and the fine grain makes it great for digital scanning. However, it is expensive compared to other films.
Lomo Color Negative 400 is another great option for color film. It has fine grain for scanning which appear sharp and has cult status for its consistent color reproduction with a lot of contrast and vintage feel (though not as revered as Porta 400) and it is a cheaper alternative to other films.
While Fuji 400H has never been as popular as Kodak Portra 400 it is a good solid film that has many of the same qualities as the other films. It overexposes well like Portra 400 creating softer more pastel colors, great for portraits, sharp, and has fine grain that works well for scanning. However, it does tend to have a green tint when it isn’t shot in natural light and it tends to be more expensive than Portra 400.
Do You Need a Darkroom to Develop Film?
Now that you have an idea of the overall steps of the process, as well as what equipment you’ll need, let’s consider where you’ll be developing your film. Many people use a dedicated light-tight space called a darkroom to develop film (or just a dark room), but that’s not necessarily a requirement. Because the development tank is light-tight, as long as you make sure that undeveloped film isn’t exposed to light when loading it into your development tank, your developing process will work just fine. One way people without a darkroom can develop film is by using a film changing bag.
To use a film changing bag, place your unopened film canister, bottle opener, scissors, developing tank, and reels through the openings where you can insert your hands of a blacked-out changing bag and do the loading process inside the bag. Even though it will block much of the light, it is still recommended that you keep the changing bag out of direct sunlight and in a room with low light (like a closet or basement bathroom) to minimize light reaching the film before being developed.
Film changing bags can vary from something that looks just like a small plastic bag (like this one on Amazon.com for around $20) to larger options that resemble a mini tent or box (like this one for around $50 on Amazon.com) which has much more room and is more durable. I recommend this highly rated changing bag on Amazon.com because it is well-made, durable, and convenient in size. Whichever option you might choose, either will work well for developing film.
Understand the Full Color Film Development Process Before You Get Started
Before you get started on developing your color film, it’s important to go through and understand each of the steps in advance. Damaging or ruining film your first time developing pictures is something you want to avoid, so make sure you’re prepared for each of the steps we’ll be going over. If you happen to see weird things on your negatives after developing the film, see this guide to help you understand your problem and how to fix it or, at least, prevent it in the future.
Some of these steps are somewhat time-sensitive. So, after you’ve gone over these instructions and make a dry run with a blank roll of film, make sure that you arrange your supplies in a way that makes it easy for you to progress between each stage of the process with the lights off or with your hands in a film changing bag.
Step 1: Remove the Film from the Canister in Complete Darkness
Before you begin this step, both films should be out of the camera. See this guide on how to rewind your 35mm film and how to take your 120 medium format film out of the camera. However, if you aren’t familiar you may need to google search how to accomplish this for your specific camera make and type.
Once you’re ready to start, make sure you have all your supplies ready to unload your 35mm color film from the canister or unroll your 120 medium format color film. This will need to be done in complete darkness, whether that’s in a darkroom or using a film changing bag.
You’ll need to open up the film canister, which is usually done using the flat edge of a key or a bottle opener on the top. See this video on how to do this correctly. If you’re developing medium format film, you’ll need to use scissors to cut the strip from the paper holding the film together tightly around the roll.
Remove the film from the canister or roll.
Make a cut near the end of the roll to remove the plastic piece the film is attached to or paper backing for medium format film. This cut should be straight across the width of the film, perpendicular to the long side of the roll. Keep in mind that every step until your film has been loaded into your film tank needs to be done in total darkness to preserve the images in the film.
How to Retrieve Film Leader or Unwind a Roll of Film?
If you ever lose the film leader inside its canister, you can purchase a film leader retriever (like this one on Amazon.com) to get it easily without the risk of exposing the undeveloped film to light.
The way that it works is that you insert the leading “tongue” of the film picker into the slot/opening along the side of the canister. You’ll push back until you hear a “click” sound, and then you can start to pull the picker back out until you’ve re-exposed the film leader section. Make sure that you don’t pull too quickly, as you could accidentally expose the film behind the leader.
Some people have also found success retrieving film leaders wound back into the canister by using the film leader from a second canister. See this Youtube video on how this process works. In the end, whichever method you try, keep in mind to be careful not to expose any undeveloped film as you’re retrieving the leader.
Step 2: Load the Color Film onto the Developing Tank Reel And Assemble the Tank
Now, you’ll need to load the film reel with your color film, which can be challenging if you’ve never tried it before. To get an idea of what you’ll be doing, you can practice with blank film with the lights on rather than making your first attempt in a darkroom or while using a film changing bag. See this video on Youtube.com on how to load your film onto a plastic or metal film reel.
If you’re using an adjustable film reel, you must change the size before you even turn off the lights or open your film canister in a changing back. If you’re switching between sizes, take note of where the tabs of the film reels are, as placing them in the wrong way can scratch and ruin your film and damage the reels themselves as well. See this video on Youtube.com on how to adjust your plastic film reel successfully.
Many auto-load film reels (also known as metal reels) can make this part of the process easier, but regardless, take care when transferring the film to the reel as the metal canister can potentially cut your fingers.
Also, if you’re loading the film reel in a dark room, make sure not to drop the film on the floor or any cluttered surface, as even the smallest scratches can damage your film. Touching the film with your hands and fingertips generally isn’t a huge issue, but wearing cotton gloves (like these on Amazon.com) during this part of the process can be a great way to avoid any damage to the film.
Once you’ve loaded the first part of the reel with the film, turn the reel until the entire roll has been loaded if using a plastic reel. Then, use scissors to cut the remaining portion of the film that will still be attached to the canister. With medium format film, this will be a second paper backing. See this video on Youtube.com on how to load your film onto a plastic or metal film reel.
Once the film is loaded onto the film reel, you need to re-assemble the developer tank. Place the film reel inside, then the center column, and finally close the tank with the lid, depending on the specific type of tank that you have.
As soon as the developer tank is securely closed and light-tight, you can remove the tank from the changing bag or turn on the lights in your darkroom (assuming there isn’t any undeveloped film lying around).
Step 3: Mix the Color Chemicals And Prepare Water Bath
Now your film is ready for processing but before you can begin, you need to use your storage bottles and measuring cups to prepare any powder chemicals or mix any pre-made solutions that you’ll be using.
Although the next step in the process only involves the developer, it’s best to mix all the chemicals (including the color film developer, blix, stabilizer you’ll need) at the same time, so you’re ready for the remainder of the process. Make sure to accurately follow the directions specific to the products you’re using.
How to Make Color Developer, Blix and Stabilizer from Powder?
When mixing powder chemicals for color film development from the Ultrafine Unicolor C-41 Powder 35mm / 120 Film Home Developer Kit, you need to use the recommended water temperatures, and it’s best to always use distilled water rather than tap water, which can leave mineral deposits on your photos depending on the water quality where you live. Before mixing the chemicals in a well-ventilated area like outside (the chemicals are in concentrated amounts but not light sensitive), put on an apron, gloves, and eye-protection.
How to Mix the Color Developer
- Using a 1000 ml / 1 liter / about 1 quart bottle. Pour the 800 ml / 0.8 quarts (or roughly 80% of the water for the intended amount) of distilled water into the clean storage bottle first, using a clean funnel. Make sure the water is 110°F (43.5°C). Once the water reaches the correct temperature, while stirring pour the packet of developer powder in the distilled water.
- Stir the solution rapidly with agitation until it is completely dissolved. Pour in the rest of the water in the storage bottle to create a developer solution of 1000 ml / 1 liter / about 1 quart.
How to Mix the Color Blix
- Using a 1000 ml / 1 liter / about 1 quart bottle. Pour the 800 ml / 0.8 quarts (or roughly 80% of the water for the intended amount) of distilled water into the clean storage bottle first, using a clean funnel. Make sure the water is 110°F (43.5°C). Once the water reaches the correct temperature, while stirring pour the packet Blix A followed by Blix B in the distilled water.
- Stir the solution rapidly with agitation until it is completely dissolved. Pour in the rest of the water in the storage bottle to create a Blix solution of 1000 ml / 1 liter / about 1 quart. This is a endothermic reaction so the solution may become colder and needs to be warmed back up before pouring into the developing tank.
How to Mix the Color Stabilizer
- Using a 1000 ml / 1 liter / about 1 quart bottle. Using a funnel, fill the bottle distilled water. Make sure the water is room temperature. Pour the packet of stabilizer powder into the distilled water while stirring until completely dissolved.
Place the chemical storage bottles in a large water bath (large shallow tub or large sink with water to fit all of the bottles and development tank) and heat the water bath to 102°F (43.5°C). This can be done with a thermometer in the solution and adding hot and cold water until a correct temperature is reached or with an automatic immersion water heater and circulator (like this one on amazon.com)
Step 4: Pre-Soak the Color Film
Once the film is loaded onto the film reel, you need to re-assemble the developer tank. Place the film reel inside, then the center column, and finally close the tank with the lid, depending on the specific type of tank that you have.
As soon as the developer tank is securely closed and light-tight, you can remove the tank from the changing bag or turn on the lights in your darkroom (assuming there isn’t any undeveloped film lying around).
Next, you’ll want to take your tank and soak your film with distilled water in it with the main lid on. Pre-soaking your film helps you avoid any air bubbles that could form during processing, help with dust, and remove any extra layers of chemicals on the film to prepare for developing.
Put the distilled water into a clean bottle, with enough capacity to fill your development tank, and place it into the heated water bath the chemicals are in to heat the distilled water to 102°F Farenheit (43.5°C).
Pre-soak the film in the development tank with the main lid on by pouring distilled water at 102°F Farenheit (43.5°C) into the tank for 1 minutes with no agitation.
After 1 minute, pour the water out of your development tank while leaving the main lid on (your film is still sensitive to light!).
Step 5: Add the Color Developer to the Film Tank
First, make sure your developer solution is at the correct temperature (102°F or 43.5°C) in its storage bottle and pour the developer solution into the center column of the tank for 3.5 minutes without taking the main lid off of the tank. The solution will filter into the tank, and the reel will allow every part of the color film to be exposed to the developer. The chemicals in the developer are what allows the picture to appear in the film, but the film will still be light sensitive. So, make sure not to open the tank during this part of the process for any reason.
NOTE: Most tanks will have the amount of liquid need labeled on the bottom or the side, so you can use a pourable measuring cup (like these one on Amazon.com) to make sure you are adding the right amount.
Place the secondary lid onto your development tank to keep the solution from spilling out during agitation. Agitate your film in the development tank continuously for the first 10 seconds, then 4 complete tank inversions every 30 seconds. One complete tank inversion is turning your tank, with the secondary lid securely on the top of your tank so chemicals don’t leak out, upside down and then right-side up again at a consistent pace. Set a timer (like this one on Amazon.com) for the correct duration of time and let the developer do it’s magic.
Agitating the film ensures that every part of the film gets into contact with the developing chemicals during processing, which gives the film even development and helps elevate common problems when developing film. See this article I wrote about common film developing problems and how to fix them.
See this excellent video on Youtube on how to properly agitate your film in the development tank with the immersion process.
After the time is up, pour your color developer from your development tank back into the storage bottle using a clean funnel (like one of these on Amazon.com). That way you can be ready to develop your next roll of film.
Step 6: Wash Film In the Tank With the Blix
Next, make sure your Blix solution is at the correct temperature (102°F or 43.5°C) in its storage bottle and pour the Blix solution down the center column of the tank for 6.5 minutes. Place the secondary lid onto your development tank to keep the solution from spilling out during agitation.
Agitate your film in the development tank (with the secondary lid or cap on) continuously for the first 10 seconds, then 4 complete tank inversions every 30 seconds. One complete tank inversion is turning your tank, with the secondary lid securely on the top of your tank so chemicals don’t leak out, upside down and then right-side up again at a consistent pace.
Set a timer (like this one on Amazon.com) for the correct duration of time and let the Blix do it’s magic.
When added after the developer is removed, the blix (a bleach and fix solution) will bleach and will fix your color film so it won’t be sensitive to light after this step.
After the time is up, pour your blix solution from your development tank back into the storage bottle using a clean funnel. If using the same funnel for all of these steps make sure to thoroughly wash it so you don’t cross contaminate your chemicals.
Step 7: Wash Film With The Water
Next, wash the development tank with the film in it with clean, running water between 95° – 105°F (or 35° – 40.5°C) for 3 minutes. Set a timer (like this one on Amazon.com) for the correct duration of time and let the water wash away the excess chemicals.
NOTE: At this point, the main lid can be removed from the development tank because the film is not sensitive to light anymore.
After 3 minutes, pour the water down the drain.
Step 8: Wash Film With The Stabilizer Solution
Next, make sure your stabilizer solution is at room temperature (68°F or 20°C) in its storage bottle and pour the solution into the center column of the tank for 30 sec. to 1 minute. The stabilizer solution is important because it will prevent water spots and streaks on the film while it is drying as well as prevent fungus from growing on the film.
Agitate your film in the development tank continuously left and right for 15 seconds turning the short agitation piece included in your development tank while connected to the film reel.
After the time is up, pour your stabilizer from your development tank using a funnel (like one of these on Amazon.com) out of the film tank and back into it’s storage container.
Step 8: Complete Your Final Wash with Water and Drain the Film
Finally, wash the development tank with the color film it it with clean, running water between 95° – 105°F (or 35° – 40.5°C) for 30 seconds – 1 minute to remove any excess chemicals.
Once that’s complete, remove the film reel from the developing tank while holding it over the sink. Once it’s out of the tank, shake the reel over a sink to drain water from the color film. You can then pull the color film negatives out of the reel, but be careful, as wet film can be very delicate. At this point when I develop color film I make a piece sign with my pointer and middle fingers and while keeping my fingers straight, I put the film between them and lightly squeeze to not scratch the film, and run them from the top to the bottom of the film over a sink to catch the excess water.
You’ll need to hang them up to dry using clothespins or paperclips, and you want to avoid doing so in any area where they’re likely to be disturbed or go through temperature fluctuations. I suggest over a bathtub. Apply enough paper clips or clothes pins to the bottom of the film strip to prevent it from curling up.
The color film will need to dry for between 2 and 5 hours, depending on the temperature and humidity. The color film is fully dry once the film completely curls toward the emulsion side (not the shiny side but the dull side). You can also check by pinching the film with a clean and dry thumb and pointer finger to see if the film is smooth.
After the color film is dry, it can be cut into shorter sections (around 5 to 6 images per length for 35mm film, medium format is three images depending on the size of your negatives) and placed into plastic pages like this one for 35mm film or these for medium format film on Amazon.com) to keep them organized. If you want to work with the image digitally, you can scan them using a digital scanner, like the Epson v600, a digital camera, or a Lomography smartphone film scanner.
Safety Considerations While Developing Color Film
Overall, the process of developing color film is fairly simple and safe, but you do need to take some precautions when handling the chemicals necessary for this process. See this article I wrote about everything you need to know about darkroom chemicals for more information.
Do your best to avoid getting any of the development chemicals on your skin, a good way is using an apron and gloves and eye-protection when mixing and pouring. Also, work in a space that has adequate ventilation and airflow, as you don’t want to breathe in concentrated fumes from the color developing chemicals.
If you do get any chemicals on your skin, make sure to wash that area off with soap and water as soon as possible. Always wash your hands after you finish developing color film and avoid eating until you’ve done so, even if you don’t think you spilled anything on your hands. Additionally, if you ingest any of these chemicals or suspect someone in your home has, call poison control immediately.
When disposing of the chemicals, keep in mind that none of these chemicals should be poured down the drain unless diluted thoroughly by running cold water and then hot water immediately afterward. According to the Film Photography Project, since there is no silver in color processing so there is nothing to collect. The caustic chemicals are not as strong as what is in drain cleaner, so that can go safely down the drain by diluting it by running cold water for 3 mins then running hot water immediately afterward.
However, If you are on a septic system these chemicals can do damage to the bacteria present (though Rid-X on Amazon.com can help keep your septic system healthy if you are concerned) so it is best to collect them when exhausted and dispose of them properly. I recommend collecting your darkroom chemicals and pouring them into a disposable container once they are exhausted. Then, once you have collected enough, dispose of them properly by transporting them to the nearest hazardous waste disposal facilities to you.